A nice cup of MoCA…

Let’s jump into the time machine and head back to the turn of the century (21 years ago, y’all… can you believe it?). It was a time when cable TV was king, and you could usually count on a cable outlet in almost every room of the house, when a cable TV package could easily come with half a dozen converter boxes, before the term “cord-cutter” struck fear into the hearts of cable executives. and when Netflix was an upstart DVD by mail company. This was also when a brand new technology called “Wi-Fi” had just showed up on the scene. Broadband internet (a whole 5 megabits!) was starting to find its way into homes served by cable TV, and it made dialup look severely lame. Usually these “cable modems” were hooked directly up to a single computer, either via USB, or via Ethernet if your computer was really snazzy. Often, these computers were directly connected to the internet with no firewall software, which led to all kinds of shenanigans.

Ah, those were the days.

If you had a home built around that time, chances are, the builder put coaxial cable into every room they could think of so you could have TV everywhere. And they’d usually string a daisy chained chunk of Cat5 for telephones. If they were really fancy, they would run each cable and phone outlet back to a central point where you could pick and chose where the signals went.

The challenge is that while technology changes every few years, the wiring in a house is generally put in place with little thought given to even the near future. In 2000, only the serious nerds (such as yours truly) had computers (plural) in their homes. The idea of the networked home and the Internet of Things was still a long way off.

If you were a nerd with computers (plural) and so fortunate as to have a home whose Cat5 phone cables were “home-run” back to a central interconnect (where they were usually all spliced together on a single pair for voice), you could reterminate them on both ends with a modular jack and use them for Ethernet (the idea of a router at home with NAT was still pretty new back then as well). In most cases, the runs were short enough that when gigabit Ethernet started showing up, you could still make the Cat5 work.

Recently, I had to figure out how to connect up a bunch of access points in a few homes that were built in the 1999-2000 time frame. One is the rental I just moved into, and the other is a moderately sized home owned by a client who has found himself and his family working from home a lot more lately, just like the rest of us.

My home was wired to nearly every room with home run Cat5 and coax (lucky me!). Since I have buckets full of Cat5e jacks, it was a pretty simple swap on both ends and I got gigabit. Didn’t require much effort, and thankfully didn’t require causing any damage to the rental house, which the landlord tends to get cranky about.

The client’s home, on the other hand, had daisy chained telephone line and coaxial cable throughout. And since it’s a higher end home, running ethernet cable to each room is a non-starter (not to mention expensive and disruptive). And, of course, the cable modem/router/wireless/waffle iron/juicer/vacuum combo device provided by the cable company is as far across the house from the home office as you can possibly get without actually putting it in the neighbors’ house. Cable installers love outside walls, which are about the worst possible place to put a wireless access point. Zoom calls can get a little frustrating and embarrassing when you’re the presenter and your connection sucks…

So how to get a decent connection up to the office and elsewhere in the client’s house to blanket it with wifi? Thankfully, 20 years of innovation has happened, and the chip makers and the cable companies got together to solve this problem, because they needed to deliver services over IP within the homes as well. What they came up with is the deliciously named “MoCA“, which stands for “Multimedia over Coax Alliance”. They figured out a way to be able to run a digital network signal over the existing coax wires present in most houses, and make it compatible with Ethernet.

Early versions weren’t very fast (version 1.0 in 2006 was capable of 100Mbps), but as they applied some of the same RF tricks that Wi-Fi used, they were able to make it perform at a much higher level (Version 2.5, released in 2016, is capable of 2.5Gbps). Version 3 aims to provide 10Gbps.

MoCA will support up to 16 nodes on the wire, and can coexist with some shockingly bad signal conditions. It operates from 1125MHz up to 1675MHz, which is above where cable TV signals live but still quite functional over short distances with existing coaxial cable and splitters. It forms a full mesh where each node talks directly to the other nodes that it needs to, using a combination of Time-Division Multiple Access (TDMA) and Orthogonal Frequency Division Multiple Access (OFDMA), a trick that is also used by WiFi 6/802.11ax to make better use of airtime.

If you want a quick summary of how it works, device maker GoCoax has a great rundown on their home page.

MoCA also requires putting in a filter between the pole and your house so that your MoCA signals don’t end up putting your neighbors on the same network or screwing with the cable company’s lines.

Most current cable company provided gateways also support MoCA, and adding a MoCA transceiver to a live coaxial port on the wall in your house basically acts as another ethernet port on the gateway device. Cable companies commonly use this for IP based set-top boxes (over coax!) and additional wireless access points (such as Cox’s “Panoramic WiFi” and XFinity’s “XFi pods”).

While I haven’t tested the cable company’s wireless offerings (because I’m not a masochist, and I have access to vastly better wifi gear), I did want to find out how well MoCA performed as a straight Ethernet bridge for connecting up the client’s access points in such a way that I didn’t have to use wireless meshing, which performs quite poorly in most residential environments.

So I grabbed a couple of MoCA adapters (and a splitter) from Amazon and tried it out in a couple of different configurations. Testing was done from a MacBook Pro connected to the network via Ethernet, and a WLANpi connected on the other end of a MoCA adapter.

The test setup.

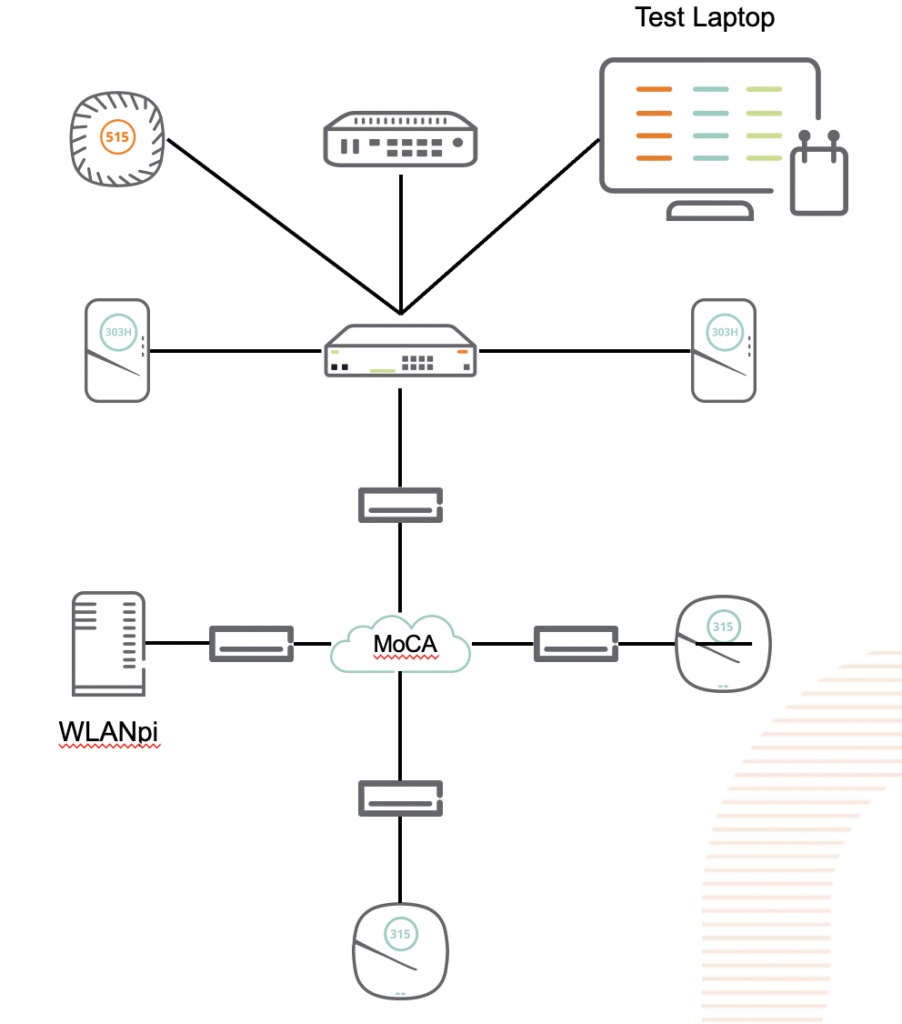
The first thing I noticed is that these devices are truly “plug and play”. I hooked one up to the coax in my office and the Ethernet side went into my switch. I then hooked 3 more up around the house, and on two of them, hooked up an access point, and on the third, the WLANpi. The access points came up and showed up in the controller just like they would on Ethernet (caveat: I had to power them externally). The WLANpi grabbed a DHCP address, and I started testing, using the librespeed web speed test built into the WLANpi, as well as iPerf3, also built into the Pi.

First, the baseline with the WLANpi connected directly to the switch. Pretty solid, about what you would expect from a gigabit network.

Next: The WLANpi at the other end of a 4-node MoCA 2.5 network:

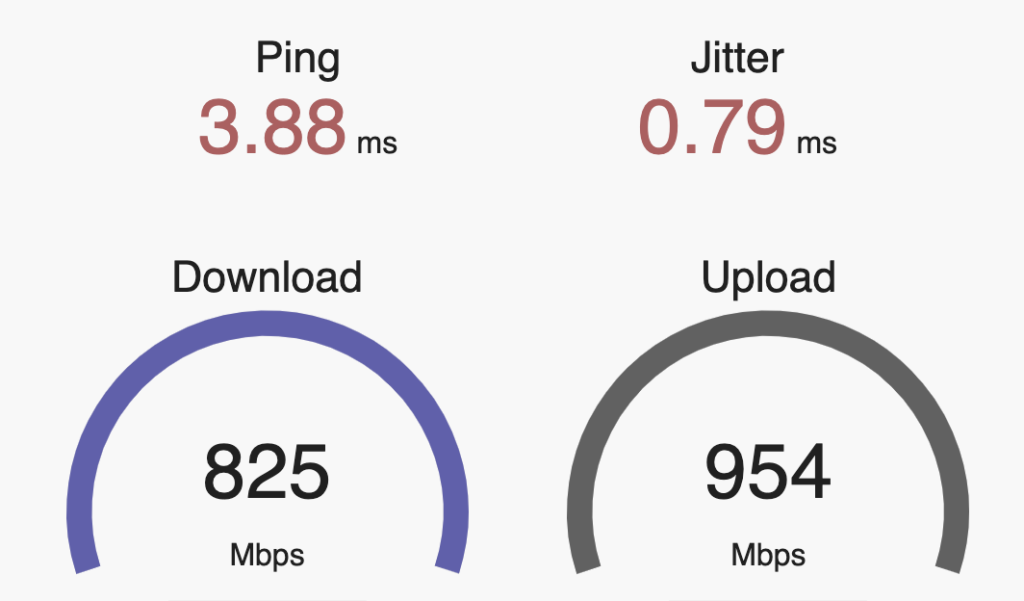
An ever so slight reduction in throughput, and an extra few milliseconds of latency.

Directly connecting two nodes performed similarly.

So, bottom line, MoCA is a pretty solid option if all you have available is coax. It has the full wire speed, and doesn’t introduce the kind of latency that a wifi mesh does.

Downside: The MoCA spec doesn’t seem to provide for any means of powering converters centrally, or pushing PoE to the Ethernet device.

Other MoCA devices worth looking at:

  • Kiwee Broadband, has a passthru port as well as a second Ethernet port.
  • GoCoax, another inexpensive option that works on v2.5.

Aruba AP Provisioning

As part of trying to wrap my own head around the various profile dependencies in actually provisioning an Aruba AP , I’ve mapped it out. This is the <stuff> that goes into this process:

provision-ap
read-bootinfo {wired-mac|ip-addr|ap-name} <data>
<stuff>
reprovision {serial|wired-mac|ip-addr|ap-name} <data>

As you go to provision an AP, start on the outside of this map and work your way in. This will make sure that all the various profiles you need are in place. The web UI hides some of this stuff from you and doesn’t organize it as logically as one might expect.

When doing this on the CLI in Mobility Master Conductor, make sure you’re in the right corner of your hierarchy (namely, /md or /md/GROUP). And remember that on MMMCR, show run is not nearly as useful as show config effective… And config purge-pending sure comes in handy when you goof something up.

You can also do show profile-hierarchy but that only shows the profile entries and it doesn’t fit neatly in a terminal window.

Lastly, don’t forget about show references to see what other profiles reference the one you’re interested in.

Caveat: This is not comprehensive by any stretch. There are dozens more options, these are just the more common ones. If I goofed, let me know. All the gory details can be found in the ArubaOS User Guide.

“It’s ALWAYS DNS (or DHCP)”

There’s a common saying among my network engineering peers: “It’s ALWAYS DNS!”. For those not familiar with the concept, this refers to the alarming regularity with which networking troubles end up being caused by something trivial, such as name resolution. And when it’s not DNS, it’s usually DHCP. Those two troublemakers alone are responsible for some ridiculously large percentage of network support issues. (At least until someone at a tier 1 provider inserts a typo into a route table advertised to half the internet via BGP, and takes everything down, but I digress.)

Last weekend, I rebuilt my home wireless network from an Aruba Instant cluster back to a controller based network, using ClearPass as an authentication and authorization backend for the home network. Gross overkill for a home network, but it gives me stick time on stuff that I need to know for work, at a much grander scale.

But first, a little background into the Aruba Way of doing things: In an Instant cluster, the wireless networks are bridged to a VLAN that is trunked to the access point. You can also do this with campus networking, but managing all those VLANs on every port that feeds an access point is usually a recipe for forgetting something vital. So the campus model lets you build a single access VLAN on your AP ports, and the AP establishes a GRE tunnel back to the controller cluster (which also allows for some great redundancy and high availability options), and the various VLANs terminate on the user anchor controllers (because each user has their own tunnel back to the controller, which allows you to segment their traffic out and handle it at layers 4-7 based on a variety of rules, and the only thing going over the wire is an encrypted tunnel, which is a significantly better security posture should someone unethically decide to monitor traffic on a switch port when they shouldn’t.

This is also where ClearPass comes into play – How user sessions and traffic are handled is defined in roles. Each role consists of various rules. How roles are applied are defined by policies. You can map roles to users and/or machines with the magic of ClearPass, and then when someone connects to the wireless network, ClearPass can return a role (and it can map a different role based on whether you authenticated with a username/password, a certificate, or any one of a number of other data inputs). Basically, when ClearPass returns the OK to the controller, it also includes a bunch of attributes for that user, including roles. It’s extremely powerful magic, and when wielded wrong, it can cause no end of heartache trying to figure out just what exactly went haywire. And I’m still very much a ClearPass n00b.

Which brings me back to my newly built and ClearPass-enabled network. And so like every good story…

No $#!+, there I was…

When I connected, it would take a good 10 minutes before I could access the internet. And so, I’m wondering what I screwed up in my ClearPass setup that would have done this… But the roles were being assigned correctly, and the rules associated with those roles were pretty straightforward: “allow all”. So why in the heck were devices on the home network taking forever and a week to get an address? This was not happening on my IoT and guest networks.

First, I realized that my devices were associating just fine, so ClearPass and the role derivation were working correctly, which immediately acquitted the Wi-Fi (but as far as the others in my house were concerned, the Wi-Fi was still screwed up). But that meant I had a good Layer 2 connection. I tried to make sure that the VLAN was properly connected from the pfSense router to the core switch, and the controllers (running in VMWare) were properly trunking to the distributed vSwitch and also out to the core switch. Everything on that front looked good. I tried manually assigning IPs to the wireless clients on the home LAN, and they worked great. So L3 worked, which implied L2 did as well. And when clients on the home network did eventually get an IP address, they worked fine as well. So nothing was being bottlenecked anywhere either (I should hope not, as the VMWare hosts and the router are all connected to the core switch with dual 10-gigabit fiber links!).

After a few days of racking my brain over this, and hearing the people who live in my house continue to complain about network weirdness (thankfully, my family is not doing virtual school/work… except for me), I finally resigned myself to doing what I should have done in the first place: Breaking out Wireshark and figure out just what was actually happening on the network. DHCP is pretty simple, so finding out what broke should be straightforward, right?

Quick refresher on DHCP: The process of obtaining a DHCP address goes like this:

Since I knew I had good L2 connectivity, I fired up Wireshark on my laptop, capturing what was going on at L2, and would move to other points in the network if I needed to. The first thing I saw is that a residential network, even with isolated guest and IoT traffic, while nobody else in the house is using it, is a fairly chatty place. I saw a bunch of multicast traffic (I have a lot of Apple devices), even IP broadcast traffic. And there, among all that, was the DHCP process. Discover. Discover. Discover. Offer. Request. Request. Request. Discover. Discover. Offer. Request. Request. Request. Discover. Discover. Discover. Offer. Request. Request. Request. The more astute among you may have noticed something missing from this sequence. Something rather… important.

Turns out, my DHCP server was making an offer, and then ghosting my devices as soon as they responded to that offer. And periodically, a DHCP ACK would sneak through. And by now, it had started happening on my IoT network as well, as half my Nest Protect alarms were now showing offline. But that told me one very important thing: that my DHCP server was in fact online, reachable, and responding. Up until that very last point.

So I then did what any sane engineer would do:

I had already restarted the dhcpd on my pfSense box, so I didn’t have much faith in the curative effects of a digital boot to the head, but what the heck, can’t hurt, right?

And that’s when I saw it. I went down to my lab, and there, on the front of the DL360 that is running my router, is an angry orange light which should normally be a happy little green. Uh-oh.

So, I pop out the handy little SID tray, to see what it’s angry about… And this is not something a server admin wants to see:

Yep, that’s flagging all three memory modules in Processor 1’s Bank A. This just became more than a simple reboot. Sure enough, when it went through POST, it flagged all three modules. Power off, slide out the server (rails FTW), and perform that tried and true troubleshooting method I learned and perfected in the Air Force a quarter century ago: Swaptronics. Move a suspected bad component and see if the problem follows. So, I switched all the DIMMs from bank A with those in Bank B. If the fault stayed with Bank A, then I had a bum system board. If the fault followed the DIMMs to Bank B, then the fault was in the DIMMs. I really wanted the fault to follow the DIMMs.

Plug it all back in, and fire it up, and the fault was…

NOW IN BANK B!!!! Hallelujah, I don’t have a bad server on my hands!

So now I shut it down, tossed the bad DIMMs in the recycling bin (yes, our recycling pickup actually takes e-waste, which is really nice when you’re a nerd with way too many electronic bits), and repopulated/balanced the banks (I also had to remove a fourth DIMM to keep things even, but it’s a known good part, so it did not go to recycling).

I fire the machine back up, and yay, it’s no longer grumpy about the bad memory, although it is briefly perplexed by the fact that it now only has 24GB instead of 32GB, and has somehow realized that it just had a partial lobotomy. After a few minutes of much more intensive self-testing than usual, it boots up pfSense, and gives me the happy beeps that pfSense does when it’s fully booted (for those of us who run our pfSense boxes headless!)

The moment of truth: I connect my laptop to the Wi-Fi (with the wireshark still circling)… and sure enough, the DHCP ACK comes through on the first try… So as near as I can tell, whatever part of the system RAM contained the bit of code required to send the DHCP ACK had suffered some kind of stroke, but not one severe enough to take the whole box or even the operating system down.

See? It’s always DHCP.

EDIT: Turns out there was also more to this – Wired clients (and access points) started getting DHCP right away after fixing this, but wireless was still giving me fits. As it turned out, There was something about the Aruba mobility controllers terminating user sessions that played havoc with the hashing algorithms that VMWare uses to handle NIC teaming on switch uplinks, and the ACKs were coming back through a different path and getting lost along the way.

For the moment, I disabled one of the 10G links to the switch until I can figure out what magic incantations I need to make on the vSwitch to get the hashing algorithms to properly use the multiple connections with the VMCs – or I may just use the second 10G interfaces for vMotion or something.

and that, kids, is how I used Wireshark to diagnose a system memory problem.

Hands On : Aruba Instant

After our quick little tour of Aruba InstantON, I’m going to move up to the next level of Aruba gear: Instant.

The naming can be a little confusing to the ArubaNoob, but Instant has been part of Aruba’s product offering for a very long time. While it appears controllerless, it still makes use of a virtual controller that lives inside the APs on the network (and in case the AP running the controller goes offline, the remaining APs on the network decide on a new leader by holding a rap battle or a dance-off. OK, just kidding. They actually do a sort of digital version of Rock, Paper, Scissors, Lizard, Spock.

This virtual controller concept has also been done by Ruckus with their Unleashed platform, which in terms of functionality is somewhere between Instant and InstantON, and Cisco’s Mobility Express. I’m not 100% sure, but I think Aruba had it first.

In previous generations of Aruba access points, you either purchased an Instant AP (IAP), a Campus AP (CAP) , or a Remote AP (RAP). The latter two required a Mobility Controller (MC). You definitely couldn’t RAP without an MC. Now, all APs ship as Universal APs and figure out which mode to be when they boot up, and can be easily converted from one to the other (in the dog park that is Ruckus Unleashed, you would have to reimage the AP with new firmware).

Who it’s meant for

Instant is designed for small and medium business environments, and home labs of geeks who subscribe to the idea of “if it’s worth doing, it’s worth overdoing” (My home wireless network right now consists of 7 APs in an Instant cluster). It also is very useful in large enterprises that consist of many small locations, especially once you start managing them all with Central. If you have a chain of coffee shops or boutiques that only require a few APs, then Instant+Central is definitely something you should look at. If you only have one, InstantON is more your speed.

Instant does not require any per-AP licensing, but it still includes a lot of the features you find on the campus systems. It even includes an internal RADIUS server and user database so you can do enterprise authentication (as of 8.7 which was just released in July 2020, you can even do up to 24 unique passphrases with MPSK before having to get ClearPass involved, which is real handy for IoT networks that use crappy chipsets that don’t support enterprise auth). It will also do an internal captive portal. It still has role-based access control, which provides layer 3 policy enforcement at the AP, including content filtering. And much like the InstantON APs can do, you can even use an Instant AP as your internet gateway (guess where InstantON learned it from?). You can even use it with ClearPass and all the goodies that come with that.

When a Universal AP powers up, it goes through the following process:

If setup mode is not accessed within a period of 15 minutes, the UAP reboots and goes through the process again. It can be a lonely existence. (this mode is not unusual to find in large campus networks where there exists a network disconnect at Layer 2 or Layer 3 between the AP and the controller. Chasing these down on a cruise ship is maddening… but it gets you a lot of steps.)

Setup Mode

Once the AP is in setup mode, it will broadcast an open SSID called SetMeUp-DD:BE:EF (where the last half is the last half of the wired MAC address of the AP). Connecting to this SSID will bring you to the configuration page (it will even conveniently pop it up in the captive portal window if your OS has such a thing). You can also access this by opening a browser to https://setmeup.arubanetworks.com, which it looks up via mDNS. (Caveat: This doesn’t work so great if the AP does not have an uplink and an IP address on the network, even if that IP is not routable… And accessing it via IP address only redirects to the hostname, and mDNS doesn’t really like not having a network to do its thing. So give it an uplink, even if it’s just a WLANpi.)

I once was traveling through a midwestern airport where I was scanning the wifi (it’s a wifi nerd thing) when I saw a lone AP broadcasting “Instant” (which is what Instant used to do before AOS 8.x). I eventually found the AP in a restaurant, where it was sitting all by itself on the ceiling, still in setup mode with the defaults… A quick peek into the setup page showed that this thing had never been configured… I found the manager to let them know that someone didn’t finish a job they were likely paid handsomely for, and she told me it had been there for almost 3 years and nobody had any idea what it was for or remembered who installed it or when. The airport’s installed public system was Meraki.

Once you’re in the setup interface, you can then configure it to your heart’s content. Then, when you bring up a second and subsequent access points on the network, they will find the first one, grab the configuration, and join the party. This scales surprisingly well – you can run several dozen access points on a network like this (There’s no actual hard limit, and it’s been officially tested up to 128 APs, but this is definitely not recommended – that’s well into Campus AP territory). It may not be truly instantaneous (we do love instant gratification), but it’s pretty darn close.

Limitations

There are a few limitations to this mode of operation, in addition to the aforementioned scaling issues (if you’re used to a SOHO/SMB system like Ubiquiti, 100 APs will sound like a lot to you. Once you get into controller based networks with Aruba, even a thousand APs is middle of the road – I routinely work with networks well in excess of this).

A few of the things you can’t do with Instant:

  • AP Groups
  • AirMatch (Instant uses the older ARM techniques for RF management)
  • Tunneling to controller (yet…)
  • I’m probably forgetting some things…

Perhaps the most useful aspect of Instant is that it can either be managed in the cloud with Aruba Central (if you’re used to Meraki, you’ll love Central), or if your network requirements grow to where you need to get a controller involved, switching the APs over to that mode is quick and easy, and you don’t have to buy new gear.

Labbing It Up

If you want to play around with Instant, it’s pretty easy: Buy an AP. Or more. If you have to fund your own lab gear, there’s a ton of used and refurbished Aruba gear on Amazon or eBay (If you go with HPE Renew, you still get HPE’s legendary lifetime warranty on network equipment). Recently, I saw a whole bunch of Renewed AP-345s on ebay for under $200. Just make sure you get the correct country code (US or RW) – the two can’t coexist on the same Instant cluster (in a controller environment, the controller country code takes over and ignores the AP setting).

If you’re new to the Aruba product line, here’s a quick cheat sheet to figure out what kind of AP you’re getting. It’s not 100% exact, but it should give you a general idea of what you should be getting.

The first digit of the 3-digit model number indicates product generation:

  • AP-0XX (or just AP-XX): 802.11g
  • AP-1XX: 802.11n
  • AP-2XX: 802.11ac Wave 1
  • AP-3XX: 802.11ac Wave 2 with integrated BLE
  • AP-5XX: 802.11ax with integrated BLE and ZigBee

The second digit indicates capabilities (1XX series and up)

  • AP-X0X: 2 spatial streams
  • AP-X1X: 3 spatial streams (although the 51X series is 2SS on 2.4GHz and 4SS on 5GHz)
  • AP-X2X: 3 spatial streams, second Ethernet port
  • AP-X3X: 4 spatial streams, SmartRate port, Gigabit Port
  • AP-X4X: 4 spatial streams, dual SmartRate ports, dual-5GHz,
  • AP-X5X: 8 spatial streams, three radios (only AP-555 for now… that thing is a monster)
  • AP-X6X: Outdoor AP with 2 Spatial streams
  • AP-X7X: Outdoor AP with 4 spatial streams
  • AP-X8X: Outdoor AP with 60GHz (only AP-387)

The last digit indicates the antenna type. Odd numbers are internal, even numbers are external.

  • AP-XX3: Internal Omni
  • AP-XX4: Connectorized
  • AP-XX5: Internal Omni
  • AP-XX7: Internal Directional
  • AP-XX8: Connectorized and ruggedized,

APs with the H suffix indicate a wallplate mount designed for the hospitality industry. These APs also have a built-in switch. I love these APs.

Naturally, if you want to get the gory details, head on over to Aruba and look for the data sheet.

Stay tuned for the next Hands On post in which I will discuss Aruba Central.

Disclaimer: Aruba is my employer, but this post reflects my personal experience as a wi-fi nerd with Aruba products. Some APs were purchased on the open market, some were provided to me by my employer for lab use. This is not a paid promotion, and is not official Aruba communication. I am not part of the Instant product team.

Tag, You’re It!

Cover Image: Unmasked (detail), (Brian Wall, 2014)

Just this past week, Ekahau released the latest iteration of their excellent wireless network planning software, and with this version, they’ve added a few features that many of us have been wanting for quite some time. Of course, we always want more, and there’s only so much the elves at Ekahau can do! So this leaves us with building our own tools to extract the data we need out of the project file. (Hey, Ekahau, you know what would be really awesome? an SDK for doing this!)

Fortunately, Ekahau has been really good about building a standards-based project file format (and not encrypting it or doing things that make it a pain to use your own data). Since the Ekahau software is built in Java (cross platform on Windows/Mac!), it’s logical for the data file to be in something like XML or JSON, and they have chosen the latter, and have effectively built a relational database in JSON, and bundled the whole thing up into a convenient zip file. It’s almost like they understand that their core market is made up almost entirely of customers who like to tinker with things.

Disclaimers:

Naturally, manipulating this file is something to be done entirely at your own risk, and if you break it, don’t go crying to Ekahau, because they don’t support mucking with their data file outside of their application (nor should they be expected to!) Make sure you have backups, etc, etc.

Also, this post is in no way based on any inside information from Ekahau, nor is it anything official from them – this is simply an analysis of the contents of the project file that anyone could do, whose nature as a zipped file full of JSON has been known for quite some time.

“I’m gonna get some tags… This is f’ing awesome”

Probably the coolest new feature in v 10.2 is the ability to add key:value tags to stuff. You can apply these tags to APs, either just the tag by itself, or a tag with a value associated with it. The Quick Select also lets you select any APs that have a particular tag key (although somehow they missed the ability to refine based on tag value, which I hope will be corrected in the near future).

Why is this useful? This allows you to add free-form information to access points, whether simulated or measured, that allows Ekahau to be more than just an RF simulation tool, and extends it into a full blown planning and deployment tool. Tagged information can be any kind of metadata you wish. things like:

  • Mounting hardware
  • Wired MAC address
  • AP Group
  • Serial Number
  • Zone
  • Switch
  • Port
  • Cable
  • IDF
  • … and the list is nearly endless.

This is in addition to the already rich metadata that is associated with the AP that are directly relevant to the RF modeling, such as mounting height, mounting surface, antenna angles, power, channel, antenna types, and so forth.

So how does it work? Pretty simple: on an AP, simply open the sushi menu at the top right, select “Tag AP”. You can also do this from the Edit AP or bulk edit screen when doing multiple APs. This will give you a list of existing tag keys already associated with the project (as well as tags you’ve used before on other projects), along with a free form box to enter your own, or add a value.

As of right now, there’s not a whole lot you can do within the Ekahau software once you have those tags (I would LOVE a table view of my APs and all the metadata, as well as ability to import/export to CSV or Excel), nor is template-based reporting on those tags documented at this point (although I expect they’re working diligently to document this). One key weakness of the template reporting system is that it all has to go through Microsoft Word (with a whole bunch of limitations imposed by that format), and that gets really hairy once you start creating data tables, especially if you want them in Excel or something else.

Side note: Using Excel as a database is really a terrible use of a spreadsheet, but it happens all. the. time.

Which brings me to manipulating/extracting your data by building your own tools. Several people have been doing this unofficially for years, but Ekahau doesn’t offer anything for this… yet.

I mentioned earlier that Ekahau’s data is stored mostly in JSON, which makes it really easy to work with using Python (or, for that matter, Java or perl if you’re into self-flagellation). Every object in the data file has an ID that ties it back to other objects. And that’s the key thing (literally). There are about 2 dozen separate files that track various data, and that’s how they all tie together. Notes and tag keys are each kept in their own file, while the AP data file has a data object that contains a list of the note IDs, and another that keeps a list of tag IDs and the value associated with that tag:

accessPoints.json:

{
   "accessPoints": [
     {
       "location": {
         "floorPlanId": "b799747a-e2ed-49ad-8c5e-c9ea8c36fa61",
         "coord": {
           "x": 2475.397796817626,
           "y": 1537.8008975928194
         }
       },
       "name": "Simulated AP-1",
       "mine": true,
       "userDefinedPosition": false,
       "noteIds": [
         "37faa8ef-c5c8-4d9d-a882-916db175b935",
         "663419b4-ddb4-4ddb-b3f2-d50233743c5c"
       ],
       "vendor": "Aruba",
       "model": "AP-515",
       "tags": [
         {
           "tagKeyId": "59650f76-3e4b-4c40-b78b-2d0088f5b227",
           "value": "123456789"
         },
         {
           "tagKeyId": "5c9cb127-8ba2-4a60-84e5-75f47ce87f99",
           "value": "C-Suite"
         },
         {
           "tagKeyId": "991b12b7-dbb0-47de-9cd2-260ee064b3e3",
           "value": "aa:bb:cc:dd:ee:ff"
         }
       ],
       "id": "a0b90f2a-8b1b-4339-8362-dc51122931ed",
       "status": "CREATED"
     }
   ]
 }

tagKeys.json:

{
  "tagKeys": [
    {
      "key": "Serial",
      "id": "59650f76-3e4b-4c40-b78b-2d0088f5b227",
      "status": "CREATED"
    },
    {
      "key": "AP Group",
      "id": "5c9cb127-8ba2-4a60-84e5-75f47ce87f99",
      "status": "CREATED"
    },
    {
      "key": "MAC",
      "id": "991b12b7-dbb0-47de-9cd2-260ee064b3e3",
      "status": "CREATED"
    }
  ]
}

notes.json:

{
  "notes": [
    {
      "text": "This is another test note",
      "history": {
        "createdAt": "2020-06-08T16:25:11.868Z",
        "createdBy": "Ian Beyer"
      },
      "imageIds": [],
      "id": "663419b4-ddb4-4ddb-b3f2-d50233743c5c",
      "status": "CREATED"
    },
    {
      "text": "This is a test note",
      "history": {
        "createdAt": "2020-06-08T16:25:04.883Z",
        "createdBy": "Ian Beyer"
      },
      "imageIds": [],
      "id": "37faa8ef-c5c8-4d9d-a882-916db175b935",
      "status": "CREATED"
    }
  ]
}

simulatedRadios.json:

{
  "simulatedRadios": [
    {
      "accessPointId": "a0b90f2a-8b1b-4339-8362-dc51122931ed",
      "accessPointIndex": 2,
      "transmitPower": 0.0,
      "antennaTypeId": "bdf0702a-42be-456a-8891-4cf54940a5c2",
      "antennaDirection": 0.0,
      "antennaTilt": 0.0,
      "antennaHeight": 2.4,
      "antennaMounting": "CEILING",
      "radioTechnology": "BLUETOOTH",
      "spatialStreamCount": 1,
      "shortGuardInterval": false,
      "defaultAntennas": [
        {
          "radioTechnology": "BLUETOOTH",
          "frequencyBand": "TWO",
          "antennaTypeId": "bdf0702a-42be-456a-8891-4cf54940a5c2"
        }
      ],
      "enabled": true,
      "id": "c4f3c521-873c-40de-8076-b1f02b655993",
      "status": "CREATED"
    },
    {
      "accessPointId": "a0b90f2a-8b1b-4339-8362-dc51122931ed",
      "accessPointIndex": 0,
      "transmitPower": 8.000293592441343,
      "channel": [
        1
      ],
      "antennaTypeId": "785280d6-168c-4eab-9819-88e6010e2bef",
      "antennaDirection": 0.0,
      "antennaTilt": 0.0,
      "antennaHeight": 2.4,
      "antennaMounting": "CEILING",
      "technology": "AX",
      "radioTechnology": "IEEE802_11",
      "spatialStreamCount": 2,
      "shortGuardInterval": true,
      "greenfield": false,
      "defaultAntennas": [
        {
          "radioTechnology": "IEEE802_11",
          "frequencyBand": "TWO",
          "antennaTypeId": "785280d6-168c-4eab-9819-88e6010e2bef"
        },
        {
          "radioTechnology": "IEEE802_11",
          "frequencyBand": "FIVE",
          "antennaTypeId": "4ef1637e-06e5-415a-96fd-a97a82273242"
        }
      ],
      "enabled": true,
      "id": "bb7304d1-d564-4018-aa92-e6ca52cba37b",
      "status": "CREATED"
    },
    {
      "accessPointId": "a0b90f2a-8b1b-4339-8362-dc51122931ed",
      "accessPointIndex": 1,
      "transmitPower": 13.979400086720377,
      "channel": [
        36
      ],
      "antennaTypeId": "4ef1637e-06e5-415a-96fd-a97a82273242",
      "antennaDirection": 0.0,
      "antennaTilt": 0.0,
      "antennaHeight": 2.4,
      "antennaMounting": "CEILING",
      "technology": "AX",
      "radioTechnology": "IEEE802_11",
      "spatialStreamCount": 4,
      "shortGuardInterval": true,
      "greenfield": false,
      "defaultAntennas": [
        {
          "radioTechnology": "IEEE802_11",
          "frequencyBand": "TWO",
          "antennaTypeId": "785280d6-168c-4eab-9819-88e6010e2bef"
        },
        {
          "radioTechnology": "IEEE802_11",
          "frequencyBand": "FIVE",
          "antennaTypeId": "4ef1637e-06e5-415a-96fd-a97a82273242"
        }
      ],
      "enabled": true,
      "id": "4ab4a7e1-708d-4f18-b33e-d8891a808e9f",
      "status": "CREATED"
    }
  ]
}

One thing you can do with simulatedRadios.json is go through and adjust your antenna orientations to the nearest 5 or 15 degree increments – having decimal granularity in the antenna orientation isn’t really useful unless you’re doing some very long point to point shots, and it will make the maps look cleaner when your antenna is at 90° instead of 88.6367879° because you manually rotated it by dragging it with the mouse.

I’m also going to omit the antennaTypes.json here, but it’s worth noting that if you have any custom APs/Antennas in your Ekahau setup, that data is included in your project file for portability, and you don’t need that custom config replicated on the next machine that opens up this file, and aren’t limited to the APs and antennas that Ekahau offers by default (although it would be really nice if they made it easy to add custom APs/antennas that survived a code update)

So here’s the basic process to report on your tags and notes:

  1. bring in the list of access points from accessPoints.json. This will get you a list of notes, as well as the tag key IDs, along with that tag’s values.
  2. You’ll need to then cross-reference the tag key IDs from tagKeys.json to get the key values (this approach seems a little convoluted at first, but ensures that a key value can be consistent from one file to the next based on not merely the text in the key value, which will come in to play when merging multiple data files into one. Ekahau was very smart about designing it this way.)
  3. Extract any notes from notes.json.
  4. Cross-reference any additional radio-specific data you need (including orientation) by looking for the access point ID in simulatedRadios.json
  5. Cross-reference any antenna pattern data by looking for the access point ID in antennaTypes.json.
  6. information such as floor number lurks in buildingFloors.json and buildings.json.
  7. and so forth.

Hopefully you’re starting to get the general idea of how this data is put together. It should be a fairly straightforward matter of running a little code against the data file and being able to generate not only a drop list for your installation contractor, but also a big chunk of your configuration script for deploying against your wireless controller. If you’re feeling especially adventurous and saucy, you can even use your wireless system’s API for this and be able to orchestrate a large chunk of your configuration from within Ekahau.

Once I build some actual code, I’ll be sure to share it here.

Here is the big gnarly mind map of the Ekahau data file. It’s probably still very much incomplete and I don’t promise 100% accuracy of data types, but it gives a good visual reference of how the whole thing goes together:

Resolution got smashed by WordPress, so you can check out the full resolution version, or a PDF version.

Working From Home: Home Network

Continuing the series about working from home, today I’m going to talk about the network inside your home, after it gets to your side of the router.

I posted some time ago about solving home wifi woes, so you can read that piece if you’re just trying to fix Wi-Fi weirdness.

In the previous post about internet access, I talked about the router being the gateway between your home network and the rest of the internet. For many home users, your modem, your router, ethernet switch, and your Wi-Fi access point are all stuffed into the same box, which can lead to some confusion when troubleshooting. It also means that if one of those components fails, you likely need to replace the whole thing, which can be a pain. So I’m going to talk about the various components, but just remember that they can sometimes be separate, or sometimes all in that one box we call “router”.

Network Switches

The network switch is the first stop after the router. The switch is what allows you to connect multiple Ethernet devices together. This forms the basis for your entire home network, known as a Local Area Network, or LAN. If you need more ports (not uncommon, since most all-in-one router devices usually only have 4 ports), you can attach a network switch to another. I won’t get into the gory technical details, but this is what allows you to split your network connection among multiple devices. For some homes, 4 ports is enough. For others (such as my own, where I have seven switches comprising nearly a hundred ports), you need to add switches to connect everything.

As a general rule, if a networked device in your house doesn’t move (or is bolted to the structure of the house), you should connect it via a wire, even if it’s capable of wireless. This includes things like TVs, printers, desktop computers, gaming consoles, and so on. A wired network connection will always be more secure and perform better than wireless. If you are a gamer, the reduced latency (“ping”) of a wired connection is something you desperately seek.

Many switches (mostly enterprise grade, but there are growing numbers of small business and home office switches) can also provide DC power over the Ethernet connection – this is known as PoE (and it is spelled out, not pronounced as in “Edgar Allan”), and allows you to power a variety of network devices such as access points and IP phones from a single physical connection. If you have your PoE power source equipment (switch) on a UPS, it can keep all the devices on the network running during a power outage. PoE comes in 3 basic flavors: 15 Watts (802.3af/PoE), 30 Watts (802.3at/PoE+), and most recently, 60 Watts (802.3bt/UPoE). Most devices you’ll encounter at home are perfectly happy to use the 15W variety.

A quick note about network patch cables: Don’t buy into the “Cat 7” marketing hype. This standard doesn’t even exist in the IT world because it doesn’t add any benefit to Ethernet connections. Unless you’re a huge nerd like me, the most you’re ever going to use on your home network is going to be 1 gigabit, which only requires Cat 5e cabling. Buying a more expensive Cat 6, 6a, or 7 cable isn’t going to make your network run any faster (and be very wary of all advice from anyone who tells you otherwise, because they’re about to sell you a whole bunch of crap you don’t need. Cat6 is the norm these days, so it’s probably the cheapest and most common. It will also run 10 gigabit connections within the distances presented in most residential environments. In any case, you’re never going to need 10 gig at home. Not even if you’re a big nerd. See my post about cabling categories for more details.

Wireless

Your Wi-Fi is simply an extension of your home network (LAN) without wires. The device that provides the Wi-Fi signal is called an Access Point, or AP. (Some people still call it a “WAP” for Wireless AP, but that’s not really helpful, because the W could also mean “Wired”). Even inside your residential gateway/router, the access point is a separate piece of hardware that connects internally to the built-in network switch.

The major downside to having an all-in-one gateway device is that what is optimal placement for the gateway (usually where the ISP installer could get a wire through the wall with a minimum amount of effort and damage) is rarely the best place to put an access point. Access points should be centrally located, and the ISP/Cable tech usually likes to be on an outside wall. When you put your wireless there, you’re sending half your signal outside and into your neighbor’s house, especially if you have it turned up to full power to hit the other end of the house.

A recent development in residential Wi-Fi is the rise of “Mesh” devices. This is basically a system of multiple access points which are centrally managed as one system, which allows you to extend wireless throughout your house. “Mesh” refers to those access points themselves connecting to the network wirelessly, rather than using an ethernet connection. Remember what I said earlier about wiring in devices that don’t move? This applies to access points as well. If an access point has to connect wirelessly to your network, it’s going to suffer from all the same wireless problems as any other device. Wire it in unless you have no other option. It’s going to perform a LOT better that way. And, as I mentioned earlier, you may be able to centrally power the access point with PoE.

IoT

As we get more connected, we have more and more smart devices at home. These are collectively referred to as the “Internet of Things”, or IoT. It’s a broad category that includes everything from connected thermostats to smart appliances, wearables such as smart watches, and so on. This is more of a side note to the Work From Home discussion, as IoT is one of those things that potentially impacts a network, but is largely tangential. There’s a saying that “The S in IoT stands for Security”. You’re already saying to yourself, “but there’s no S in IoT!” That’s precisely the point. IoT devices can pose a major security threat on your home network because most of them were not designed with network security in mind. Bottom Line: Isolate them from everything else as much as you can.

Summary/tl;dr

This was just a quick review of your home network components and how they interact, even if they’re all inside the same box. As usual, comments and questions below!

Winnie the Pooh in a honey pot

Working From Home: Firewalls and Honeypots

Yesterday, I saw a social media post from my friend Thorsten, who is an engineer for a large network security company, in which he shared some nifty dashboard graphics from his installation of a nifty little Linux distribution known as T-Pot (I’m a total sucker for great dashboards!).

T-Pot is a collection of various network honeypots with a very nice reporting backend. The project is maintained by Deutsche Telekom, who use it extensively within their own networks. (disclosure: If you run it, it will send back anonymized collected information about the threats seen to their data lake)

So I’m going to veer off a little bit from my regularly scheduled Working From Home series and talk about the importance of securing your networks. T-Pot won’t actually secure your network, it will merely report on the threat actors (most of them automated) that are attacking your network every second of the day. And to a small extent, time they spend “attacking” your honeypot is time they’re not spending attacking real targets (like Pooh up there at the top)

T-Pot takes about 30 minutes to install on a virtual machine (put it in a VLAN that is isolated from everything else!) and then all you do is add a firewall rule to port forward all TCP/UDP (I also did ICMP) to that machine (after any rules to forward to actual stuff), and let it do its thing.

Results will start coming in almost instantly. In a matter of minutes, I’d collected literally hundreds of attacks. After a couple of hours, the numbers were a little disturbing. About 90 minutes after going live, I saw a sharp uptick in one type of attack, as it seems the attackers had found a new target and relayed that information to other attackers.

2.5 hours worth of data.
China, Russia, and.. Canada?
the T-Pot dashboard will show you what usernames and passwords are being used against your honeypot, as well as which known vulnerabilities were being exploited.

If you’re a business hastily trying to get people to work from home, did you just open up a port forward on your Layer 3 firewall to allow Remote Desktop? That probably wasn’t a great idea. As you can see, threat actors are constantly scanning each and every IP address on the internet, probing for vulnerabilities. All it takes is one successful entry into your network, and you’re toast. That can come through your homebound workers as well, if their networks aren’t secure.

Do you still think you don’t need a Layer 7 firewall?

Working From Home: Internet Access

In my previous post, I went over the basics of working from home. It’s worth noting here that many of these concepts can also be applied to your kids who might be taking school online – they’re teleworking just like you are, and face many of the same challenges. In this and future posts, I’ll be dealing with the tech basics required for a successful and productive home office.

I was originally going to do a single post on all things tech, but it started getting lengthy, so I decided to break it down into a couple of parts. This post will deal specifically with external network connectivity.

The Internet

No surprises here – a decent internet connection is pretty much a given for remote work. One thing that is becoming apparent during this quarantine period is that a whole lot of people have abysmally bad internet connections at home. I’m hearing horror stories from the trenches, from my colleagues and friends who work front-line IT support.

The word “Broadband” is thrown around a lot by ISPs intent on selling you a service package, but what does it really mean? In the United States, the Federal Communications Commission updated their definition of “broadband” most recently in 2015, to mean a connection speed of at least 25Mbps downstream (from ISP to your house), and 3Mbps upstream (from your house to your ISP. But what do those speeds really mean? The FCC also has a handy guide listing what activities require what level of speed.

So your Cable ISP touts their “SuperGigaFast” service with “gigabit” service. Sounds great, right? Not so fast. Cable-based ISPs that come into your house via a coaxial cable use a technology called DOCSIS, which has great downstream speeds, and (usually) abysmally bad upstream speeds. The cable companies originally designed this technology back in the late 1990s when internet usage consisted largely of downloading web pages and sending small bits of control data. This meant that an asymmetrical connection would work great for most users, and they would be able to leverage their existing wiring infrastructure.

Fast forward 25 years to 2020, and cloud-based data storage and teleconferencing and the like mean that you need a lot more upstream speed than you used to. But that hasn’t stopped cable companies from selling “gigabit” packages with a paltry 10Mbps upstream connection. When getting an internet service package for teleworking, your upstream speed should be at least 10% of your downstream speed – because if you saturate your upstream link, it’s going to negatively impact your downstream traffic and limit it. This lets the cable company sell you “gigabit”, knowing full well that they’ll never have to deliver on that promise. They also usually provide really cheap equipment which means your Wi-Fi speeds are going to be limited even more, and they still don’t have to deliver on those gigabit speeds they’re charging you for. If you have the option of a symmetrical connection (usually delivered over fiber optic cable), it will be a lot more functional.

Much of what applies to DOCSIS cable connections also applies to DSL connections from the local telephone company. Make sure you have enough upstream bandwidth to do what you need to do. Also beware of any service that has a data cap – working from home can blow through a data cap in a real hurry.

It’s usually worth investing in your own router – the equipment provided by the ISP is, in most cases, absolute junk. AT&T is notoriously bad about this on both their U-Verse DSL and fiber-based services, and they have it configured such that it’s very difficult to use a “real” router with their service.

And in some places, cable, fiber, or DSL aren’t an option, and you’re stuck with either a wireless ISP or cellular.

Hardware

The typical internet connection requires a couple of devices. ISPs and telcos generally refer to this as “Customer Premises Equipment”, or “CPE”.

1950s-era dial telephone using an acoustic coupler modem

The Modem

This is the device that interfaces your ISP’s connection with your home network, usually via an Ethernet connection. The term comes from “modulation/demodulation”, which is the process of converting a data stream into a series of electrical signals. This operates between what us network nerds call “Layer 1” (electrical signals) and “Layer 2” (data link). I posted on network layers in this post from 2018, if you want to get into some of the details of those. The modem’s primary function is extending your ISP’s physical network to your house. Before the days of direct internet connections, the data link was established over a telephone line by modulating the data signals into electrical signals in the narrow audio range supported by the telephone system.

Modems can take many forms, and in many cases, your ISP’s modem is integrated into a single device with a router. In the case of cable, you can usually supply your own. In the case of DSL or fiber service (where it’s usually called an Optical Network Terminal instead of a modem) it’s usually provided by the ISP and you won’t get much choice in the matter, although sometimes it’s possible to request a specific type or model.

Your smartphone also contains a modem that interfaces to the cellular networks – it likely uses LTE (4G), but older ones (3G) would use CDMA or GSM, and newer ones (5G) use a few different things, mostly based on LTE. If you need to interface a cellular network to your home network, either as a primary or backup link, there are dedicated cellular modem devices for that (more on that in a moment).

GIF from "The IT Crowd" where Moss shows Jen a small black box, and tells her, "This, Jen, is the Internet"

The Router

This is the device that connects your network to your ISP’s network. It operates at “Layer 3”, which for the vast majority of people means “the internet”. The internet is nothing more than a whole bunch of interconnected networks. A protocol (known as the “Internet Protocol”, or “IP”) has been in place for decades, specifying how all these networks can talk to each other. Each network is connected to other networks by way of a router (also known as a “gateway”). Its job is to look at traffic that comes in, and decide where it needs to go next. If it’s for another device on a network it’s directly connected to, it sends it directly. For something elsewhere on the internet, it sends it to the next router down the line (usually your ISP) to deal with and eventually get it to where it needs to go. This process usually happens in a matter of milliseconds (you can use the “ping” command to see how long this takes, or “tracert” (windows)/”traceroute” (everything else) to see the path it takes. The whole idea is that you don’t see what’s happening under the hood.

The term “Router” is often misconstrued to mean “WiFi”. This is often because the equipment provided by an ISP or purchased consists of a router, a network switch, and a Wi-Fi access point (and sometimes a modem) all in one box referred to as “the router”.

Owing to a general shortage of IP addresses, your ISP will assign a single IP address (which is unique on the entire internet!) to your router’s Internet-facing connection (the Wide Area Network/WAN interface), and your own network devices (on the Local Area Network/LAN interface) will occupy address space that is defined by RFC1918 as “private” address space (which can not be used directly on the internet, but can be re-used by anyone – in most cases, your network will be 192.168.something, the specifics vary from one devices to another). The router will then perform Network Address Translation (NAT) to move data between the two networks. Most of the time, you don’t need to worry about the details of how it’s set up, although when it comes to troubleshooting, having at least a general awareness of how it’s set up can be useful.

3D Illustrated representation of a firewall.

The Firewall

This is a key piece of the network, as it is what decides which traffic is and isn’t allowed. This is critical to providing network security. It is usually integrated into the router. It examines each packet and checks a list of rules (which can be updated multiple times a day to react to ongoing threats) to determine if the packet should be sent along its merry way, or dropped into a deep, dark hole.

LAN Party

The Local Area Network

The router is the transition point from your network to the rest of the internet. I’m not going to get into the details of the LAN for the moment (that’s for another post), but this is where you will connect all your equipment, either wirelessly via Wi-Fi, or via a wire to an Ethernet switch.

Single car in a tunnel

Virtual Private Networking (VPNs)

This isn’t really a hardware component, but is usually a key piece of any home office (it sometimes uses dedicated hardware, though). The function of a VPN is to connect you to another private LAN located elsewhere (either physically or just another part of the network.) When working from home, installing a dedicated private network connection between the main office to a home office is cost-prohibitive (although there are some interesting new technologies with 5G that will allow you to connect mobile devices directly to the corporate network, essentially making the corporate network its own cellular carrier.)

Enter the VPN – It uses the public internet to establish a connection to the corporate network, and it builds an encrypted tunnel that allows corporate traffic to pass through securely. Sometimes, this is an application that runs directly on a computer, establishing the tunnel directly to that computer, and sometimes, the tunnel is established by the network equipment you have at home, and it just presents another LAN for you to connect anything to. In most cases, in order to use bandwidth more efficiently, any traffic destined for the internet will go out directly from your router rather than through the tunnel and go out from the corporate network. This is known as a “split tunnel”. Some companies, however, will choose to pass all traffic through the tunnel in order to benefit from high-power corporate firewalls to better secure traffic against malware, data leakage, or to just filter content.

As cloud-based services such as Office 365 become more prevalent, VPN connections back to the office are becoming less important.

It’s worth noting that this is very different from public “VPN” services that claim to offer privacy when accessing the internet. While the underlying technology is similar, all these are doing is relocating where you hop on to the internet, sending it through the VPN service’s network where they can inspect all your traffic.

Home Network Equipment

Equipment

A quick rundown of connectivity equipment:

Cellular Modems

If you need to connect to a cellular network, you can use the following:

  • Your smartphone hotspot (easiest in a pinch, can also usually connect to your laptop via a USB cable if you don’t want to or can’t use Wi-Fi)
  • A portable hotspot, sometimes called a “Mi-Fi” or a “Jetpack”, both are brand names for common devices in this category. Many of these also can connect via USB.
  • A USB cellular modem (check your cellular carrier for options)
  • An Ethernet cellular modem or router such as a CradlePoint IBR series device

Some home routers and most enterprise routers will support a USB cellular modem as a WAN connection, either primary or as a backup.

Home Routers

There is a wide variety of these out there, and most of what you can get commercially will do the job better than what the ISP provides. NetGear and Asus both make devices that perform well, but these devices have limited security capabilities. TP-Link and Linksys are cheap, but tend to underperform. Plan on about $200-300 for these types of devices. I’ll get into this a little more when I talk about the LAN side of things.

Many people recommend Ubiquiti equipment, but that’s a lot more complex than I feel is appropriate for non-technical users. If it’s what a managed service provider supplies, then it’s quite adequate, but make sure they’re the ones that have to deal with the technical side of it. If you’re a network nerd, then you already know this stuff.

Enterprise Firewalls

This is where your corporate IT department or managed service provider usually comes into play, and provide you with a firewall/router device that is pre-configured for corporate networking and security standards (and will often set up a dedicated VPN connection as well). These devices come from a vendor like Fortinet, Aruba (in the form of a Remote Access Point), Palo Alto, Cisco/Meraki, and other enterprise networking vendors. These are helpful in a home office because they are generally managed by your MSP or IT department and are essentially plug and play, giving you a secure network connection that is functionally equivalent to being on the network at the office.

You can also purchase your own standalone firewall from these vendors, all of which have a home office model or two in their lineup. They usually come with an annual subscription cost which gives you frequent updates to the security profiles and rules, to adapt to the changing network threat landscape. These will typically provide much better security than a residential gateway device, but are more complex and expensive to operate.

Summary/tl;dr

This got long (which is why I’m breaking tech up into multiple posts), but the bottom line is that your internet connection is a vital piece of the home office puzzle, and it’s one where you’re going to want to spend some time and money getting it right. If you have to go cheap somewhere, this is not the place to do it, but you also don’t need to go overboard.

My colleague Scott Lester also posted on his blog about temporary internet access.

Please share your internet access related tips and experiences in the comments.