Having spent most of the last 5 years steeped in the HPE/Aruba networking ecosystem, I didn’t pay much attention to what Ubiquiti has been doing, as their primarily Prosumer and small business market segment didn’t significantly overlap with the large global customers I was working with at Aruba. HPE did venture into the SMB space with the InstantON product line, and have been reasonably successful at it, but the consulting work I was doing rarely went anywhere near that space. Now that I’m free of any competitive constraints. I’m taking another look at a product line that has clearly evolved.
About a year or so ago, I saw a marketing slide that surprised me, indicating that the #3 player in the Wi-Fi space (measured by total access points deployed) behind 800-pound gorilla Cisco and #2 Aruba, was, in fact, Ubiquiti.
Ubiquiti is a company that originally made a name for themselves by selling proprietary (AirMax) Wi-Fi-ish point-to-point and service provider gear, and eventually jumped into Wi-Fi. They quietly built themselves into a nearly US$2B/year operation by selling inexpensive (but broadly adequate) Wi-Fi hardware that appealed to small businesses, and they were largely ignored by the “Big Players” for years.
It had long been my own experience that the Ubiquiti ecosystem was decent but had some significant scalability limitations in terms of their management platform. This was especially clear after I got down and dirty with some absolutely massive deployments while working at Aruba. Over the years prior, I’ve deployed a number of Ubiquiti-based solutions and periodically watched them release a few products that were real stinkers (both hardware and software) or distractions from the core product line (anyone remember mFi? their solar product? the first 802.11ac access point to ship?). They gained a reputation (and it was largely deserved) by marketing the product as plug-and-play that required minimal engineering skill, along with a bunch of defaults that really weren’t doing anyone much good. They were the “cheap” brand, preferred by minimally competent “trunk-slammers” and customer bean counters and IT departments who didn’t really understand Wi-Fi, leading to a lot of really bad installations. They were also plagued by supply chain and quality challenges for a very long time.
But over the last several years, other consumer-focused companies like Netgear, TP-Link, Linksys (fresh off the utter debacle that was Cisco’s ownership of the brand), new players like Google (Nest) and Amazon (Eero), and eventually larger legacy players like Aruba (InstantON) started realizing that Ubiquiti did in fact have the prosumer market largely locked up. They decided they wanted a piece of that pie, right around the same time that the consumer market started realizing that it needed multi-AP solutions, especially in the US market where homes were growing ever larger, and all the while, ISPs were providing equipment was almost criminally cheap and awful.
This new competition ultimately proved to be a good thing for Ubiquiti, as complacency had been taking hold. The competition breathed new life into the company, who began to make some really smart hiring decisions on the product and development side.
Meanwhile, the founder of Ubiquiti, Robert Pera, decided to do as so many company founders with mountains of wealth do, and invested some of it into a professional sports team, the Memphis Grizzlies of the National Basketball Association. Along with the team came the management and operation of their home arena, the FedExForum. As it would never do for a competitor’s networking product to be in the arena, the team set about deploying Ubiquiti’s Wi-Fi product to serve the arena, at a scale that the product had never been deployed before. This ultimately proved that the product can in fact scale, if given the proper engineering attention by someone who actually knows what they’re doing (their lead network architect is a good friend and colleague), and product support and development that can integrate feedback and the unique challenges posed by Large Public Venues. This gave the hardware and software some much-needed improvements.
Most recently, Ubiquiti put in a long-awaited appearance at Mobility Field Day 11, and got to present their product portfolio and roadmap to deeply experienced professionals in the wireless network space. They came to announce that they have been listening to extensive feedback from Wi-Fi pros (including yours truly), and how they’re starting to make moves into offering truly enterprise-grade products and services. In doing so, they’ve announced that they’re coming to play, and I’m hopeful that they provide some much-needed competition to the likes of Cisco (especially Meraki), Aruba, Juniper, Extreme, and Ruckus, in the same way the consumer players did for them. The big players have gotten complacent too, and it’s high time the market got shaken up.
I was fortunate enough to be part of the beta test audience for their MFD presentation and received a rather generous shipment of lab equipment in exchange for my time and expertise. Over the next several posts, I’ll go over the unboxing and commissioning of the gear and provide my thoughts on it. Stay tuned!
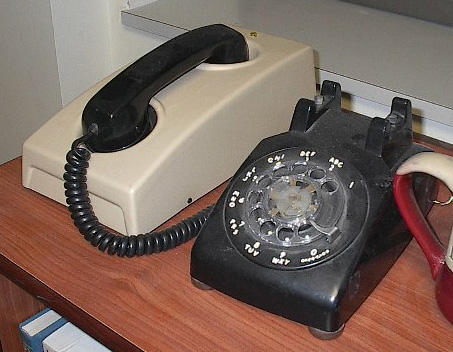
Let’s jump into the time machine and head back to the turn of the century (21 years ago, y’all… can you believe it?). It was a time when cable TV was king, and you could usually count on a cable outlet in almost every room of the house, when a cable TV package could easily come with half a dozen converter boxes, before the term “cord-cutter” struck fear into the hearts of cable executives. and when Netflix was an upstart DVD by mail company. This was also when a brand new technology called “Wi-Fi” had just showed up on the scene. Broadband internet (a whole 5 megabits!) was starting to find its way into homes served by cable TV, and it made dialup look severely lame. Usually these “cable modems” were hooked directly up to a single computer, either via USB, or via Ethernet if your computer was really snazzy. Often, these computers were directly connected to the internet with no firewall software, which led to all kinds of shenanigans.
Ah, those were the days.
If you had a home built around that time, chances are, the builder put coaxial cable into every room they could think of so you could have TV everywhere. And they’d usually string a daisy chained chunk of Cat5 for telephones. If they were really fancy, they would run each cable and phone outlet back to a central point where you could pick and chose where the signals went.
The challenge is that while technology changes every few years, the wiring in a house is generally put in place with little thought given to even the near future. In 2000, only the serious nerds (such as yours truly) had computers (plural) in their homes. The idea of the networked home and the Internet of Things was still a long way off.
If you were a nerd with computers (plural) and so fortunate as to have a home whose Cat5 phone cables were “home-run” back to a central interconnect (where they were usually all spliced together on a single pair for voice), you could reterminate them on both ends with a modular jack and use them for Ethernet (the idea of a router at home with NAT was still pretty new back then as well). In most cases, the runs were short enough that when gigabit Ethernet started showing up, you could still make the Cat5 work.
Recently, I had to figure out how to connect up a bunch of access points in a few homes that were built in the 1999-2000 time frame. One is the rental I just moved into, and the other is a moderately sized home owned by a client who has found himself and his family working from home a lot more lately, just like the rest of us.
My home was wired to nearly every room with home run Cat5 and coax (lucky me!). Since I have buckets full of Cat5e jacks, it was a pretty simple swap on both ends and I got gigabit. Didn’t require much effort, and thankfully didn’t require causing any damage to the rental house, which the landlord tends to get cranky about.
The client’s home, on the other hand, had daisy chained telephone line and coaxial cable throughout. And since it’s a higher end home, running ethernet cable to each room is a non-starter (not to mention expensive and disruptive). And, of course, the cable modem/router/wireless/waffle iron/juicer/vacuum combo device provided by the cable company is as far across the house from the home office as you can possibly get without actually putting it in the neighbors’ house. Cable installers love outside walls, which are about the worst possible place to put a wireless access point. Zoom calls can get a little frustrating and embarrassing when you’re the presenter and your connection sucks…
So how to get a decent connection up to the office and elsewhere in the client’s house to blanket it with wifi? Thankfully, 20 years of innovation has happened, and the chip makers and the cable companies got together to solve this problem, because they needed to deliver services over IP within the homes as well. What they came up with is the deliciously named “MoCA“, which stands for “Multimedia over Coax Alliance”. They figured out a way to be able to run a digital network signal over the existing coax wires present in most houses, and make it compatible with Ethernet.
Early versions weren’t very fast (version 1.0 in 2006 was capable of 100Mbps), but as they applied some of the same RF tricks that Wi-Fi used, they were able to make it perform at a much higher level (Version 2.5, released in 2016, is capable of 2.5Gbps). Version 3 aims to provide 10Gbps.
MoCA will support up to 16 nodes on the wire, and can coexist with some shockingly bad signal conditions. It operates from 1125MHz up to 1675MHz, which is above where cable TV signals live but still quite functional over short distances with existing coaxial cable and splitters. It forms a full mesh where each node talks directly to the other nodes that it needs to, using a combination of Time-Division Multiple Access (TDMA) and Orthogonal Frequency Division Multiple Access (OFDMA), a trick that is also used by WiFi 6/802.11ax to make better use of airtime.
MoCA also requires putting in a filter between the pole and your house so that your MoCA signals don’t end up putting your neighbors on the same network or screwing with the cable company’s lines.
Most current cable company provided gateways also support MoCA, and adding a MoCA transceiver to a live coaxial port on the wall in your house basically acts as another ethernet port on the gateway device. Cable companies commonly use this for IP based set-top boxes (over coax!) and additional wireless access points (such as Cox’s “Panoramic WiFi” and XFinity’s “XFi pods”).
While I haven’t tested the cable company’s wireless offerings (because I’m not a masochist, and I have access to vastly better wifi gear), I did want to find out how well MoCA performed as a straight Ethernet bridge for connecting up the client’s access points in such a way that I didn’t have to use wireless meshing, which performs quite poorly in most residential environments.
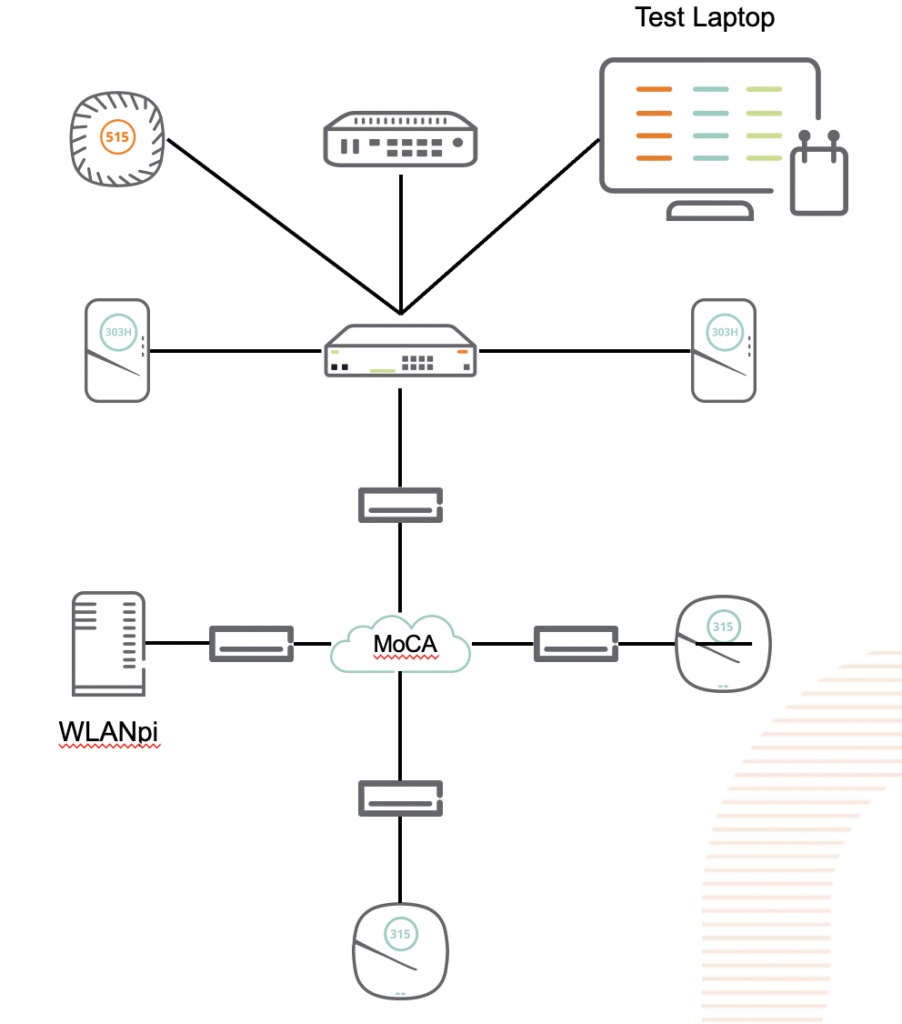
So I grabbed a couple of MoCA adapters (and a splitter) from Amazon and tried it out in a couple of different configurations. Testing was done from a MacBook Pro connected to the network via Ethernet, and a WLANpi connected on the other end of a MoCA adapter.
The test setup.
The first thing I noticed is that these devices are truly “plug and play”. I hooked one up to the coax in my office and the Ethernet side went into my switch. I then hooked 3 more up around the house, and on two of them, hooked up an access point, and on the third, the WLANpi. The access points came up and showed up in the controller just like they would on Ethernet (caveat: I had to power them externally). The WLANpi grabbed a DHCP address, and I started testing, using the librespeed web speed test built into the WLANpi, as well as iPerf3, also built into the Pi.
First, the baseline with the WLANpi connected directly to the switch. Pretty solid, about what you would expect from a gigabit network.
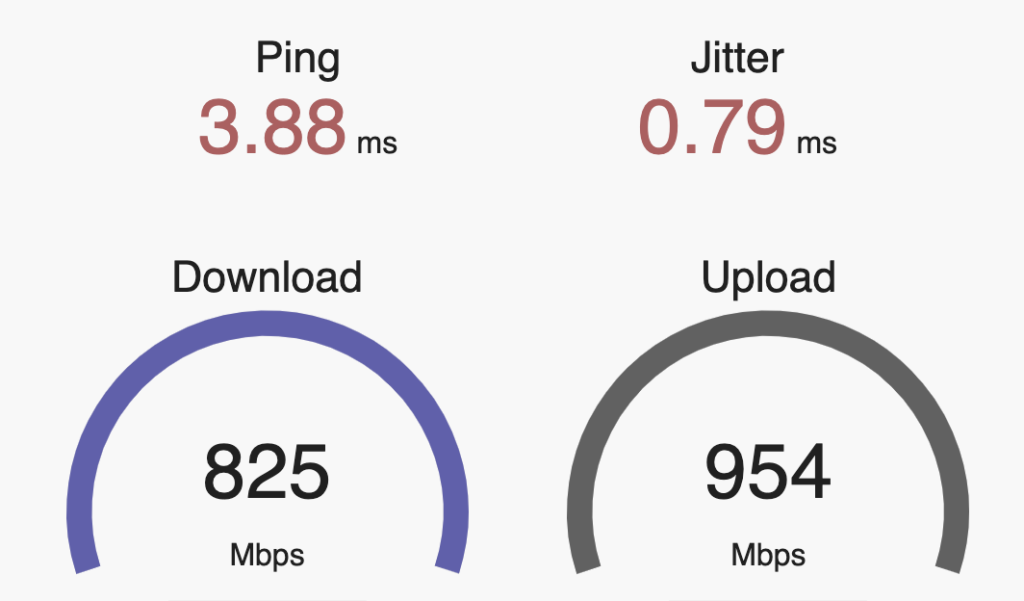
Next: The WLANpi at the other end of a 4-node MoCA 2.5 network:
An ever so slight reduction in throughput, and an extra few milliseconds of latency.
Directly connecting two nodes performed similarly.
So, bottom line, MoCA is a pretty solid option if all you have available is coax. It has the full wire speed, and doesn’t introduce the kind of latency that a wifi mesh does.
Downside: The MoCA spec doesn’t seem to provide for any means of powering converters centrally, or pushing PoE to the Ethernet device.
Other MoCA devices worth looking at:
Kiwee Broadband, has a passthru port as well as a second Ethernet port.
GoCoax, another inexpensive option that works on v2.5.
In my previous post, I went over the basics of working from home. It’s worth noting here that many of these concepts can also be applied to your kids who might be taking school online – they’re teleworking just like you are, and face many of the same challenges. In this and future posts, I’ll be dealing with the tech basics required for a successful and productive home office.
I was originally going to do a single post on all things tech, but it started getting lengthy, so I decided to break it down into a couple of parts. This post will deal specifically with external network connectivity.
The Internet
No surprises here – a decent internet connection is pretty much a given for remote work. One thing that is becoming apparent during this quarantine period is that a whole lot of people have abysmally bad internet connections at home. I’m hearing horror stories from the trenches, from my colleagues and friends who work front-line IT support.
The word “Broadband” is thrown around a lot by ISPs intent on selling you a service package, but what does it really mean? In the United States, the Federal Communications Commission updated their definition of “broadband” most recently in 2015, to mean a connection speed of at least 25Mbps downstream (from ISP to your house), and 3Mbps upstream (from your house to your ISP. But what do those speeds really mean? The FCC also has a handy guide listing what activities require what level of speed.
So your Cable ISP touts their “SuperGigaFast” service with “gigabit” service. Sounds great, right? Not so fast. Cable-based ISPs that come into your house via a coaxial cable use a technology called DOCSIS, which has great downstream speeds, and (usually) abysmally bad upstream speeds. The cable companies originally designed this technology back in the late 1990s when internet usage consisted largely of downloading web pages and sending small bits of control data. This meant that an asymmetrical connection would work great for most users, and they would be able to leverage their existing wiring infrastructure.
Fast forward 25 years to 2020, and cloud-based data storage and teleconferencing and the like mean that you need a lot more upstream speed than you used to. But that hasn’t stopped cable companies from selling “gigabit” packages with a paltry 10Mbps upstream connection. When getting an internet service package for teleworking, your upstream speed should be at least 10% of your downstream speed – because if you saturate your upstream link, it’s going to negatively impact your downstream traffic and limit it. This lets the cable company sell you “gigabit”, knowing full well that they’ll never have to deliver on that promise. They also usually provide really cheap equipment which means your Wi-Fi speeds are going to be limited even more, and they still don’t have to deliver on those gigabit speeds they’re charging you for. If you have the option of a symmetrical connection (usually delivered over fiber optic cable), it will be a lot more functional.
Much of what applies to DOCSIS cable connections also applies to DSL connections from the local telephone company. Make sure you have enough upstream bandwidth to do what you need to do. Also beware of any service that has a data cap – working from home can blow through a data cap in a real hurry.
It’s usually worth investing in your own router – the equipment provided by the ISP is, in most cases, absolute junk. AT&T is notoriously bad about this on both their U-Verse DSL and fiber-based services, and they have it configured such that it’s very difficult to use a “real” router with their service.
And in some places, cable, fiber, or DSL aren’t an option, and you’re stuck with either a wireless ISP or cellular.
Hardware
The typical internet connection requires a couple of devices. ISPs and telcos generally refer to this as “Customer Premises Equipment”, or “CPE”.
The Modem
This is the device that interfaces your ISP’s connection with your home network, usually via an Ethernet connection. The term comes from “modulation/demodulation”, which is the process of converting a data stream into a series of electrical signals. This operates between what us network nerds call “Layer 1” (electrical signals) and “Layer 2” (data link). I posted on network layers in this post from 2018, if you want to get into some of the details of those. The modem’s primary function is extending your ISP’s physical network to your house. Before the days of direct internet connections, the data link was established over a telephone line by modulating the data signals into electrical signals in the narrow audio range supported by the telephone system.
Modems can take many forms, and in many cases, your ISP’s modem is integrated into a single device with a router. In the case of cable, you can usually supply your own. In the case of DSL or fiber service (where it’s usually called an Optical Network Terminal instead of a modem) it’s usually provided by the ISP and you won’t get much choice in the matter, although sometimes it’s possible to request a specific type or model.
Your smartphone also contains a modem that interfaces to the cellular networks – it likely uses LTE (4G), but older ones (3G) would use CDMA or GSM, and newer ones (5G) use a few different things, mostly based on LTE. If you need to interface a cellular network to your home network, either as a primary or backup link, there are dedicated cellular modem devices for that (more on that in a moment).
The Router
This is the device that connects your network to your ISP’s network. It operates at “Layer 3”, which for the vast majority of people means “the internet”. The internet is nothing more than a whole bunch of interconnected networks. A protocol (known as the “Internet Protocol”, or “IP”) has been in place for decades, specifying how all these networks can talk to each other. Each network is connected to other networks by way of a router (also known as a “gateway”). Its job is to look at traffic that comes in, and decide where it needs to go next. If it’s for another device on a network it’s directly connected to, it sends it directly. For something elsewhere on the internet, it sends it to the next router down the line (usually your ISP) to deal with and eventually get it to where it needs to go. This process usually happens in a matter of milliseconds (you can use the “ping” command to see how long this takes, or “tracert” (windows)/”traceroute” (everything else) to see the path it takes. The whole idea is that you don’t see what’s happening under the hood.
The term “Router” is often misconstrued to mean “WiFi”. This is often because the equipment provided by an ISP or purchased consists of a router, a network switch, and a Wi-Fi access point (and sometimes a modem) all in one box referred to as “the router”.
Owing to a general shortage of IP addresses, your ISP will assign a single IP address (which is unique on the entire internet!) to your router’s Internet-facing connection (the Wide Area Network/WAN interface), and your own network devices (on the Local Area Network/LAN interface) will occupy address space that is defined by RFC1918 as “private” address space (which can not be used directly on the internet, but can be re-used by anyone – in most cases, your network will be 192.168.something, the specifics vary from one devices to another). The router will then perform Network Address Translation (NAT) to move data between the two networks. Most of the time, you don’t need to worry about the details of how it’s set up, although when it comes to troubleshooting, having at least a general awareness of how it’s set up can be useful.
The Firewall
This is a key piece of the network, as it is what decides which traffic is and isn’t allowed. This is critical to providing network security. It is usually integrated into the router. It examines each packet and checks a list of rules (which can be updated multiple times a day to react to ongoing threats) to determine if the packet should be sent along its merry way, or dropped into a deep, dark hole.
The Local Area Network
The router is the transition point from your network to the rest of the internet. I’m not going to get into the details of the LAN for the moment (that’s for another post), but this is where you will connect all your equipment, either wirelessly via Wi-Fi, or via a wire to an Ethernet switch.
Virtual Private Networking (VPNs)
This isn’t really a hardware component, but is usually a key piece of any home office (it sometimes uses dedicated hardware, though). The function of a VPN is to connect you to another private LAN located elsewhere (either physically or just another part of the network.) When working from home, installing a dedicated private network connection between the main office to a home office is cost-prohibitive (although there are some interesting new technologies with 5G that will allow you to connect mobile devices directly to the corporate network, essentially making the corporate network its own cellular carrier.)
Enter the VPN – It uses the public internet to establish a connection to the corporate network, and it builds an encrypted tunnel that allows corporate traffic to pass through securely. Sometimes, this is an application that runs directly on a computer, establishing the tunnel directly to that computer, and sometimes, the tunnel is established by the network equipment you have at home, and it just presents another LAN for you to connect anything to. In most cases, in order to use bandwidth more efficiently, any traffic destined for the internet will go out directly from your router rather than through the tunnel and go out from the corporate network. This is known as a “split tunnel”. Some companies, however, will choose to pass all traffic through the tunnel in order to benefit from high-power corporate firewalls to better secure traffic against malware, data leakage, or to just filter content.
As cloud-based services such as Office 365 become more prevalent, VPN connections back to the office are becoming less important.
It’s worth noting that this is very different from public “VPN” services that claim to offer privacy when accessing the internet. While the underlying technology is similar, all these are doing is relocating where you hop on to the internet, sending it through the VPN service’s network where they can inspect all your traffic.
Equipment
A quick rundown of connectivity equipment:
Cellular Modems
If you need to connect to a cellular network, you can use the following:
Your smartphone hotspot (easiest in a pinch, can also usually connect to your laptop via a USB cable if you don’t want to or can’t use Wi-Fi)
A portable hotspot, sometimes called a “Mi-Fi” or a “Jetpack”, both are brand names for common devices in this category. Many of these also can connect via USB.
A USB cellular modem (check your cellular carrier for options)
An Ethernet cellular modem or router such as a CradlePoint IBR series device
Some home routers and most enterprise routers will support a USB cellular modem as a WAN connection, either primary or as a backup.
Home Routers
There is a wide variety of these out there, and most of what you can get commercially will do the job better than what the ISP provides. NetGear and Asus both make devices that perform well, but these devices have limited security capabilities. TP-Link and Linksys are cheap, but tend to underperform. Plan on about $200-300 for these types of devices. I’ll get into this a little more when I talk about the LAN side of things.
Many people recommend Ubiquiti equipment, but that’s a lot more complex than I feel is appropriate for non-technical users. If it’s what a managed service provider supplies, then it’s quite adequate, but make sure they’re the ones that have to deal with the technical side of it. If you’re a network nerd, then you already know this stuff.
Enterprise Firewalls
This is where your corporate IT department or managed service provider usually comes into play, and provide you with a firewall/router device that is pre-configured for corporate networking and security standards (and will often set up a dedicated VPN connection as well). These devices come from a vendor like Fortinet, Aruba (in the form of a Remote Access Point), Palo Alto, Cisco/Meraki, and other enterprise networking vendors. These are helpful in a home office because they are generally managed by your MSP or IT department and are essentially plug and play, giving you a secure network connection that is functionally equivalent to being on the network at the office.
You can also purchase your own standalone firewall from these vendors, all of which have a home office model or two in their lineup. They usually come with an annual subscription cost which gives you frequent updates to the security profiles and rules, to adapt to the changing network threat landscape. These will typically provide much better security than a residential gateway device, but are more complex and expensive to operate.
Summary/tl;dr
This got long (which is why I’m breaking tech up into multiple posts), but the bottom line is that your internet connection is a vital piece of the home office puzzle, and it’s one where you’re going to want to spend some time and money getting it right. If you have to go cheap somewhere, this is not the place to do it, but you also don’t need to go overboard.
The life and contents of a survey kit is a dynamic one. Here’s what’s in my kit these days. The Pelican 1510 is airline carry-on size, because there’s no way they’ll let you check that stuff with the batteries (which are all just under the airline limit of 100Wh), and the contents are valuable enough that you probably don’t want it out of sight, or trust it to the airline baggage handlers. If you’re carrying this stuff, it’s because you need it at your destination. Downside is that the 1510 doesn’t allow the overhead bin to be closed on Embraer 135/145 regional jets.
Links go mostly to Amazon where I get all this stuff
DeWalt DW040 Laser Measure (This is a little cheap one I got from Home Depot for measurements up to 40′ after my previous Bosch suffered a fatal fall to a concrete deck from a scissor lift.)
Garmin GLO Bluetooth GNSS receiver (although the USB-connected 18x may be a better option if you are surveying Bluetooth)
Red/white sUAS strobes (x2) These are FAA-approved for being visible from at least 3 miles away. They’re ridiculously bright and have a few flashing modes, so I mount these to the AP stand at eye level so people don’t walk into it. Also good to have one on your back when surveying areas with heavy forklift traffic. Since they also have a constant on mode, they make a good flashlight in a pinch.
Safety StrobesSame as above – just a different configuration.
All this fits inside the case… See? Whole thing weighs a little over 20 lbs, and there’s room to spare. Bright yellow inside makes it harder to lose stuff in there. Tripod is held in place with some velcro straps screwed to the lid.
Thule laptop backpack/briefcase (I rotate between a Thule backpack/briefcase, an employer-logoed backpack, and a 5.11 Rush 24 pack, depending on the loadout) containing:
BatPower PDE2 96Wh USB Battery Pack (Amazon has removed this item. The upcoming Accelerator 2.0 battery pack from AccelTex will have full power type C PD ports on it)
Also, if you’ve started adding this up in your head, you can see why I carry this on instead of leaving it to the baggage system. Make sure your business has insurance, especially if you’re self employed. If you’re traveling overseas, you’ll need special insurance coverage. I used to carry audiovisual insurance (the kind news crews carry) when doing streaming, and those policies will even cover against force majeure and acts of God. I don’t know if there’s an IT equivalent.
One of my favorite things to do when I’m at a Disney park is to play the wireless nerd’s version of Hidden Mickeys: Trying to spot the myriad creative ways in which Disney’s Imagineers have blended their excellent wireless network into the carefully contrived scenery. It truly is magical how they can make wireless everywhere while keeping it nearly invisible.
So naturally, when I’m wearing the wireless engineer hat and have a challenge where I get to flex some of that creativity, I’m all over it.
A few years back, I helped a church in Wichita overhaul their aging and underpowered WiFi by designing and installing a new Ruckus system. Last year, they embarked on a new project to add a chapel to their campus. Naturally they wanted to extend the wireless LAN to this new building.
But… It’s a chapel aimed at doing weddings and other sorts of events, so it was paramount that the wireless equipment not be visible, to maintain clean architectural lines with a minimum amount of obvious tech equipment. Some concessions had to be made for audiovisual, but visible access points were a (network) bridge too far.
After pondering the problem as well as observing drawings and renderings, I happened upon the architectural lighting elements in the plan that were mounted on each of the columns. I dug into the design of these and discovered that they were a pair of LED fixtures concealed inside some finish carpentry with a textured plastic surface. And most importantly, there was an empty space in the middle between the two light fixtures that measured about 20cm square by 40cm high, and centered approximately 8 feet off the floor. Not only was that low enough to keep the APs close to the clients, there was plenty of room to put in one of the Ruckus H510 Wall APs designed for the hospitality market (which I also currently have in my house running Unleashed, although they will soon make way for some of the Aruba AP303H units or their new Instant On AP11D counterpart). I’m a big fan of these in-wall units for many reasons.
I asked the electricians to give me a box and conduit to four of these columns, as well as a pair of data cables. I only planned to use two access points initially, but since running cable would be prohibitively difficult after the buildout, I wanted to keep my options open should capacity needs increase in the future.
After many months of construction (Summer of 2019 was an utterly awful weather summer if you were in the construction business), I finally got the green light to install these. I took a bit of personal time on my way down to another job in Oklahoma for my employer, and executed the plan. I’m pretty happy with the results.
The lighting fixture: two pieces of dark wood on either side floating 1″ off the wall with a textured face and tunable color temp LED fixtures facing up and downThe lighting fixture with the plastic face slid up (there’s a stop at the bottom). An electrical box was placed behind it and a 2″ hole drilled for cable access. The overall construction of this fixture is beautifully simple: a few pieces of solid oak and some stain. The overall look in this space is one of stone, wood, and glass, with 90° and 45° angles being dominant. The Ruckus H510 bracket screwed directly to the finish carpentry. The mount could also have screwed to the electrical box but that was an unnecessary level of effort. The Ruckus H510 access point mounted on the bracket. The fixture with the AP mounted inside. The wood and textured face provide minimal attenuation, and in this environment, I’m using the attenuation constructively. The recess in white is where a large TV (in lieu of projection) will be mounted on a swing arm and can fold into the wall when not in use. Side view – the gap was just enough to get a screwdriver in to secure the AP to the bracket using the provided T10 screws. I was concerned that this wouldn’t be possible. Lighting fixture side view. Is this with or without the AP installed? If you can’t tell, that means I was successful. The AP was mounted on the second column from the back of the room, near the sound booth. The corresponding column on the other side is wired for an AP if capacity requires one. The AP was mounted on the third column from the front of the room, near the front of the stage. The corresponding column on the other side is also wired for an AP if additional client capacity requirements dictate it.
Second in a series about our first deployment of a Mist Systems wireless network.
In my last post, I gave you an overview of the various components of the Mist Wireless system. This post will go into some of the design considerations pertaining to this particular project.
Because we’re now designing for more than just Wi-Fi, there are a few additional things to factor in when planning the network.
Floor Plans
It’s not uncommon for your floor plans to have a “Plan North” that doesn’t always line up with “Geographic North”. Usually this isn’t a factor, but looking at it in hindsight, I would strongly encourage you to build your floor plans aimed at geographic north from the start, as the Mist AI will also use that floor plan for direction/wayfinding and the compass in mobile devices will be offset if you just go with straight plan north. You can also design on plan north, but then output a second floor plan file that is oriented to true north. Feature request to Mist: Be able to specify the angle offset of the plan from true north and correct that for user display in the SDK.
For this project, I had access to layered AutoCAD files for the entire facility, which (sort of) makes things easier in Ekahau Site Survey, but sort of doesn’t – the import can get a little overzealous with things like door frames. I had to go do a fair bit of cleanup afterwards, and might have been better off just drawing the walls in the first place. This was partly due to the general lack of any good CAD tools on MacOS that would have allowed me to look at the data in detail and massage it before attempting the import into Ekahau. The other challenge is that ESS imported the ENTIRE sheet as its view window, which made good reporting impossible as the images had wide swaths of white space. Having the ability to crop the CAD file would have been nice.
Density Considerations
Since one of the areas being covered is a large auditorium, we had to plan on multiple small cells within the space. We needed to put the APs in the catwalks, as we did not have the option of mounting the units on the floor because of the sanctuary being constructed onslab (and while the cloud controller allows you to specify AP height and rotation from plan north, there is no provision to tell it the AP is facing *up* and located on/near the floor). This posed a few challenges, the first being that we were well above the recommended 4-5m (the APs were at 10m from the floor), the other being that we needed to create smaller cells. For this, we used the AP41E with an AccelTex 60-degree patch antenna.
We also needed to either run a whole lot of cables up to the theatrical catwalks, or place a couple of small managed PoE switches – we unsurprisingly opted for the latter, using two 8-port Meraki switches, and uplinked them using the existing data cabling that was feeding the two UniFi APs that were up there.
As an added bonus, the sanctuary area was built with tilt-up precast concrete panels, which allowed us to use that heavy attenuation to our benefit and flood the sanctuary space with APs and not worry about spilling out too much.
Capacity-wise, we used 10 APs in the space, which seats 1700. Over the course of several church designs, I’ve found that a ratio of one active user for every three seats usually works out pretty well – in most church sanctuaries, the space feels packed when 2/3 of the seats are occupied, which means that we’re actually planning for one client for every two seats. Now, we’re talking active clients here, not associated clients. An access point can handle a lot more associations than it can active clients. As a general rule, I try to keep it to about 40 or 50 active clients per AP, before airtime starts becoming a significant factor.
In an environment like this, you want as many client devices in the room to associate to your APs, even if they’re not actively using them – when they’re not associated, they’re sitting out there, banging away with probe requests (especially if you have any hidden SSIDs), chewing up airtime (kind of like that scene from Family Guy where Stewie is hounding Lois just to say “Hi.”). Once they associate, they quiet down a whole bunch.
In addition to the main sanctuary, there are also a couple of other smaller but dense spaces: the chapel (seats 300) and the East Room (large classroom that can seat up to 250). In these areas, design focused on capacity, rather than coverage.
Structural Considerations
As is often the case with church facilities, College Park Church is an amalgamation of several different buildings built over a span of many years, accommodating church growth. What this ends up meaning is that the original building is then surrounded on multiple sides with an addition, and you end up with a lot of exterior walls in the middle of the building, as well as many different types of construction. Some parts of the building were wood-frame, others were steel frame, and others were cast concrete. The initial planning on this building was done without an onsite visit, but the drawings made it pretty obvious where those exterior (brick!) walls were. Naturally, this also makes ancillary tasks like cabling a little interesting.
Fortunately, the church had a display wall that showed the growth of the church which included several construction pictures of the building, which was almost as good as having x-ray vision.
Aesthetic Considerations
Because this is a public space, the visual appearance of the APs is also a key factor – Sometimes putting an AP out of sight takes precendence over placing for optimal Wi-Fi or BLE performance.
Placement Considerations
Coverage Area
Mist specifies that the BLE array can cover about 2500 square feet. The wifi can cover a little more, but it doesn’t hurt to keep your wifi cells that size as well, since you’ll get more capacity out of it. In most public areas of the building, we’re planning for capacity, not coverage. With Mist, if you need to fill some BLE coverage holes where your wifi is sufficient, you can use the BT11 as a Bluetooth-only AP.
AP Height
Mist recommends placing the APs at a height of 4-5m above the floor, in order to provide optimal BLE coverage. The cloud controller has a field in the AP record where you can specify the actual height above the floor.
AP Orientation
Because the BLE array is directional, you can’t just mount the APs facing any direction you please. These APs are really designed to be mounted horizontally, the “front” of the AP should be consistently towards plan north, but the controller does have the ability to specify rotation from plan north in case mounting it that way isn’t practical. The area, orientation and height are critical to accurate calculation of location information.
AP Location
Several of the existing APs in older sections of the building were mounted to hard ceiling areas, and we had to not only reuse the data cable that was there, but also the location. Fortunately, the previous system (Ubiquiti UniFi) was reasonably well-placed to begin with, and we were able to keep good coverage and reuse those locations without any trouble.
There were also some co-existence issues in the sanctuary where we had to make sure we stayed out of the way of theatrical lighting and fixtures that would pose a problem with physical or RF interference. In the sanctuary, we also have to consider the safety factor of the APs and keeping them from falling onto congregants like an Australian Drop-Bear.
Planning for BLE
Since starting this project, I’ve begun working with Ekahau on testing BLE coverage modeling as part of the overall wifi coverage, and it’s looking very promising. I was able to go back to the CPC design and replan it with BLE radios, and it’s awesome. Those guys in Helsinki keep coming up with great ideas. As far as Ekahau is concerned, multi-radio APs are nothing too difficult – They’ve been doing this for Xirrus arrays for some time now, as well as the newer dual-5GHz APs.
Stay tuned for a post about BLE in Ekahau when Jussi says I’m allowed to talk about it.
First in a series about our first deployment of a Mist Systems wireless network.
Over the course of the past few months, I’ve been working with the IT staff at College Park Church in Indianapolis to overhaul their aging Ubiquiti UniFi wireless system. They initially were looking at a Ruckus system, owing to its widespread use among other churches involved with the Church IT Network and its national conference (where I gave a presentation on Wi-Fi last fall). We had recently signed on as a partner with industry newcomer Mist Systems, and had prepared a few designs of similar size and scope for other churches in the Indianapolis area using the Mist system. We proposed a design with Ruckus, and another with Mist, with the church selecting Mist for its magic sauce, which is its Bluetooth Low Energy (BLE) capability for location engagement and analytics.
Fundamentally, the AP count, coverage, and capacity were not significantly different with Ruckus vs. Mist, and Mist offered a few advantages over the Ruckus in terms of the ability to add external antennas for creating smaller cells in the sanctuary from the APs mounted on the catwalks, as floor mounting was not an option.
About Mist
Mist is a young company that’s been around for about two or three years, and they have developed a couple of cool things in their platform – The first is what they call their AI cloud, the second is their BLE subsystem, and the last is their API.
Their AI component is a cloud management dashboard (similar to what you would see with Ruckus Cloud or Meraki — many of the engineers that started with Mist came over from Meraki), where the APs are constantly analyzing AP and client performance through frame capture and analysis, and reporting it back to the cloud controller. The philosophy here is that a large majority of the issues that users have with Wi-Fi performance is actually related to performance on the wired side of the network (“It’s always DNS.” Not always, but DNS — and DHCP — are major sources of Wi-Fi pain). The machine learning AI backend is looking at the stream of frames to detect problems, and then using that to generate Wi-Fi SLA metrics that can help determine where problems lie within the infrastructure, and doing some analysis of root causes. An example of this is monitoring the entire Station/AP conversation during and shortly following the association process. It looks at how long association took. How long DHCP took (and if it was successful), whether 4-way handshakes completed, and so on. It will also keep a frame capture of that conversation for further manual troubleshooting. It also keeps a log of AP-level events such as reboots and code changes so that client errors can be correlated on a timeline to those events. There’s a lot more it can do, and I’m just giving a brief summary here. Mist has lots of informational material on their website (and admittedly, there’s a goodly amount of marketing fluff in it, but that’s what you’d expect on the vendor website).
Next, we have their BLE array. This is what really sets Mist apart from the others, and is one of the more interesting pieces of tech to show up in wifi hardware since Ruckus came on the scene with their adaptive antenna technology. Each AP has not one, but *eight* BLE radios in it, coupled with a 16-element antenna array (8 TX, 8RX). Each antenna provides an approximately 45° beam covering a full circle. Mist is able to use this in two key ways. One is the ability to get ridiculously precise BLE location information from their mobile SDK, (and by extension, locate a BLE transponder for asset visibility/tracking) and the other is the ability to use multiple APs to place a virtual BLE beacon anywhere you want without having to go physically install a battery-powered beacon. There are myriad uses for this in retail environments, and the possibilities for engagement and asset tracking are very interesting in the church world as well.
Lastly, we have their API. According to Mist, their cloud controller’s web UI only exposes about 40% of what their system can do. The remainder is available via a REST API that will allow you do do all kinds of neat tricks with it. I haven’t had a chance to dig into this much yet, but there’s a tremendous amount of potential there. Jake Snyder has taught a 3-day boot camp on using Python in network administration to leverage the power of APIs like the one from Mist (Ruckus also has an API on their Cloud and SmartZone controllers)
Mist is also updating their feature set on a weekly basis – rather than one big update every 6 months that may or may not break stuff, small weekly releases allow them to deploy features in a more controlled manner, making it easy to track down any potential show-stopper bugs, preferably before they get released into the wild. You can select whether your APs get the early-release updates, or use a more extensively tested stable channel.
Much like Meraki, having all your AP data in the cloud is tremendously useful when contacting support, as they have access to your controller data without you having to ship it to them. They can also take database snapshots and develop/test new features based on real data from the field rather than simulated data. No actual upper-layer traffic is captured.
The Hardware
note: all prices are US list – specific pricing will be up to your partner and geography.
There are four APs in the Mist line. The flagship 4×4 AP41 ($1385), the lower-end AP21 ($845), the outdoor AP61 ($?) , and the BLE-only BT11 ($?). The AP41 also comes in a connectorized version called the AP41E, at the same price as the AP41 with the internal antenna.
The AP41/41E is built on a cast aluminum heat sink, making the AP noticeably heavy. It offers an Ethernet output port, a USB port, a console port, and what they call an “IoT port” that provides for some analog sensor inputs, Arduino-style. It requires 802.3at (PoE+) power, or can use an external 12V supply with a standard 5.5×2.5mm coaxial connector. In addition to the 4-chain Wifi radio and the BLE array, the AP41 also has a scanning radio for reading the RF environment. On the AP41E, the antenna connectors are located on the downward face of the AP.
The AP21 is an all-plastic unit that uses the same mounting spacing as the AP41, and has an Ethernet pass-through port with PoE (presumably to power downstream BT11 units or cameras). Like the AP41, it also has the external 12V supply option.
This install didn’t make use of BT11 or AP61 units, so I don’t have much hands-on info about them.
It’s also important to note that none of these APs ship with a mounting bracket, nor does the AP have any kind of integrated mounting like you would find on a Ruckus AP. Mist currently offers 3 mounting brackets: a T-Rail bracket ($25), a drywall bracket ($25) and a threaded rod bracket ($40). The AP attaches to these brackets via four T10 metric shoulder screws (Drywall, Rod), or four metric Phillips screws (T-Rail). More on these later.
The Software
Each AP must be licensed, and there are three possibilities: Wifi-only, BLE Engagement, and BLE Asset tracking. Each subscription is nominally $150/year per AP, although there are bundles available with either two services or all three. Again, your pricing will depend on your location and your specific partner. Mist recently did away with multi-year pricing, so there’s no longer a cost advantage in pre-buying multiple years of subscriptions.
When the subscription expires, Mist won’t shut off the AP the way Meraki does, however, the APs will no longer have warranty coverage. After a subscription has been expired for two months, Mist will not reactivate an AP. The APs will continue to operate with their last configuration, however, but there will no longer be access to the cloud dashboard for that AP.
As I prepare for another trip to a customer site, I figured I’d post the contents of my wireless engineering go-kit for the benefit of others wanting to put one together. I’ve posted previously about my streaming go-kit, which has largely been retired as I’m not doing nearly as much streaming as before, having shifted over to Wi-Fi. Amazon links in this post are affiliate links, and it’s where I bought most of this stuff over the course the the last several years. Some of it was freebies from conferences like the Wireless LAN Professionals Conference.
What’s in the kit?
It will depend largely on the job I’m going to do, but I’ve got several sub-kits that go in it based on the needs of the job:
Frame Analysis Sub-Kit:
(this kit has largely been deprecated by my Macbook and Airtool)
3 Netgear A6210 2SS 802.11ac adapters for use with Omnipeek – I don’t know if the 3SS version A7000 has requisite drivers for Omnipeek. Word on the street is that Metageek EyePA recently added support for these adapters. AirMagnet can also use these for surveys.
1 AirPCAP Adapter for use with Omnipeek (pretty much obsolete at this point)
Site Survey Sub-Kit:
(I hope to be able to replace this kit with a Sidekick sooner than later!)
WLAN Pros Site Survey Tray/Walking Desk (this has to go in checked luggage due to size – which is where an airline with a generous baggage policy comes in handy, or frequent flier status that gets you checked bags)
Panduit EGJT termination tool (Doesn’t hurt to carry a handful of spare jacks too) – this takes up way less space/weight than a bag of 8P8C plugs and a crimper, and results in a much better connection.
USB Charger (I carry the Apple 29W charger because my iPhone X and iPad Pro support USB-C PD and I don’t have one of the new MacBooks that uses USB-C – I can go from dead to a near full charge on my phone in about an hour, and the iPad charges wicked fast as well. I can also use this to power the USB3, HDMI, and USB Ethernet dongles off my iDevices, all at once)
Depending on the combination of stuff, most of it goes in a Pelican 1510 carry-on case (yes, it all fits – other than the PPE – with some room to spare, especially if you add the lid organizer, which is great for keeping small things contained!) . Because some of the devices in there contain lithium batteries, I can’t check it – but in that case the scissors and the knife need to go in checked luggage – But if you do some mental calculations and add up what all this stuff costs, you’ll see that even without the computers and software, that’s not generally something I am willing to let out of my immediate control. I don’t bother with TSA locks, because those don’t provide any security.
If I only need some of the items, I put them in a smaller nylon case that used to be a carrying case for a projector, which does fit in a checked suitcase. The fiber kit has a dedicated Pelican 1490 case when not traveling in the 1510.
I’ve been doing a little Raspberry Pi hacking lately, and put together a neat way to have physical status LEDs on your desk for things like EC2 instances.
The Hardware
In its most basic form, you can simply hook up an LED and a bias resistor between a ground line and a GPIO line on the Pi, but that doesn’t scale especially well – You can run out of GPIO lines pretty quickly, especially if you’re doing different colors for each status. Plus, it’s not overly elegant.
The solution? Unicorns!
No, really. The fine folks at Pimoroni in Sheffield, UK have made a lovely little HAT device for the Pi called a Unicorn. Its primary purpose is lots of blinky lights to make pretty rainbows and stuff, hence the name. However, this HAT is a 4×8 (or an 8×8) array of RGB LEDs, addressable via the I2C bus, which doesn’t eat up a line per LED (good thing, otherwise it would require 96 analog lines). The unicornhat library (python3-unicornhat) is available for Python 2 and Python 3 in the Raspbian repo. When installed onto the Pi, the Unicorn will fit within a standard Raspberry Pi case.
The Code
This is my first foray into Python, so there was a bit of a learning curve. If you’re familiar with object-oriented code concepts, this should be easy for you. Python is much more parsimonious with punctuation than PHP or perl are.
For accessing the EC2 data, we’ll need Amazon’s boto3 library, also available in the Raspbian repo (python3-boto). One area where boto3 is really nice is that the data is returned directly as a dict object (what users of other languages would call an array), so you don’t have to mess with converting JSON or XML into an object structure, and it can be manipulated as you would any other associative array (or a hash for you old-timers that use perl). AWS returns a fairly complex object, so you kind of have to dig into it via a few iterative loops to extract the data you’re after.
From there, it’s a matter of assigning different RGB values to the states. I chose these ones:
stopped: red
pending: green
running: blue
stopping: yellow(ish)
I also discovered that I needed to assign a specific pixel to each instance ID, otherwise they tended to move around a bit depending on what order AWS returned them on a particular request.
Here’s what the second iteration looks like in action:
import boto3 as aws
import unicornhat as unicorn
import time

# Initialize the Unicorn
unicorn.clear()
unicorn.show()
unicorn.brightness(0.5)

# Create an EC2 object
ec2 = aws.client('ec2')

# Define colors and positions
color = {}
color['stopped']={'red':255,'green':0,'blue':0}
color['pending']={'red':64,'green':255,'blue':0}
color['running']={'red':32,'green':32,'blue':255}
color['stopping']={'red':192,'green':128,'blue':32}

pixel = {}
pixel['i-0fa4ea2560aa17ffd']={'x':0,'y':0}
pixel['i-06b95cd864acb1a8c']={'x':0,'y':1}
pixel['i-0661da0f50ffb604c']={'x':0,'y':2}
pixel['i-063ec151e0f44ef9b']={'x':0,'y':3}
pixel['i-02c514ca567d8a033']={'x':0,'y':4}

# Loop until forever
while True:

	response = ec2.describe_instances()


	statetable = {}
	resarray = response['Reservations']
	for res in resarray:
		instarray = res['Instances']
		for inst in instarray:
			iid = inst['InstanceId']
			state = inst['State']['Name']
			# print(iid)
			# print(state)
			statetable[iid] = state


	for ec2inst in statetable:
		x = pixel[ec2inst]['x']
		y = pixel[ec2inst]['y']
		r = color[statetable[ec2inst]]['red']
		g = color[statetable[ec2inst]]['green']
		b = color[statetable[ec2inst]]['blue']
		# print(x,y,r,g,b)

		unicorn.set_pixel(x,y,r,g,b)
		unicorn.show()


	time.sleep(1)
For the moment, this is just monitoring EC2 status, but I’m going to be adding checks in the near future to do things like ping tests, HTTP checks, etc. Stay tuned.