Gear Review: GoFanco Wireless HDMI

A few weeks ago, I went to Amazon and picked up a cheap wireless HDMI transmitter to solve a camera connection challenge at the church. I needed to send a GoPro feed back to the booth without running cables all over the floor (or worrying about the GoPro’s live streaming latency — it uses HLS with a real short segment size– and getting that stream into the switcher was not a trivial task).

As is so often the case with these “off-brand” (or less well-known brand) devices, my expectations were low, and I fully expected to return it after a week.

That didn’t happen. Not only was it easy to set up, the picture quality was excellent, and latency almost nonexistent. I immediately picked up another set to run a mobile confidence monitor cart. It’s also able to send IR control to the receiver.

As it turns out, GoFanco is starting to make a name for themselves in the video accessories market for both pros and consumers, not entirely unlike how BlackMagic got their start. They offer quite a wide assortment of gizmos to move video signals around.
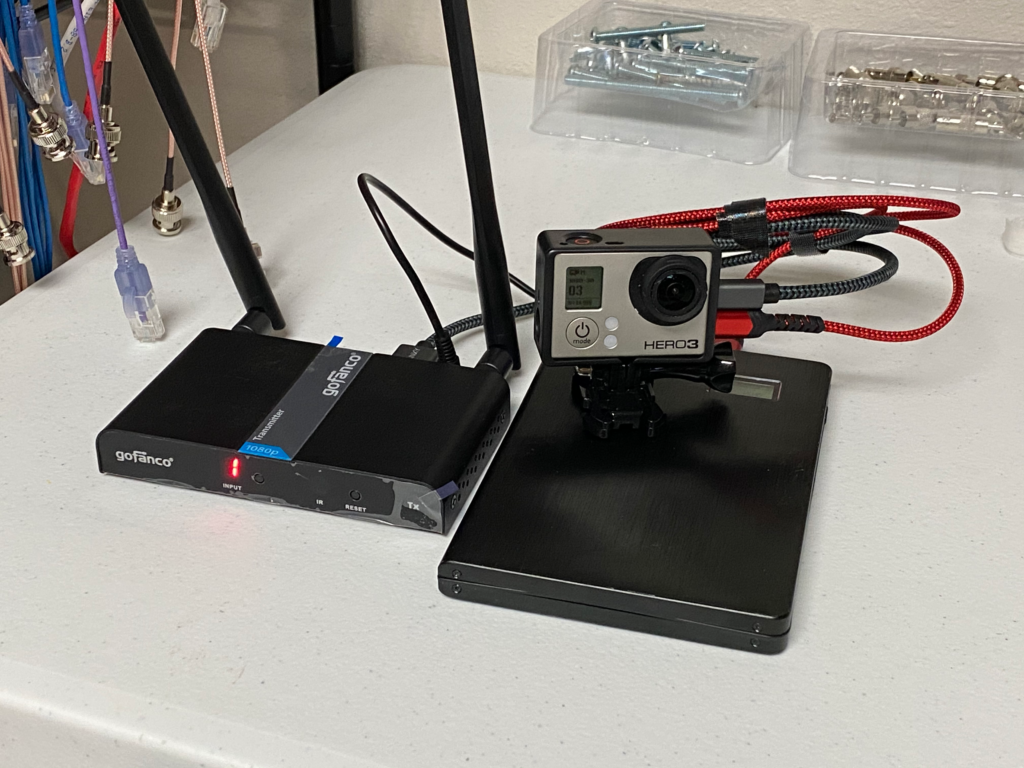
The mobile GoPro rig. This could also potentially be used for linking live UAS footage back to a switcher.

Since I am a wireless network engineer by profession, I had significant concerns about how well this would behave in the spectrum – it advertises that it uses 5GHz, and I expected it to grab as much spectrum as it could (as most wireless video devices tend to), and walk all over everything else in the band. So I hauled out my Ekahau Sidekick and its spectrum analyzer to see how well-behaved it would be… And I was pleasantly surprised to discover that it was very well-behaved on the Wi-Fi spectrum… because it’s actually running Wi-Fi!

It’s running 802.11ac on a 20MHz channel (and the channel selection allows 10 different channels, which tells me it’s running on UNII-1 and UNII-3 and avoiding the DFS bands). Airtime usage is quite efficient, around 4%, which is shocking for a video application. And perhaps most useful is that it runs on 5VDC, and the supply is rated at 2A… Which means I can use a USB battery to power the transmitter and the GoPro (and a 20Ah slice will run this rig All. Day. Long.

Additional features allow not just 1:1 link, but 1TX:2RX, 2TX:1RX, all using a single channel. And because it’s quite efficient in spectrum/airtime usage, it does this in such a way that will coexist peacefully with your Wi-Fi.

It also means that if a presenter brings a laptop and wants to put it up on the screen, the transmitter can be powered from the laptop itself. This thing is a definitely a worthwhile addition to your tool kit.

The gory technical details,

  • Channel 0: Wifi Channel 36 (20MHz) (Default)
  • Channel 1: Wifi Channel 44 (20MHz)
  • Channel 2: Wifi Channel 157 (20MHz)
  • Channel 3: Wifi Channel 157 (40MHz)
  • Channel 4: Wifi Channel 149 (20MHz)
  • Channel 5: Wifi Channel 153 (20MHz)
  • Channel 6: Wifi Channel 149 (40MHz)
  • Channel 7: Wifi Channel 153 (40MHz)
  • Channel 8: Wifi Channel 165 (20MHz)
  • Channel 9: Wifi Channel 161 (20MHz)

This appears to be fairly smart frequency selection behaviour since these preprogrammed channels look like it will never set itself up on the secondary channel of a 40MHz pair, which is good for co-existence with other Wi-Fi. When powering up the unit, it will start on 0 but then switch to the last channel it was using once it completes booting, which only takes about 5 seconds.

Each channel is its own encrypted SSID named LK_<Channel #>.

There is a pair of LEDs on each unit: The transmitter has one that indicates it is getting a good HDMI signal, the other indicates that it has synced up with the receiver. On the receiver, one indicates that it has a good wireless signal (solid indicates a connection, blinking indicates active data transmission), and the other indicates that it has synced up with the transmitter. A mild annoyance here is that changing the channel on the receiver will not trigger the transmitter to switch channels. However, the included IR remote will let you do so. The transmitter also has an HDMI pass through, so you can insert it between a source and a monitor.

Here’s about a minute of traffic captured from the Sidekick. A channel change happens around 30 seconds in. The channel change process is pretty straightforward and exactly what you’d expect. When initiated from the receiver, it sends a deauth frame, and then the transmitter continues to beacon on its existing channel. When channel change is initiated on the transmitter, it will send a series of broadcast deauth frames to the SSID, change to the new SSID and start beaconing (this takes less than a second). Meanwhile, the receiver is looking for beacons from its pal, and when it sees the right SSID on its channel, it sends a broadcast probe request, gets the response from the transmitter, and goes through the standard association process. Management frames do not appear to be protected, so this device is vulnerable to deauth spoofing.

Data rate hovers around 100Mbps according to AristaPackets analysis of the capture. Given their use of off-the-shelf Wi-Fi for the networking component, I wouldn’t be surprised in the least to discover that the video protocol running underneath the hood was NDI, or something based on it. Why reinvent the wheel? I’d really love to crack open the encryption on this guy and see…

Given that this is using standard 802.11, the advertised range is about 50 metres, but it could easily be made to go longer distances simply by attaching a 2×2 MIMO directional antenna. Antenna connectors are RP-SMA.

One caveat: When I first set it up, the receiver was having a hard time staying up and maintaining signal… I quickly discovered that I had grabbed the wrong 5V power supply, and it was only able to source up to 1A – This device definitely needs more juice than that. Once I grabbed the correct 5V power supply, everything worked great. If you use a USB cable to power it, make sure the USB supply can source the full 2A (any supply designed for tablets or higher end smart phones should be adequate)

All in all, not a bad little setup for $200 and small change. It appears to be engineered above its price point, which is a great value.
Video Production Suite

I’m going to veer off from my usual diet of wireless posts to bring you a howto post on the new video production desk that I built for the Family Life Center at our church.

Over the past year, we’ve been putting together a major upgrade to the video equipment in the FLC, because this is what we had…

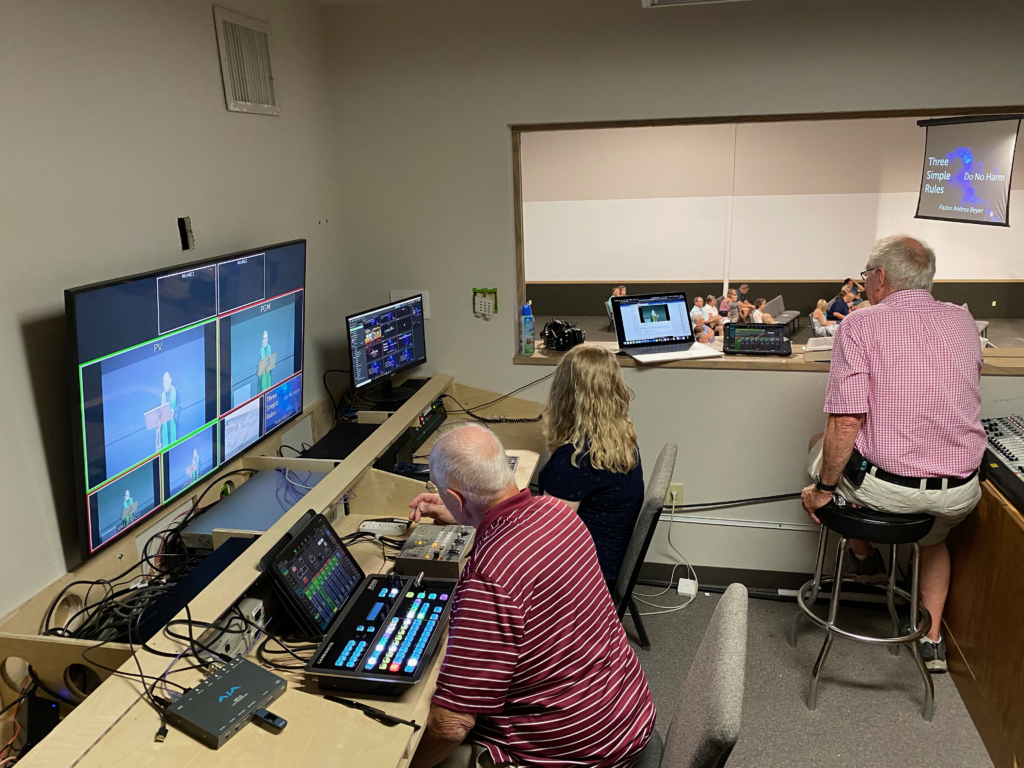
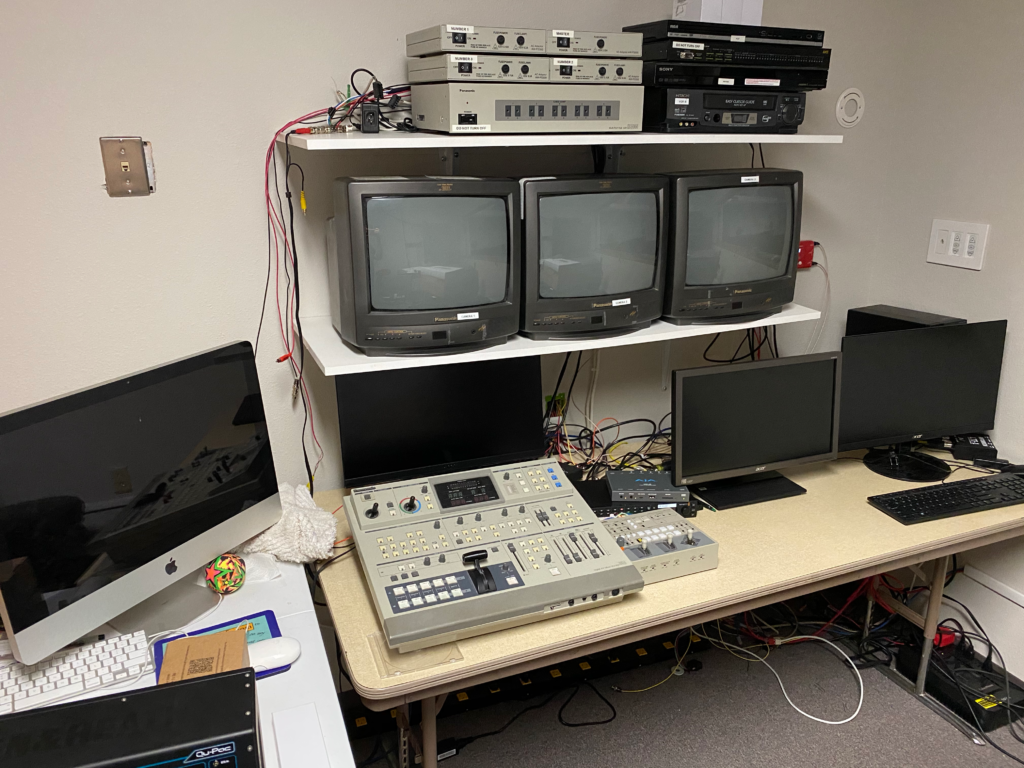
Tech Booth with 1980s vintage video equipment

If you’re young, you may not recognize some of this. That switcher is a Panasonic AG-MX50, coupled with a 3-camera PTZ system of the same era. The AG-MX50 was introduced sometime around 1990, and quickly gained popularity not just for live production, but for anyone doing tape to tape edits – I first used this same system when working in the A/V department in college, and it was a pretty slick piece of kit then. Our FLC was built in 2002, and eventually inherited this video system from the sanctuary when it was upgraded several years back. To say that this system is past its prime would be a gross understatement.

The projectors in the room were also getting on in years, and in dire need of replacement. So we looked at what we needed to bring the video in our most attended venue into the 21st Century, and continuing a video ministry that has been in operation since the mid-1970s.

Background: We are a United Methodist church in a county seat town in central Kansas – about 250 a week in worship between two venues – while that’s big by United Methodist standards, we’re not one of these big high-tech churches – we do a lot with a little. (Long-time readers of the blog will remember that I worked at one of those big high-tech churches about a decade ago… It’s remarkable how much of those ideas can be scaled down to a “normal” sized church. The overall project budget for this video upgrade was under $40,000, and we included in that about 20-25% wiggle room for random cables, connectivity, and, apparently, building furniture. That little stuff adds up after a while.

The first piece was to add a couple of 75″ TVs (Samsung 7 series) in the front of the room on either side of the stage. This allowed people sitting in front to see what was on the screens, which were roughly even with the first row of seating. Our existing projectors were running 4:3 off a VGA signal that was being split and amplified and sent over some heavy duty cables to the projectors. The TVs didn’t support any kind of analog input, so I ran some Belden 9116 RG6 cable and put a Decimator MD-HX on the computer end, and a couple of BlackMagic HDMI converters at the TVs, and a WiiStar VGA converter on the projectors, as well as an SDI to analog converter for the switcher running the stream. Later, when we added the new projectors (Panasonic PT-VMZ60), I put a Decimator MD-LX to get the signal to HDMI. the Projectors and TVs were daisy-chained on the SDI link.

The next piece of the puzzle was to upgrade our switcher – We started with a BlackMagic ATEM TV Studio, and added a couple of WiiStar analog to SDI converters, but the ATEM TVS is rather finicky about input formats, which only one of the converters managed to output correctly. So we ran the SDI from the Decimator into the TVS, and then used an analog to SDI converter to get the output of the analog switcher into the TVS as well, and switched using both. This is also when we added an Aja Helo encoder to the mix, as my Teradek VidiU (a demo from the vendor) had decided to call it quits.

After several months of this, the funds were finally available to purchase the Ross Carbonite Solo switcher we had decided upon (cheaper than the ATEM 1ME unit, with more features, but most importantly, it had 6 build in scan converters, meaning I wouldn’t have to get a small platoon of Decimator MD-HX units just to make the ATEM happy. We opted for the 9-input unit rather than the 13, as this was plenty for our needs. We also purchased the AW-RP150 camera controller so we’d be ready when the funds came in for the new cameras – We had to replace a lot of infrastructure in order to be ready for the cameras.

Naturally, this meant we were going to have to make a major update to our workspace – as you can see above, it was kind of cluttered and not very functional. So I set about making a custom desk that would accommodate all the gear, keeping cable messes out of sight, and making the overall system much more user-friendly.

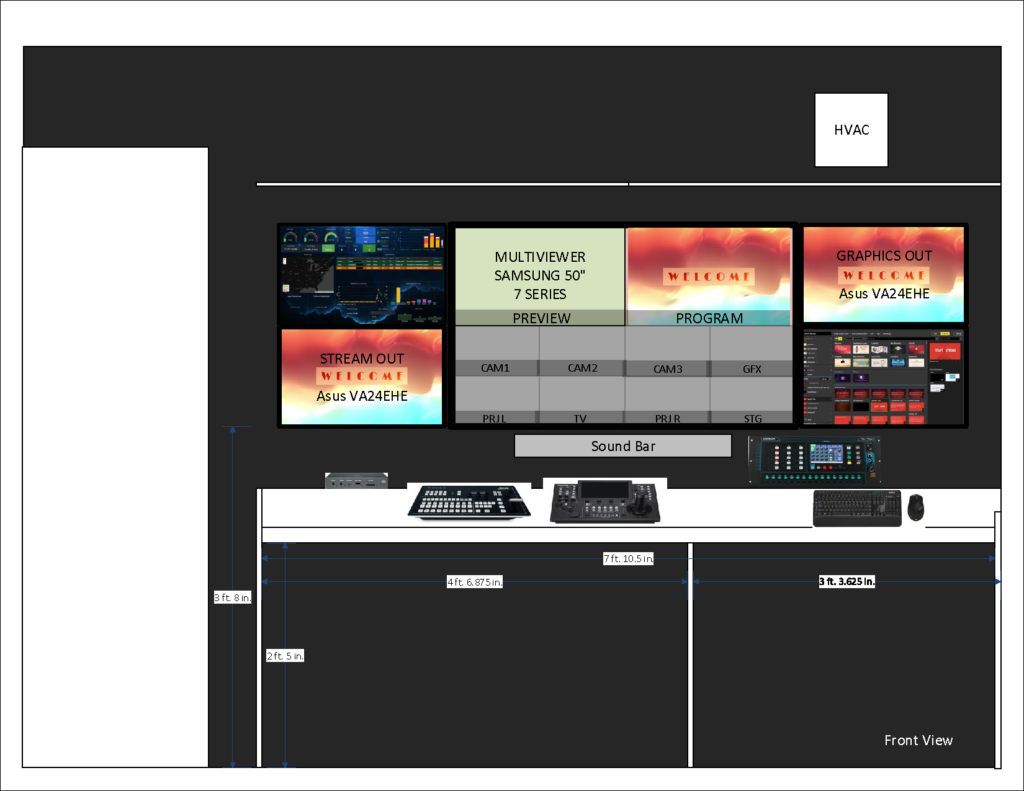
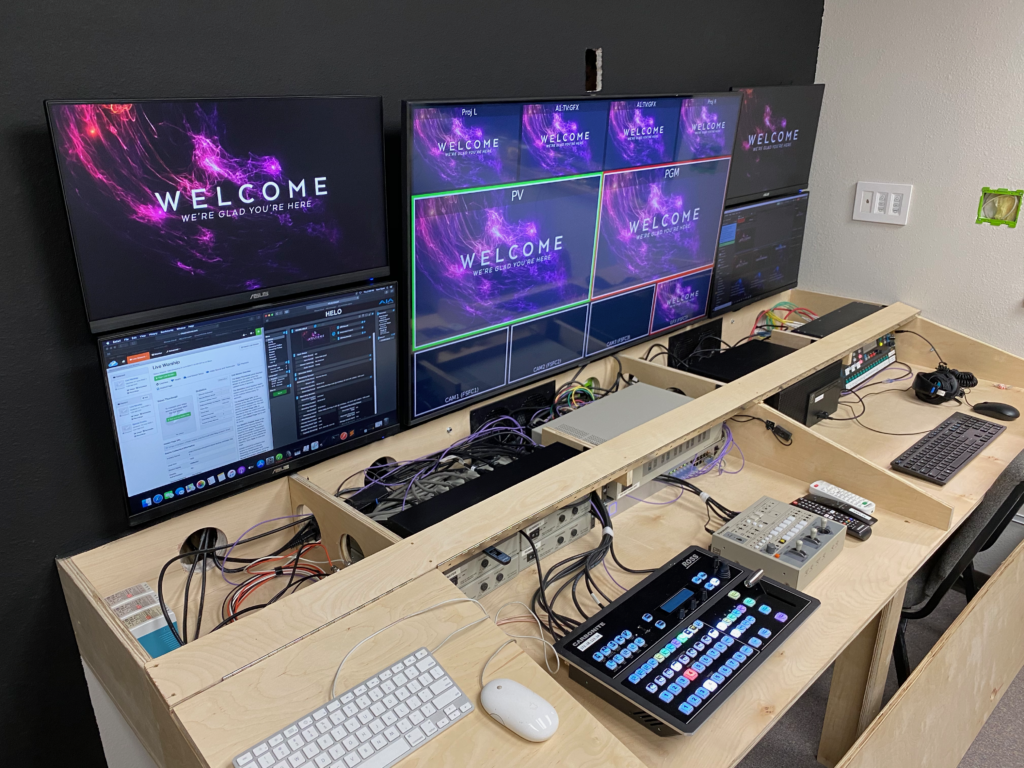
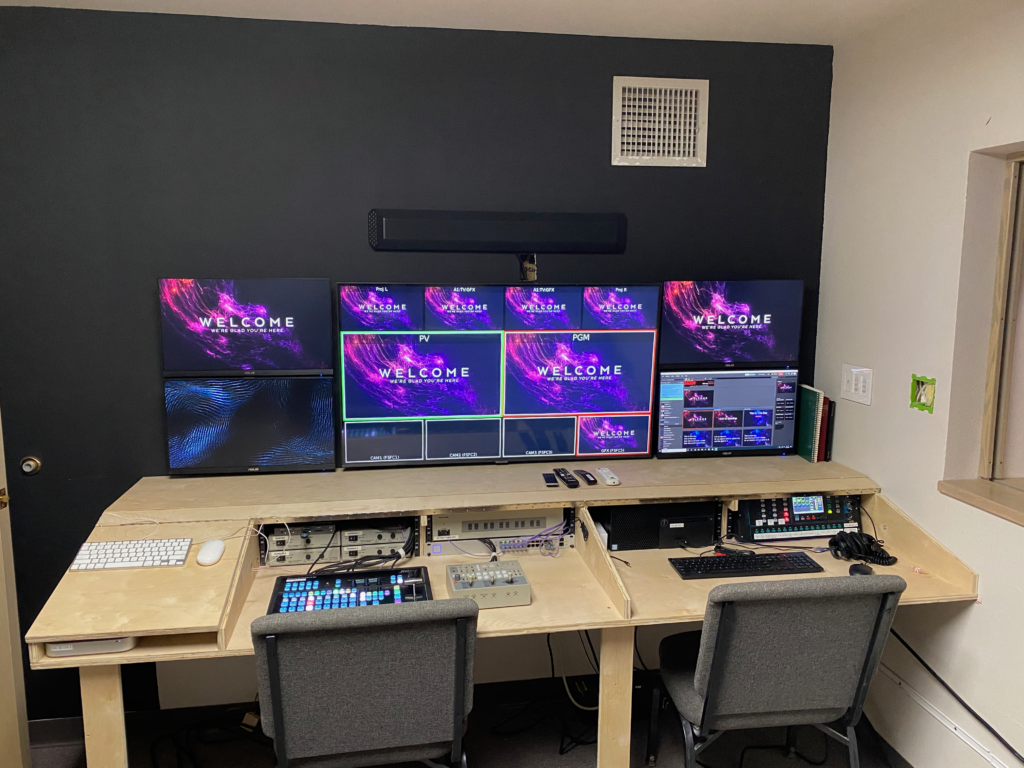
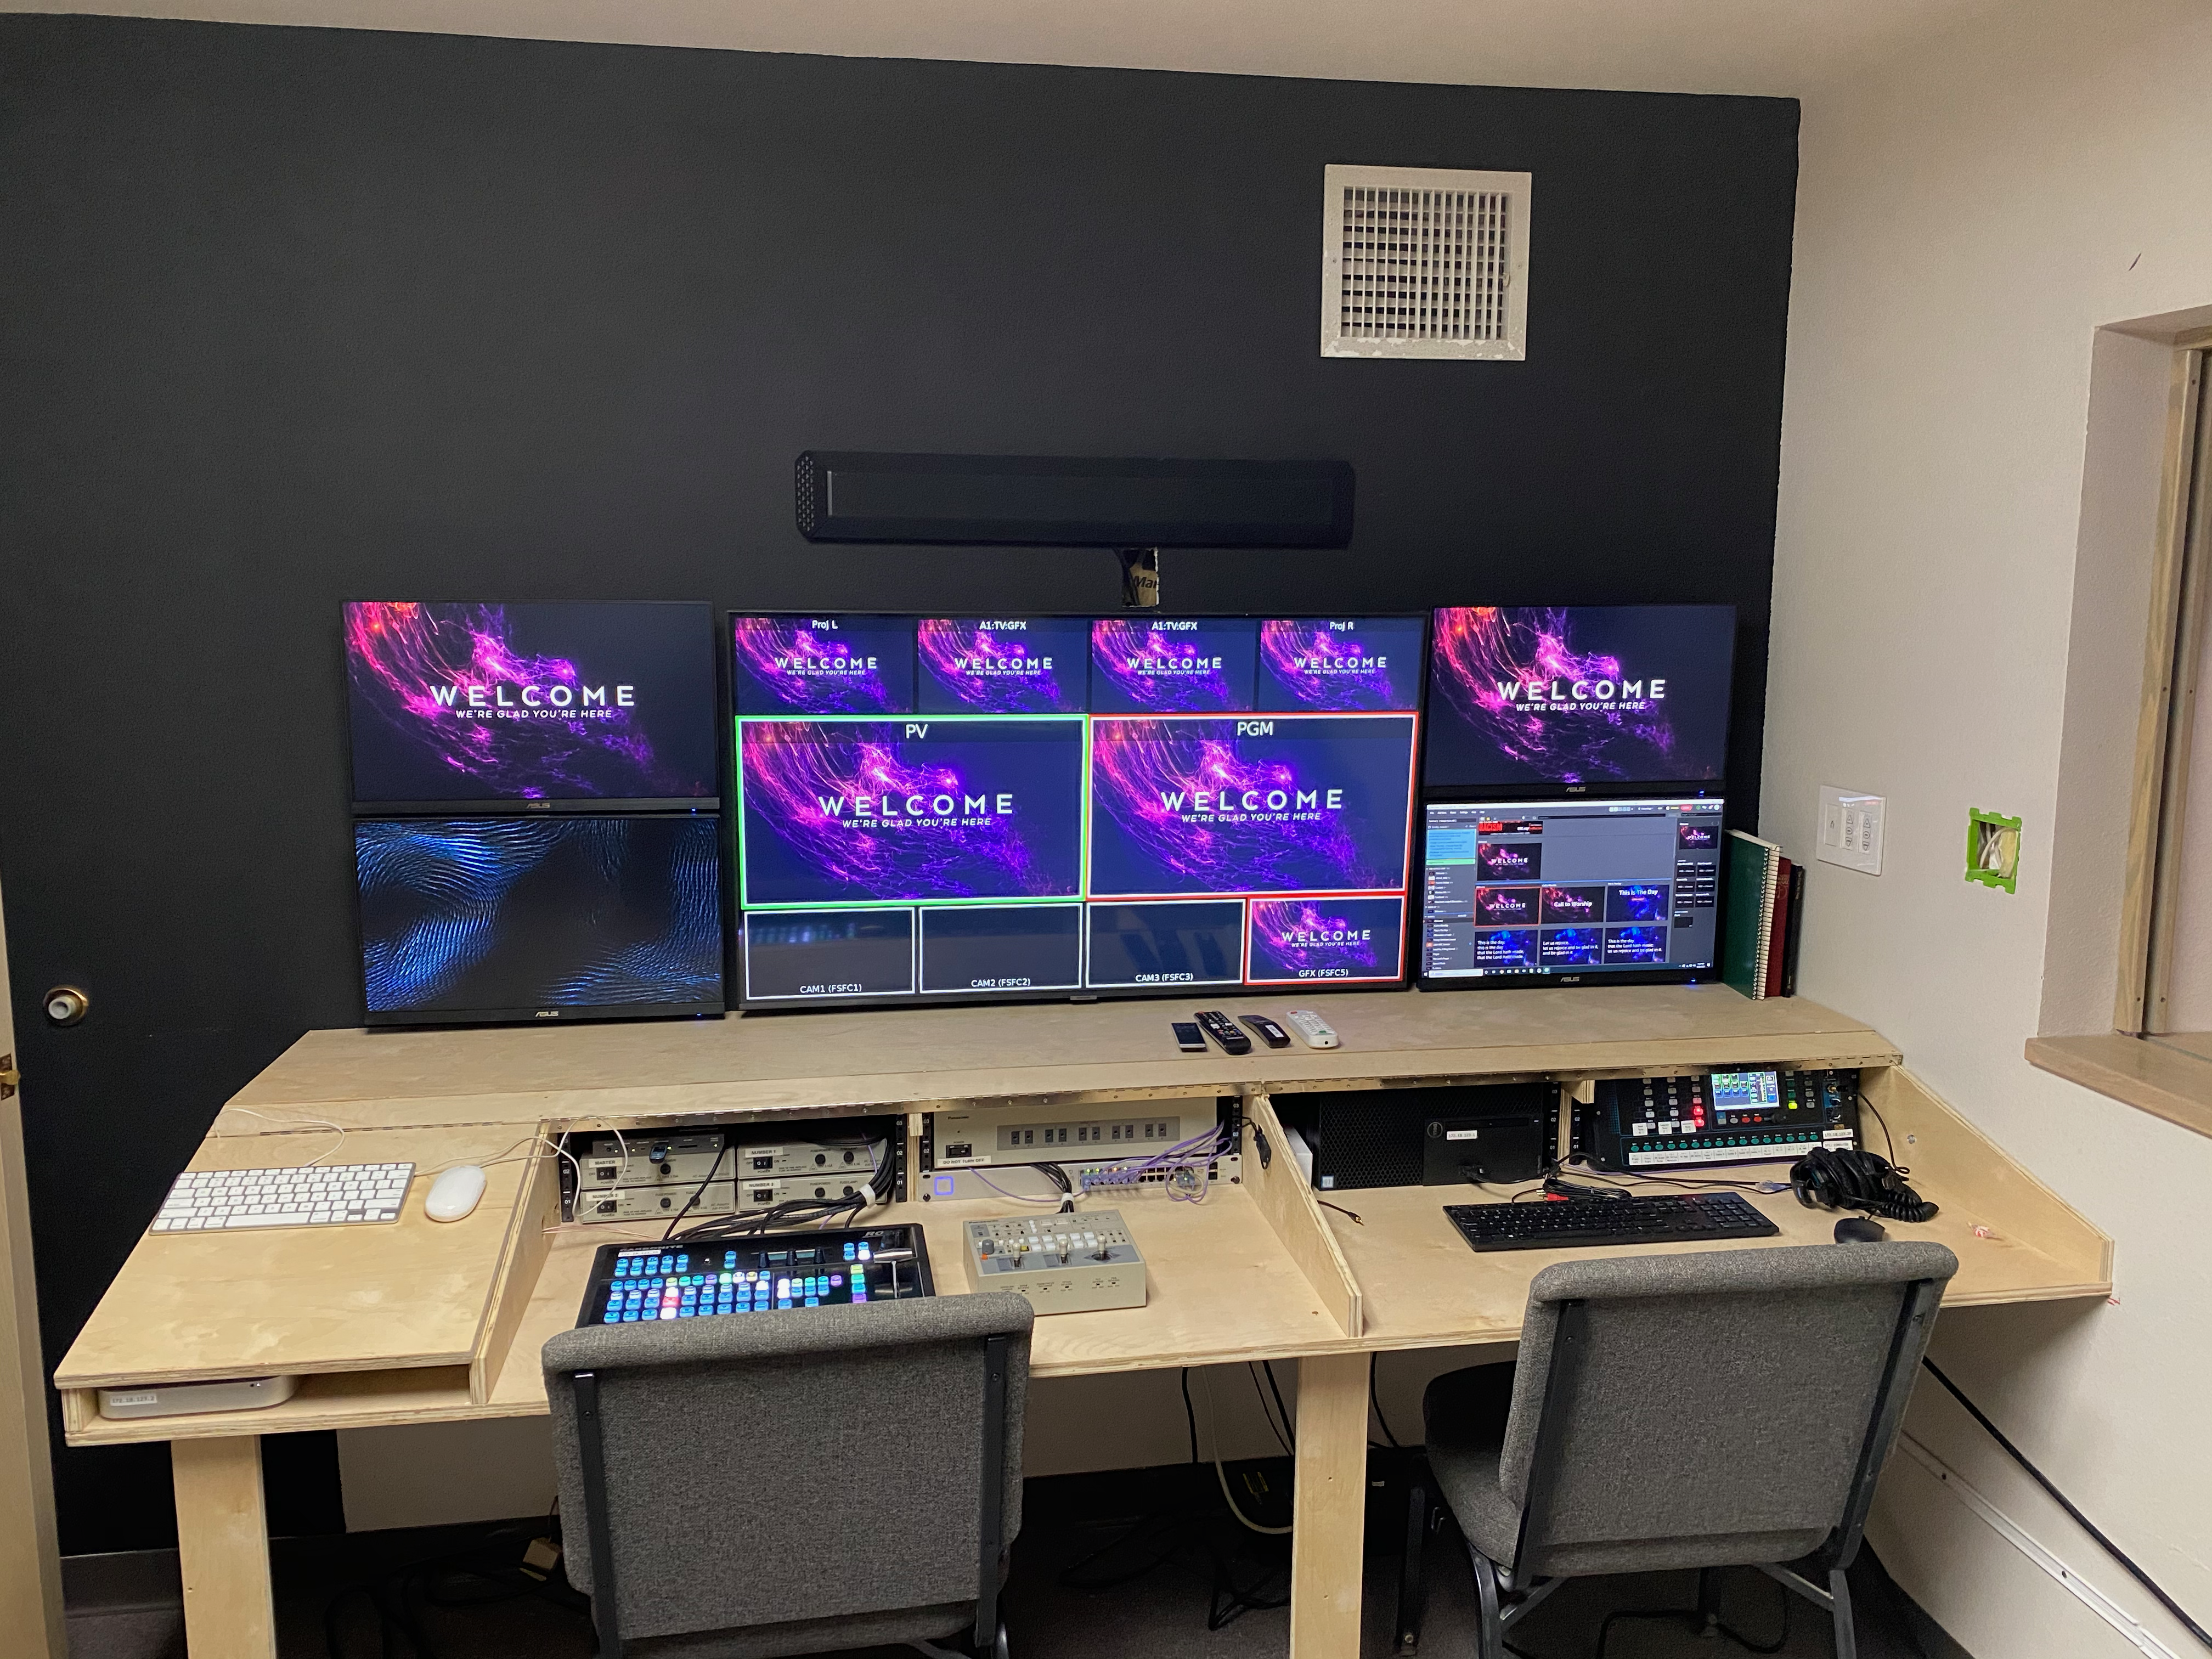
I then considered the overall layout and found that a 50″ TV as a central multiviewer with two 24″ monitors stacked on either side would give us an array of displays that would give us a good overview of the production. I had initially planned on mounting it about 8″ above the surface of the desk, but that ended up being a lot less ergonomic than we had figured, so I ended up moving them down almost flush with the flat surface of the desk, meaning I had to mount the sound bar above (suboptimal, but functional).

A rough early layout.

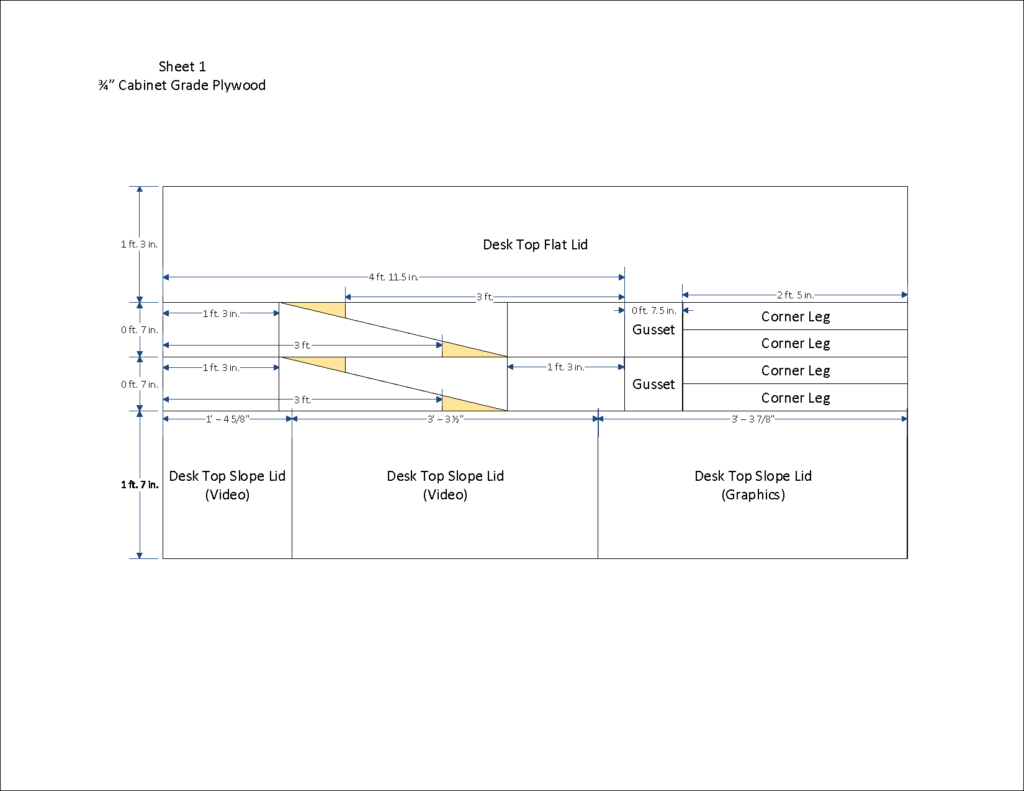
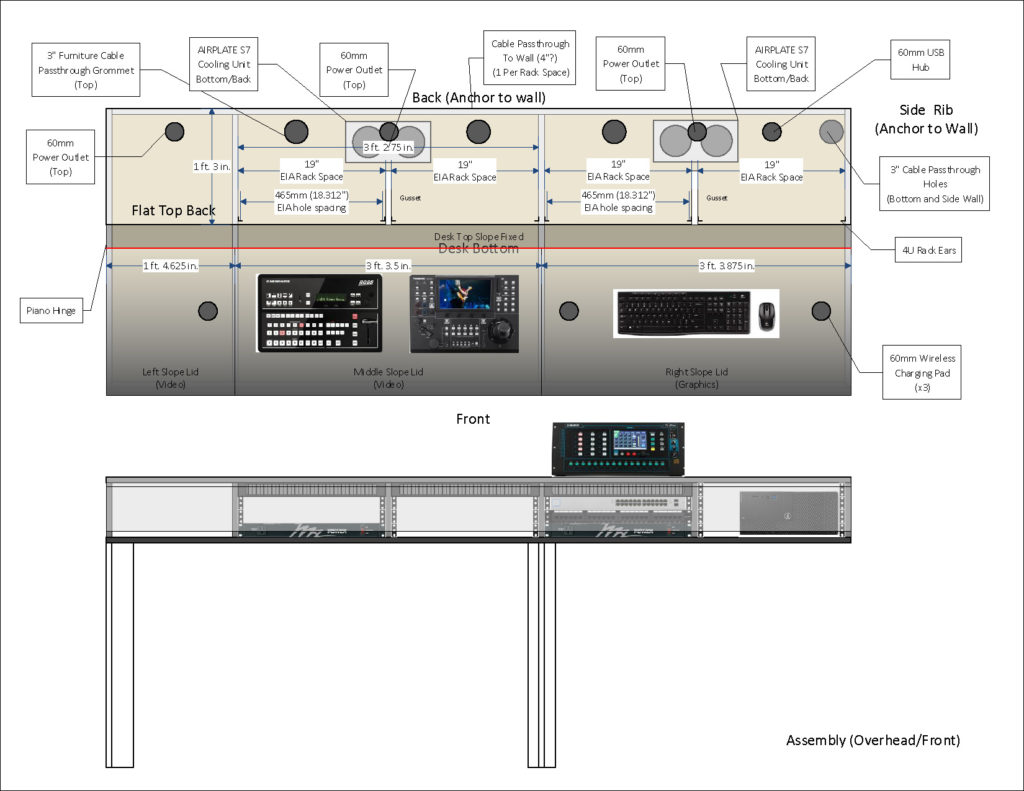
I had about 8 feet of space to work with, and could go about 3 feet deep. After tinkering around in Visio, I was able to come up with a design that could be cut from two sheets of cabinet grade plywood, provide a sloped front, in which the switcher and camera controller could be flush mounted, while also providing four bays with 4U of rack space each, where I could mount things like power strips, network switch, a patch panel, and various other bits.

Cut sheet for the first sheet

Note: the vertical dotted lines on the ribs are NOT CUTS! the lumber yard missed that memo, and I had to work around that.

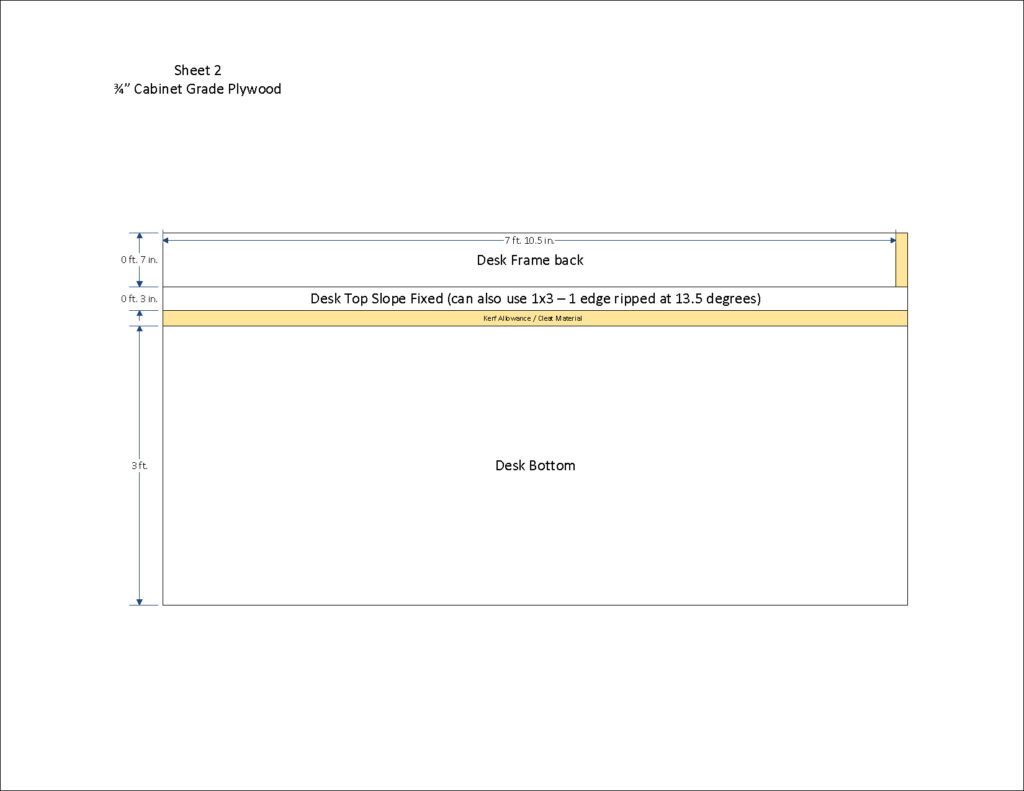
Cuts for the second sheet of plywood

An artifact of this being a two-sheet design means that there’s bar at the top of the sloped face that is fixed in place – That does somewhat impede the access to the top rack space (more on that in a second) – you could use a third sheet and make the movable panels go the whole height.

This is also where I discovered that the “imported birch faced cabinet plywood” that my local lumber yard sells is basically 3/4″ worth of layers of cheap luaun with a birch veneer and a whole lot of glue. I would not recommend this material or use it again. It’s a pain in the ass to saw and sand, and it splinters like crazy. It got the job done, but it’s got some challenges (running a hole saw on this stuff sucks). Well worth spending an extra few bucks on actual hardwood cabinet plywood.

Once I got the big cuts done by the lumber yard, I had another member of the tech team handle the angle cuts with his table saw (where he also noticed that the wood quality was poor), since I lacked that particular bit of equipment.

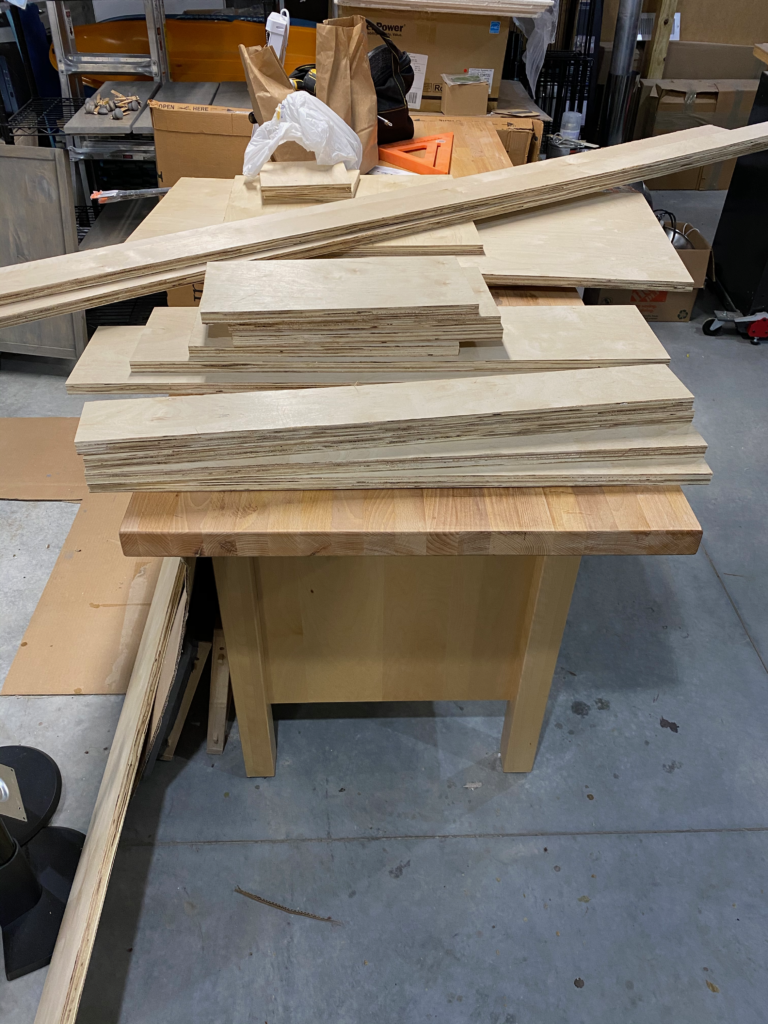
Pile of boards ready for assembly
Ready to start putting together…

Getting down into the details of the assembly required some planning ahead. I had initially planned for 6″ space inside, until I realized that our current presentation computer is 6.2″ high. Then I remembered that 4U of rack space is 7″, so I altered the design (before cutting!) to create four bays of 4U each, and ordered four sets of rack mounting rails to go in the space.

Working design for the assembly – there are three bays: two with a pair of 19″ rack bays, and one on the end that is a few inches short – Things like power supplies and a Mac Mini live in here. Because of the updated monitor placement, the Qu-PAC ended up inside.

You’ll notice here that I have a bunch of passthru holes and outlet packs on the back deck – those have mostly gone away owing to the TVs and screens taking up the back 5″ or so of the deck. I may still add a few on the back deck between the rack bays. Once I get the hinged lids going, they will contain a wireless charging pad for mobile devices.

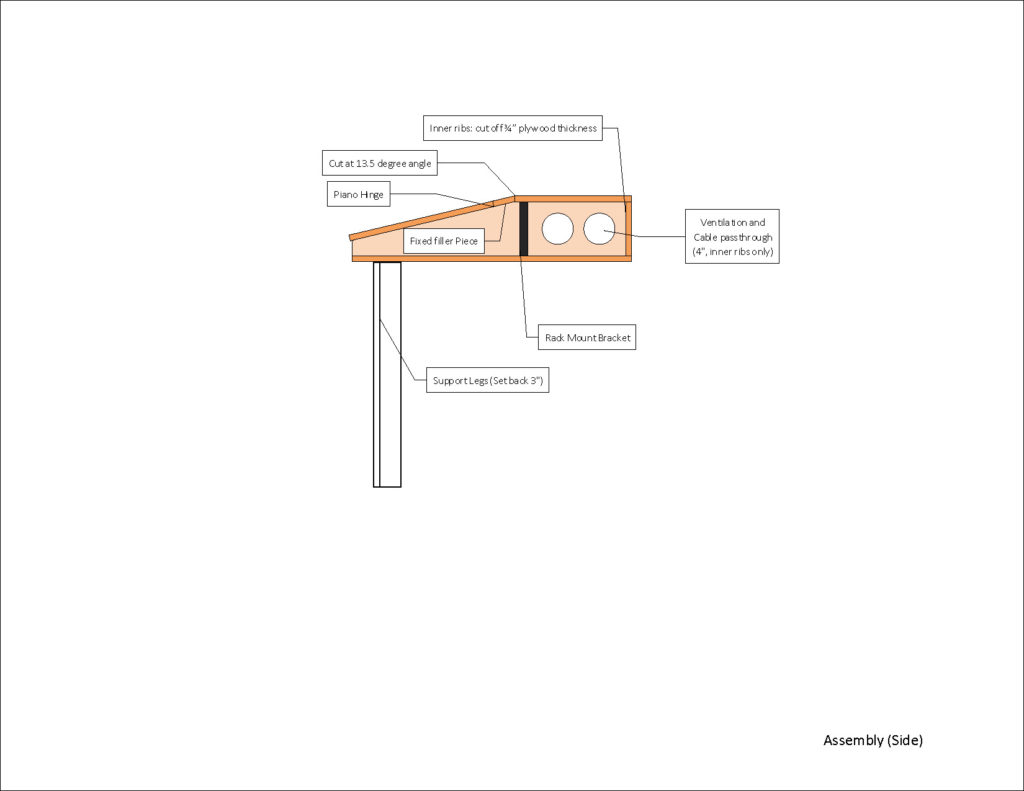
The side view – Holes between the ribs allow for airflow and cable passthrough.
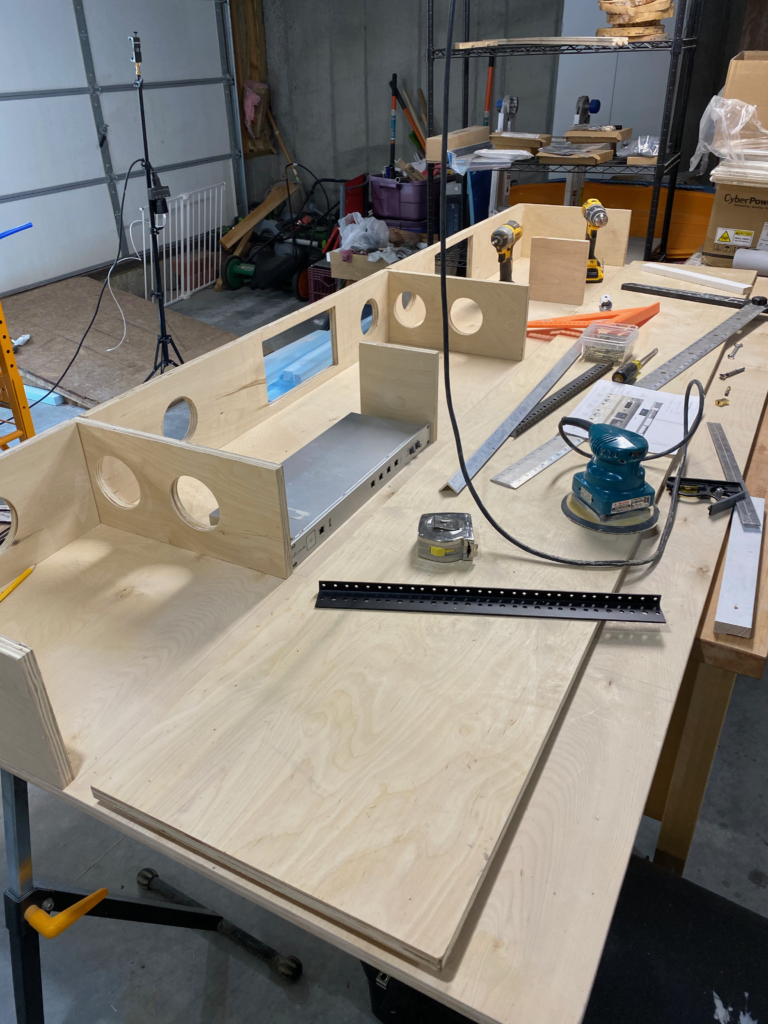
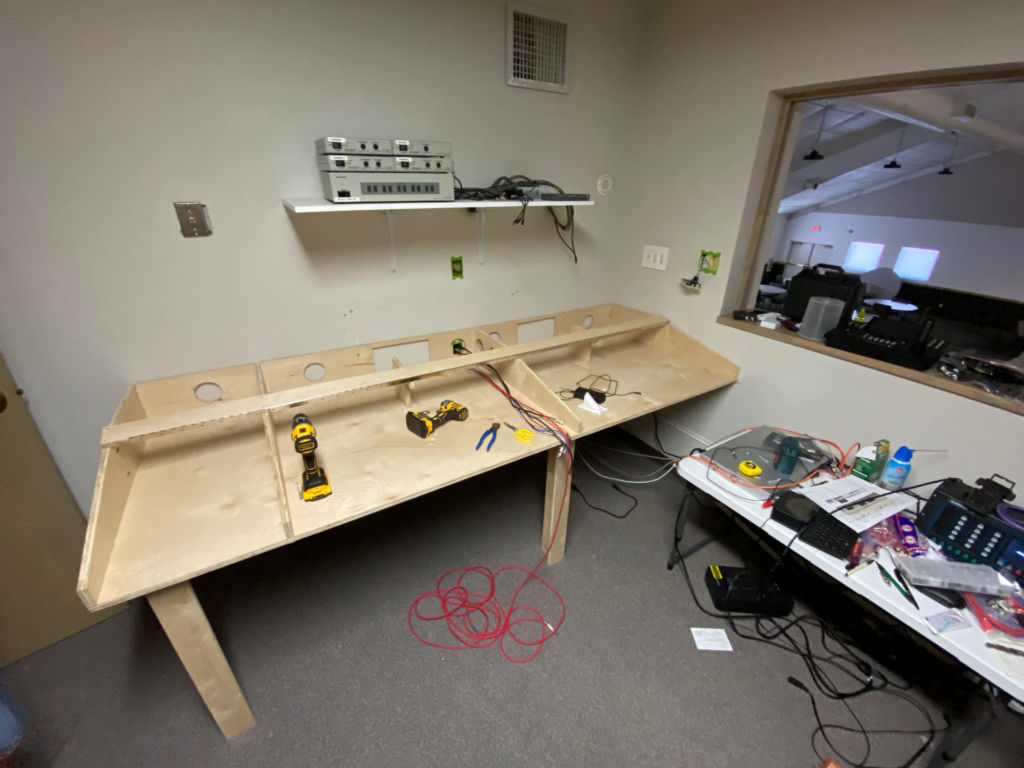
Assembling the unit – using a piece of rack equipment to get the spacing right. Holes in the back are for cable and ventilation. They were carefully placed so as not to encounter a stud when installed.
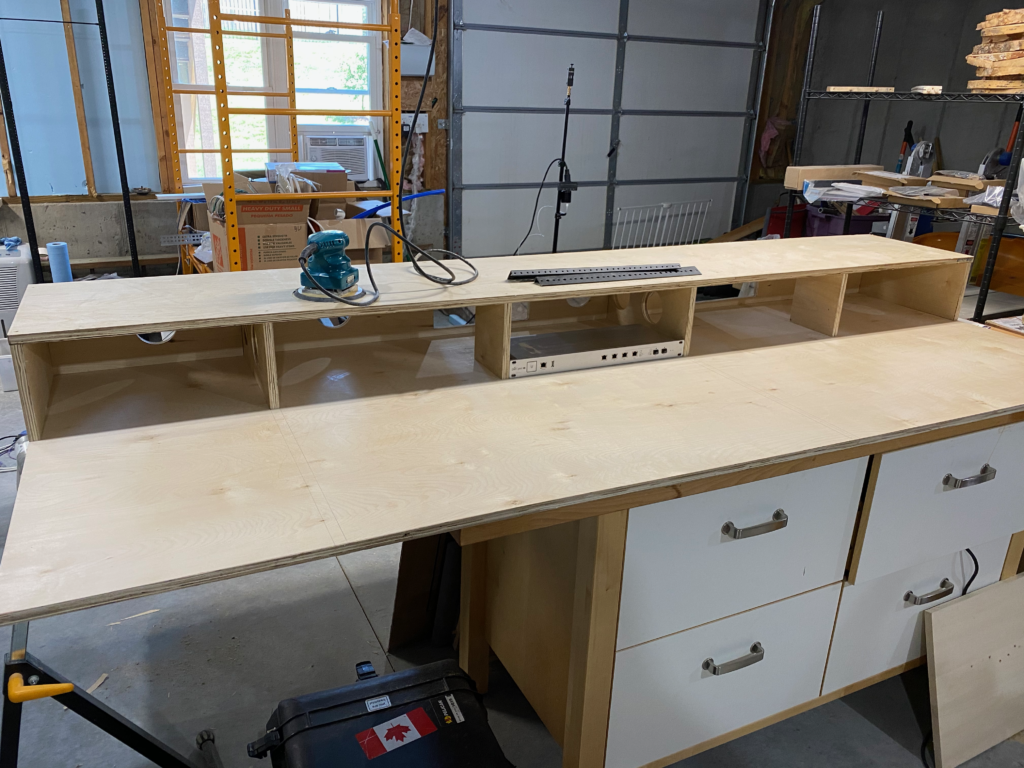
Making some headway.

When it came time to haul it over to the church, I removed the top panels just to make it easier to maneuver and carry into the booth.

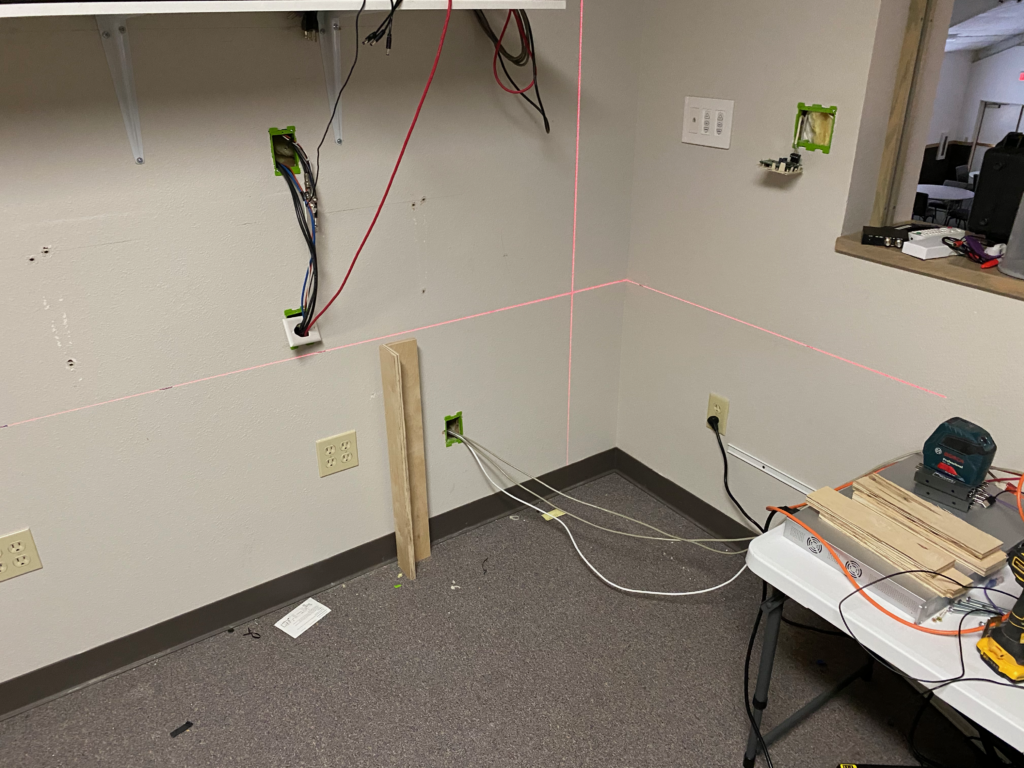
Installation time: A couple of scraps from cutting the ventilation holes were squared off on the radial arm saw and I used them as cleats to support the desk (using a laser to align it with the top of the legs)

We got it within about 1/64″ of level… I’ll take it.
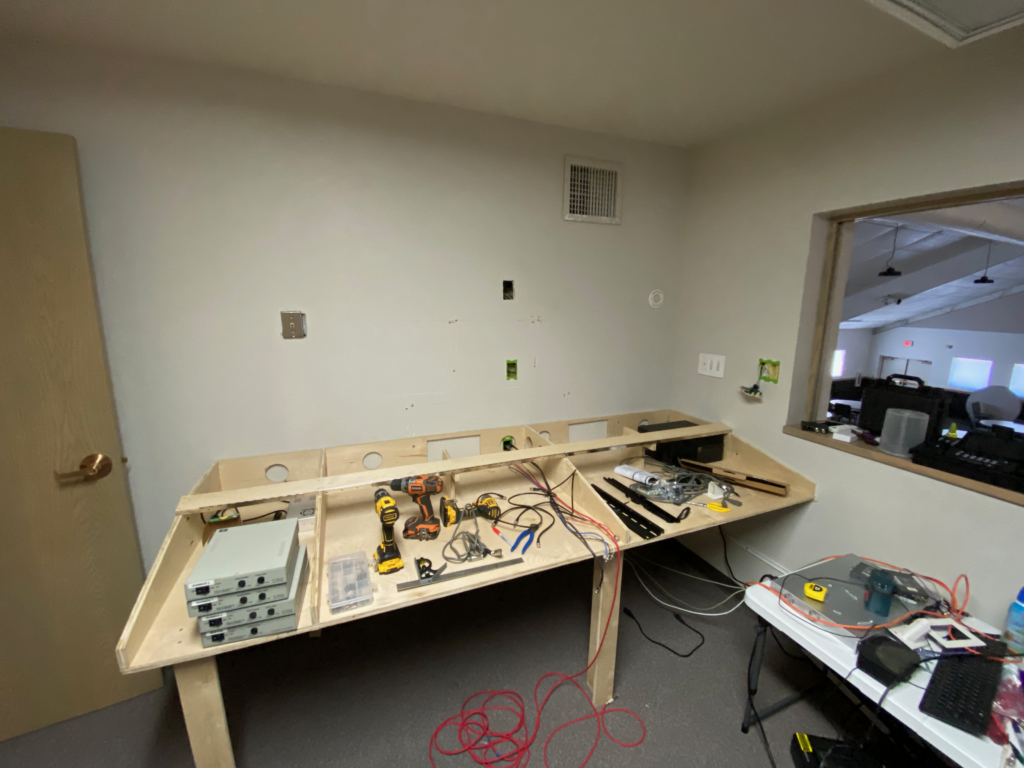
Got it at least somewhat functional for Sunday… We thought we had a few weeks to do this before we re-opened in-person worship, but then our council accelerated the timeline.

I left the front lip open to provide for airflow.

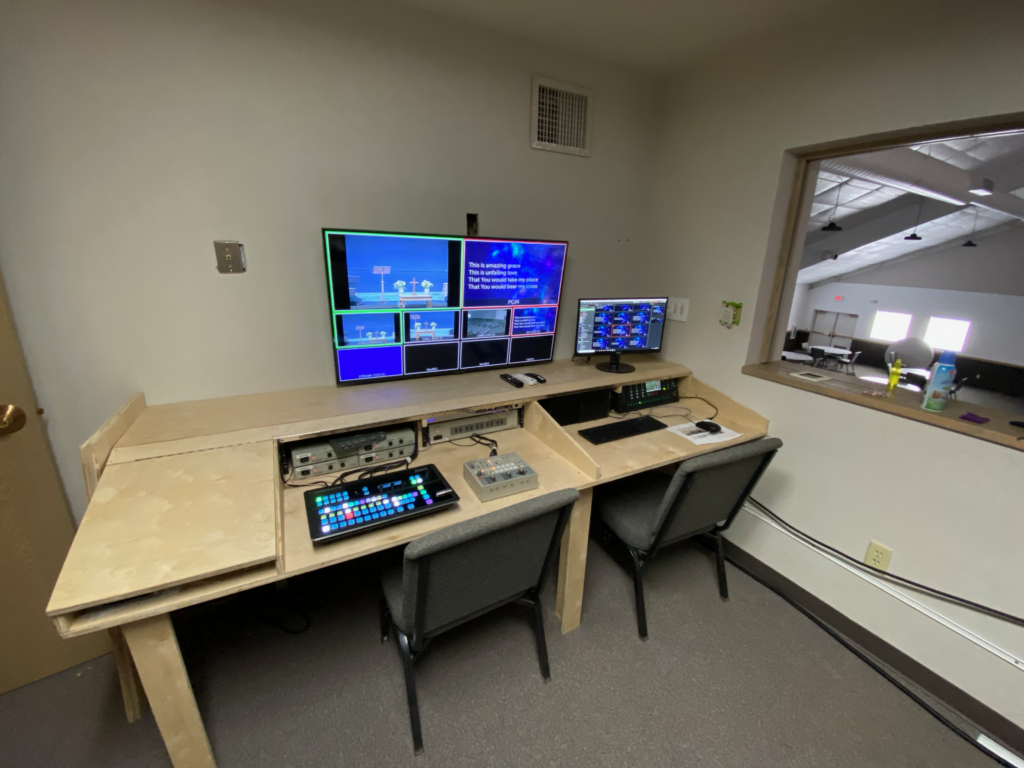
First sunday with the new desk. Lid is off as we figure out best arrangement and connections of the equipment. Once we get that all figured out, we’ll clean it up real nice.

I was able to find a set of matching Asus monitors that were inexpensive and used a VESA mount, and while those were on their way, I painted the wall behind them in flat stage black (makes the displays blend in better, and the wall was in dire need of a coat of paint anyway, so I used some of the paint left over from painting the stage)

Aligning the monitors required a lot of careful planning and the laser level. Here you can see the cable passthroughs and the fan packs.
Final layout without the lids – Still not 100% sure they’ll ever make it on… We shall see. Sound bar had to go up high (suboptimal) to keep the displays lower. It works OK for what we need it to though.

Materials List:

  • 2 or 3 sheets of 3/4″ cabinet grade hardwood plywood
  • 2″ finish screws (recommend Torx or Robertson head)
  • 4 sets of 4U rack brackets
  • 2 36″ piano hinges
  • 1 24″ piano hinge (you’ll need to cut this one to length)
  • Any trim or edge veneer you wish – We’re putting a lip on the bottom edge of the lid.
  • 2 AC Infinity AirPlate fan packs – Based on the way I built our desk, I had to flip the fans around to change the flow direction. You can either vent below the cabinet into the existing space, or vent to the rear (in our facility, the wall leads to a big empty ceiling space above the kitchen. These have a manual speed control, but a thermostat control version is also available.

Optional Components:

Tools:

  • Hole saws for the large holes
  • Forstner bits for smaller holes
  • Drill (and small bits for pilot holes)
  • Kreg Jig for pocket screws
  • Belt Sander with coarse belt (for evening things out)
  • Laser level (for installation)
  • Orbital sander with 120/180/220 grit pads (for smoothing things out)
  • Power driver (impact or drill – cordless helps a LOT here)
  • T square/Try square
  • Clamps
  • Table Saw
  • Radial Arm or sliding miter saw
  • Jig saw or reciprocating saw

Tech Equipment:

And that’s the story so far… I’ll update the post as changes warrant.

How It Works: HTTP Live Streaming

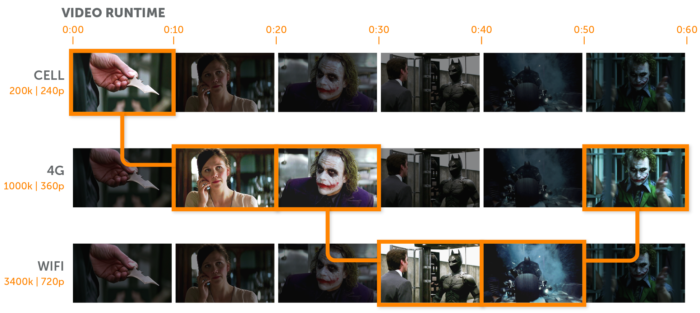
For those of us that work on wireless systems with a strong guest access component, the fine folks at Wowza Media Systems posted earlier this month about the inner workings of HTTP Live Streaming (Apple’s proprietary streaming protocol, or HLS) which accounts for about 45% of all streaming traffic – which tracks pretty closely to Apple’s market share of mobile devices.

Prior to getting hot and heavy with wireless networks, I did a lot of streaming infrastructure implementation for Wowza’s customers (as many of this blog’s readers are well aware – just go look into the archives!) HLS, which was released with the iPhone 3Gs, is designed from the ground up to handle the highly variable bandwidth and delay conditions inherent to mobile connections on Wi-Fi and cellular, while delivering a good streaming experience to the end user. It also allows streaming providers to leverage existing HTTP-based content delivery infrastructure.

Older streaming protocols like RTMP and RTSP are particularly unfriendly to wireless networks as they require a constant data stream at the stream bandwidth. For a video stream, much like a VOIP call, this requires consistent and timely medium access, which is definitely not a sure thing on Wi-Fi the way it is on Ethernet. The tradeoff is that the delay from live on HLS (a minute or two) is much higher than it is on RTSP (a few frames/milliseconds) or RTMP (a few seconds).

When working down at Layer 2, it’s usually helpful to understand what’s going on up the stack, especially with regards to what kind of unholy things are being done inside HTTP (which we may or may not have visibility into because of encrypted packet and segment payloads). In terms of the ISO model, HLS is probably best described as Layer 5 (the HTTP segmentation) and Layer 6 (the video data).

My good friend Jim Palmer (Not the baseball player) spoke at the Wireless LAN Pros Conference last year about the effects of user bandwidth throttling in a guest wireless environment with heavy streaming usage (predominantly Netflix). Understanding how HLS works in this context is key to understanding why the network behaves the way it does when you do that throttling. His talk is well worth ten minutes of your time. He’s also had some informative appearances on the Clear To Send Podcast (Episode #136, on antennas and filters), the Wireless LAN Pros podcast (Episode 116 on Captive Portals), and WiFi Ninjas Podcast (Episodes 19 and 20 on Airport Wireless Design).

So, here’s the link to Wowza’s post on the subject. I hope they post one about MPEG-DASH soon (from an HTTP standpoint, DASH works in a similar fashion).

https://www.wowza.com/blog/hls-streaming-protocol

Streaming to multiple simultaneous destinations

Live streaming has been a “thing” for some time. I work with many churches to help them solve their streaming challenges and develop their technology strategy for streaming. One of the most frequent questions I hear is, “can I stream to Facebook Live and still keep my other stream?” Fortunately, this is a lot easier than it used to be. There are variations on this question, but they all boil down to wanting to know how to send one stream to multiple outlets to expand audience reach.

Method 1:

Multiple outputs from your encoder

Several software encoder platforms support multiple outputs. The easiest among these is probably Telestream’s Wirecast software. (The free/open-source Open Broadcast Studio does this as well, but I don’t have much experience with it, and I prefer the Wirecast interface, which is much more polished.) With Wirecast, it’s merely a matter of adding the additional outputs to the various streaming services that are supported. The downside to this approach is that you’ll need more bandwidth, as you are sending the same stream multiple times.

Screenshot 2017-04-16 09.56.42

Method 2:

The Cloud

1. Teradek Core

This is a vendor-specific approach that integrates with Teradek‘s pro-grade encoders (Cube, Bond, Slice, and T-Rax). It provides a single pane of glass that lets you manage your entire fleet of encoder devices (and control/configure them remotely), and then virtually patch the output of those encoders to one or more outputs. You can also use their Live::Air apps for iOS as an input (stay tuned for a post about using Live::Air). If you are using a Bond product, the input is via their Sputnik server, which allows you to spread the stream across multiple connections for extra bandwidth and redundancy, and then it’s reassembled before sending it on to the next step.

In this example, I’m taking an input stream from the Live::Air Solo app on my iPhone, and sending it to Wowza Streaming Cloud, and Facebook Live, all while recording the incoming stream:

Screenshot 2017-04-16 07.10.22

This is a simple drag and drop operation: Drag a source on the left into the workspace, and then drag one or more destinations from the left – this can be:

Teradek decoders (this is great for a multisite church scenario)

Channels (which are external stream destinations):

Screenshot 2017-04-16 09.49.05

Groups (a combination of the above):

Screenshot 2017-04-16 09.50.31

If you click the “Auto” box on the outputs, it will start that output automatically when the stream is available from the input.

When you create stream destinations for social sites, it will authenticate you against that site and keep that authentication.

You can manage a lot of inputs and outputs this way. This example from Teradek’s marketing department shows the scale:

core-management-platform-user-interface_e811873e-7cfb-4514-a465-1467d487d8d7


2. Wowza Streaming Engine/Streaming Cloud

Similar to Core, but not tied to a specific vendor, Wowza Streaming Engine provides Stream Targets as of version 4.4 (although the functionality has been in the software since sometime in version 2, as the PushPublish module, Stream Targets integrates it into the UI). Facebook Live support has been an option since almost the very beginning of Facebook Live. YouTube Live support is there, but as a standard RTMP destination.

Similarly, Wowza Streaming Cloud also offers this capability under the “Advanced Menu”:

Screenshot 2017-04-16 10.07.49

From there, you can create a stream target:

Screenshot 2017-04-16 10.08.02


Once that target is created, simply go into a transcoder output and add it (you can also create a target directly from there):

Screenshot 2017-04-16 10.12.26


As with Core, you can add multiple destinations to a transcoder output – Generally speaking you’ll want to send your best output to places like FB Live, YouTube, etc, as they do their own internal transcoding.

Screenshot 2017-04-16 10.13.31


Method 3:

Multiple Encoders

This is the obvious one, but also the least efficient both in terms of hardware and bandwidth. Each encoder goes to its own destination. This generally requires signal distribution amplifiers and other extra hardware.


Using Bitmovin Player with Church Online Platform

Today’s post will be a brief tutorial on using Bitmovin‘s excellent HTML5 video player with Church Online Platform.

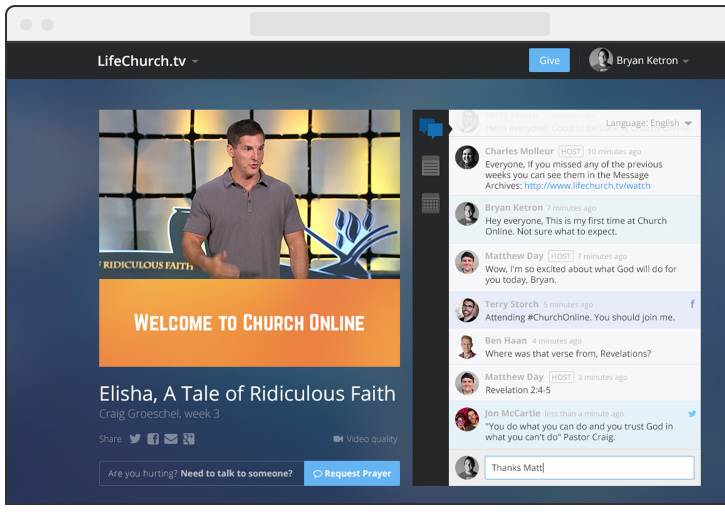
If you’re a church that is wanting to go live, and you haven’t discovered COP, it’s a marvelous product. The fine folks on the life.church Digerati Team (who created the Bible App and made it available on just about every platform known to mankind). It’s a free hosted platform that lets you deliver church online. All you have to do is bring your own streaming provider and provide an embed code. You can use your provider’s player, or you can use your own player. The Digerati team are also a client of mine, and I really enjoy working with them – they’re talented, nerdy, and very good at what they do. (most recently, I helped them build out their Wowza Streaming Engine capability for automating the scheduling and delivery of simulated live events.)

One of my favorite video players out there right now is from Bitmovin, and they provide a CDN-hosted player that provides excellent analytics (complete with API access for the especially nerdy), and usage is free for the first 5000 impressions (and pricing is quite reasonable as you scale up from there). For this reason alone, it’s an excellent choice for churches getting started with streaming. Its other major benefit is that because it is written in HTML5 and Javascript, it will work on just about anything you can throw at it (for the really archaic devices, it still has a Flash component). It also is designed from the ground up to support the new MPEG-DASH standard, but if you’re using a streaming CDN or service that doesn’t provide DASH, no big deal, as the player also supports HLS, even for Flash delivery for those 3 devices that still haven’t discovered modern streaming technology or are running a particularly ancient version of Android. Added bonus, BitMovin’s player also supports VR and 360 streaming (as does Wowza Streaming Cloud).

For starters, you’ll need to sign up for an account, which will give you player information. One thing you’ll want to make sure you do is add your churchonline.org domain to the allowed domains for your license key. This is under Player/Overview:

Bitmovin Player Domain Config

If you forget to do this, the player will simply show an error telling you you need to do it.  This keeps someone from using your player key on their site, so be sure to use yourdomain.churchonline.org, not just churchonline.org.

To put this in your COP page, go to the event where you wish to use the player, and go to the Video tab:

ChurchOnline Event Settings

When you go to the Embed menu, you will see code to put it on the page (under Default video embed code). This is a little more involved than your standard embed code.

Bitmovin Embed Controls

A couple of key things to note here with regards to COP:

  1. In order to put the <script> stuff in your <head> section, you’d need to create a custom theme in COP. This is not necessary (in fact, putting that script statement in the head that way doesn’t work). What you’ll need to do is simply put the <script> piece just above the rest of it in the default embed code section.
  2. You’ll need to edit the source section in that code. If all you’re doing is HLS, you can remove the dash and progressive entries. Leave the HLS entry in place and put in the HLS URL provided by your streaming platform. In the case of Wowza Streaming Cloud, this is located at the bottom of the Overview tab of your streaming application under “Playback URLs”.
  3. The “poster” entry is the image the player shows when you’re not streaming any video.

So, for my test stream, the embed code looks like this:


<script type="text/javascript" src="https://bitmovin-a.akamaihd.net/bitmovin-player/stable/7/bitmovinplayer.js"></script>

<div id="player"></div>
<script type="text/javascript">
var conf = {
key: "d8XXXXXX-XXXX-XXXX-XXXX-XXXXXXXXXX2e",
source: {
hls: "http://wowzaprod103-i.akamaihd.net/hls/live/######/########/playlist.m3u8",
poster: "http://dontfenceme.in/wp-content/uploads/2013/09/g-global-background.jpg"
}
};
var player = bitmovin.player("player");
player.setup(conf).then(function(value) {
// Success
console.log("Successfully created bitmovin player instance");
}, function(reason) {
// Error!
console.log("Error while creating bitmovin player instance");
});
</script>

The console.log lines aren’t necessary, but potentially useful when trying to debug why it can’t instantiate the player.

If you want to run a separate video when the doors aren’t open, put that under the offline video embed code section. You can leave the mobile and low sections empty, as your stream is probably already adaptive from your streaming provider.

Save it, and this is what you get:

BitMovin in ChurchOnline Platform

In order to remove the Bitmovin logo, edit the theme’s CSS and add the following lines:


/* Remove Bitmovin Logo on player */
.bmpui-ui-watermark {
display: none;
}

ChurchOnline Platform CSS Edit

Automating Video Workflows With PowerShell

Linking today to some great content from another Ian (ProTip: get to know an Ian, we’re full of useful knowledge). Ian Morrish posts about automating a variety of methods of automating A/V equipment using PowerShell. Lots of useful stuff in here.

No Windows? No worries, you can install PowerShell on MacOS and Linux too.

I’ve put some feelers out to some of my streaming equipment vendors to find out what kind of automation hooks and APIs they support.

Meanwhile, Wowza has a REST API for both its Streaming Engine and Cloud products. Integrating this into PowerShell should be relatively straightforward. Any PowerShell wizards wanna take a stab at it?

Stay tuned.


Wowza Stream Scheduler Hacks: Google Calendar

One of Wowza’s most underutilized yet most powerful features is the stream scheduler. I’ve blogged about it extensively in the past, and I’ll return from a long hiatus to do it again.

To recap some of the things you can do with this add-on:

  • Create a virtual stream that plays a loop of server-side content
  • Play a sequence of video content (think TV programming)
  • A combination of both
  • Play portions of a video file (in/out points)
  • In combination with the LoopUntilLive module, do all that and then interrupt with a live stream

This gives you the ability to have a continuous 24/7 stream of programming including advertising. The output of this schedule is then treated by Wowza like any other stream, meaning it can be used as input to a transcoder, nDVR, or sent somewhere with Stream Targets.

The challenge we run into is that building the schedule in XML is not the most obvious thing in the world as there is not currently any integration of the module into the Wowza Streaming Engine Manager’s GUI.

As the schedule is written as a SMIL file (a specific XML schema) in an application’s content directory, It requires either logging in to the server and manipulating files with a text editor, or uploading into the content directory.

The other way is to build the schedule programmatically. Command-line PHP is an easy way to do this as PHP has some excellent PHP processing tools.

If you want to peek at the Java code for the scheduler module, Wowza has it up on GitHub.

A quick recap of the structure of the stream scheduler’s XML Schema:

  • The entire file is wrapped in <SMIL></SMIL> tags to indicate that this is in fact a SMIL file.
  • an empty <HEAD/> block – Wowza doesn’t currently make use of anything in here, but it’s a good place to put comments, and it makes for good XML.
  • The meat of the file, a <BODY></BODY> block that contains all the good stuff.
  • Within the body block, there are two key element types:
    1. One or more <STREAM> blocks that define the names of the virtual streams that are created by the schedule.
    2. One or more <PLAYLIST> blocks that define the content and timing of what gets published. Each playlist tag specifies the following attributes:
      • name : The name of the playlist. This is arbitrary but should be unique within the file
      • playOnStream: specifies which of the streams created in the <STREAM> block this playlist’s content will go to
      • repeat: a boolean (true/false) value that specifies if this playlist loops until something else happens. If it runs out of content, the virtual stream will stop.
      • scheduled: The date and time (based on server timezone) this playlist will be published to the stream. This is in ISO 8601 format without the T delimiter (YYYY-MM-DD HH:MM:SS)
    3. Within the <PLAYLIST> block are one or more <VIDEO> tags with the following attributes:
      • src: The path and filename (relative to the application’s content directory) of the video file to play. This should be prefixed with mp4: as you would any other video file within Wowza. You can also put in the name of a live stream published within the same application.
      • start: The offset (in seconds) from the beginning of the file where playback is to begin.
      • length: Play duration (in seconds) from the start point. A value of -1 will play to the end of the file. A value of -2 indicates that this is a live stream.
      • Once the end of this item is reached, it will move to the next element in the playlist. If there is no more content it will either loop (if repeat is set to true) or stop. If there is nothing further on the schedule, the stream will unpublish and stop. If this is not a repeating playlist, It’s generally a good idea to put a buffer video (a number of minutes of black video or a logo works just fine) at the end of it to fill any gaps to the next playlist.

So, the schedule is pretty straightforward, but it can get tedious to build. I previously posted about a way to generate this with a spreadsheet in Excel. This is clunky, but can save a lot of typing, and is good for repeating events.

But this lacked a good visual interface. As I was working on a project for a client to translate a schedule generated from their video content management system into the Wowza Stream Scheduler’s XML, it occurred to me that there was another structured schedule format that could be translated easily into XML: iCal. This calendar format is defined in RFC 2445 and is widely used by many calendaring systems.

Unfortunately, iCal is not XML to begin with (iCal/RFC2445 predates XML by a decade), which would be WAY too easy. Here is a sample of iCal data out of Google Calendar that contains two events (Google used to make their calendar shares available in XML but it seems that is no longer the case):

BEGIN:VCALENDAR
PRODID:-//Google Inc//Google Calendar 70.9054//EN
VERSION:2.0
CALSCALE:GREGORIAN
METHOD:PUBLISH
X-WR-CALNAME:Wowza Event Scheduler Calendar
X-WR-TIMEZONE:America/Chicago
X-WR-CALDESC:
BEGIN:VEVENT
DTSTART:20161017T160000Z
DTEND:20161017T170000Z
DTSTAMP:20161016T164145Z
UID:xxxxxx@google.com
CREATED:20161012T212924Z
DESCRIPTION:mp4:video1.mp4\,0\,-1
LAST-MODIFIED:20161016T164138Z
LOCATION:teststream
SEQUENCE:3
STATUS:CONFIRMED
SUMMARY:11am Broadcast
TRANSP:OPAQUE
END:VEVENT
BEGIN:VEVENT
DTSTART:20161017T170000Z
DTEND:20161017T180000Z
DTSTAMP:20161016T164145Z
UID:xxxxxx@google.com
CREATED:20161016T164116Z
DESCRIPTION:mp4:video2.mp4\,0\,1800\nmp4:video3.mp4\,0\,1800
LAST-MODIFIED:20161016T164118Z
LOCATION:teststream
SEQUENCE:1
STATUS:CONFIRMED
SUMMARY:Noon Broadcast
TRANSP:OPAQUE
END:VEVENT
END:VCALENDAR

As you can see, this has some hints of XML: Opening and closing tags, attributes, and the like. Fortunately, Evert Pot wrote a handy little PHP function to make the conversion to XML.

One of the really nice things about JSON and XML in PHP is that the objects that contain them work just like any other nested arrays, and so extracting specific items is ridiculously easy. There’s a lot of data within the VEVENT block that we just aren’t interested in. We really only care about the start and stop times, and a few other fields like DESCRIPTION, LOCATION and SUMMARY, which we can hack to contain the names of the streams and content. In this example, I use DESCRIPTION to contain the names of the video files on each line (and additional comma-separated data regarding start and end points, and LOCATION to specify what stream it should be published on. SUMMARY can be used as the playlist name attribute There are a number of other iCal fields that can be used for this as well.

In order to use this data, we need to do the following:

  • Use the start/end times to calculate a duration
  • Make a list of the streams to publish to
  • figure out what video to play when
  • Convert datestamps to the local server time

For starters, we’re going to need to set a few defaults:

ini_set("allow_url_fopen", 1);
error_reporting(0);
date_default_timezone_set("US/Central");

Using Evert’s conversion function, we get the schedule into an XML object:

$calUrl = "https://calendar.google.com/calendar/ical/xxxxxxxxxxxxx8%40group.calendar.google.com/private-xxxxx/basic.ics";
// get your private calendar URL from the calendar settings. 
$CalData=file_get_contents($calUrl);
$xmlString=iCalendarToXML($CalData);
$xmlObj = simplexml_load_string($xmlString);

The object now looks like this:

SimpleXMLElement Object
(
    [PRODID] => -//Google Inc//Google Calendar 70.9054//EN
    [VERSION] => 2.0
    [CALSCALE] => GREGORIAN
    [METHOD] => PUBLISH
    [X-WR-CALNAME] => Wowza Event Scheduler Calendar
    [X-WR-TIMEZONE] => America/Chicago
    [X-WR-CALDESC] => SimpleXMLElement Object
        (
        )

    [VEVENT] => Array
        (
            [0] => SimpleXMLElement Object
                (
                    [DTSTART] => 20161017T160000Z
                    [DTEND] => 20161017T170000Z
                    [DTSTAMP] => 20161016T182755Z
                    [UID] => 72klt8s5ssrbjp9ofdk8ucovoo@google.com
                    [CREATED] => 20161012T212924Z
                    [DESCRIPTION] => mp4:video1.mp4\,0\,-1
                    [LAST-MODIFIED] => 20161016T164138Z
                    [LOCATION] => teststream
                    [SEQUENCE] => 3
                    [STATUS] => CONFIRMED
                    [SUMMARY] => 11am Broadcast
                    [TRANSP] => OPAQUE
                )

            [1] => SimpleXMLElement Object
                (
                    [DTSTART] => 20161017T170000Z
                    [DTEND] => 20161017T180000Z
                    [DTSTAMP] => 20161016T182755Z
                    [UID] => ac3lgjmjmijj2910au0fnv5vig@google.com
                    [CREATED] => 20161016T164116Z
                    [DESCRIPTION] => mp4:video2.mp4\,0\,1800\nmp4:video3.mp4\,0\,1800
                    [LAST-MODIFIED] => 20161016T164118Z
                    [LOCATION] => teststream
                    [SEQUENCE] => 1
                    [STATUS] => CONFIRMED
                    [SUMMARY] => Noon Broadcast
                    [TRANSP] => OPAQUE
                )

        )

)

So now we need to create another XML object for our schedule and give it the basic structure:

$smilXml = new SimpleXMLElement('<smil/>');
$smilHead = $smilXml->addChild('head');
$smilBody = $smilXml->addChild('body');

Now we need to iterate once through the VEVENT objects to get stream names:

$playonstream = [];

foreach ($xmlObj->VEVENT as $event) {
        $loc = $event->LOCATION;
        $playOnStream["$loc"]=true;
        // We don't really care about the value of this array element, as long as it exists.
        // This way we only get one array element for each unique stream name
}

// Iterate through the list of streams and create them in the SMIL
foreach ($playOnStream as $key => $value) {

$smilStream = $smilBody->addChild('stream');
$smilStream->addAttribute('name',$key);

}

So now we have the beginnings of a schedule:

<?xml version="1.0"?>
<smil>
  <head/>
  <body>
    <stream name="teststream"/>
  </body>
</smil>

We now need to iterate through the list again to add in the fallback items for each stream that starts when the stream starts (this is done as a separate loop to keep the output XML cleaner):

// Add in default fallback entries
foreach ($playOnStream as $key => $value) {
        $defaultPl=$smilBody->addChild('playlist');
        $defaultPl->addAttribute('name',"default-$key");
        $defaultPl->addAttribute('playOnStream',$key);
        $defaultPl->addAttribute('repeat','true');
        $defaultPl->addAttribute('scheduled',"2016-01-01 00:00:01");
        $contentItem = $defaultPl->addChild('video');
        $contentItem->addAttribute('src','mp4:padding.mp4');
        $contentItem->addAttribute('start','0');
        $contentItem->addAttribute('length','-1');

}

Which then gives us these new items:

<smil>
  <head/>
  <body>
    <stream name="teststream"/>
    <playlist name="default-teststream" playOnStream="teststream" repeat="true" scheduled="2016-01-01 00:00:01">
      <video src="mp4:padding.mp4" start="0" length="-1"/>
    </playlist>
  </body>
</smil>

And then we need to iterate again through the VEVENTS to create the actual schedule items:

foreach ($xmlObj->VEVENT as $event) {

        //parse the times into Unix time stamps using the ever-useful strtotime() function;
        $eventStart = strtotime($event->DTSTART);
        $eventEnd = strtotime($event->DTEND);

        //format them into the ISO 8601 format for use in the schedule
        //Note that we're using H:i:s rather than h:i:s because 24-hour time is important here
        $start = date("Y-m-d H:i:s", $eventStart);
        $end = date("Y-m-d H:i:s", $eventEnd);

        //extract summary for playlist name
        $plName = $event->SUMMARY;
        $plLoc = $event->LOCATION;

        //extract description for content
        $description = $event->DESCRIPTION;
        $videos=preg_split('/\\\\n/',$description);
        // add on a padding video at the end of this list
        $videos[]="mp4:padding.mp4";

        //create playlist
        $playlist = $smilBody->addChild('playlist');
        $playlist->addAttribute('name',$plName);
        $playlist->addAttribute('playOnStream',$plLoc);
        $playlist->addAttribute('repeat','false');
        $playlist->addAttribute('scheduled',$start);

        //iterate through playlist items
        foreach($videos as $plItem) {
                echo "$plItem\n";
                $attrs=preg_split('/\\\\,/',$plItem);
                // set defaults for stream start/duration if not specified
                // assume start at beginning and play all the way through
                if(!$attrs[1]) { $attrs[1] = 0; }
                if(!$attrs[2]) { $attrs[2] = -1; }

                $contentItem = $playlist->addChild('video');
                $contentItem->addAttribute('src',$attrs[0]);
                $contentItem->addAttribute('start',$attrs[1]);
                $contentItem->addAttribute('length',$attrs[2]);

        } // end of playlist loop

} // end of event loop

And, finally, we need to add a little bit of code to format the XML object for use with Wowza:

$dom = dom_import_simplexml($smilXml)->ownerDocument;
$dom->formatOutput = true;
$output=$dom->saveXML();
echo "$output\n"; // outputs to STDOUT
$dom->save('streamschedule.smil'); // save to file

For the purposes of this last section, I’ve created some additional events to add a secondary stream:

Schedule Overview

11am Broadcast Event

11am Alternate Broadcast Event

Noon Broadcast Event

Event Broadcast

The iCal looks like this:

BEGIN:VCALENDAR
PRODID:-//Google Inc//Google Calendar 70.9054//EN
VERSION:2.0
CALSCALE:GREGORIAN
METHOD:PUBLISH
X-WR-CALNAME:Wowza Event Scheduler Calendar
X-WR-TIMEZONE:America/Chicago
X-WR-CALDESC:
BEGIN:VEVENT
DTSTART:20161017T160000Z
DTEND:20161017T170000Z
DTSTAMP:20161016T182604Z
UID:8m4hcp98fmuosuoe48o20drl7k@google.com
CREATED:20161016T180813Z
DESCRIPTION:mp4:video5.mp4\nmp4:video6.mp4
LAST-MODIFIED:20161016T180813Z
LOCATION:altstream
SEQUENCE:0
STATUS:CONFIRMED
SUMMARY:11am alternate broadcast
TRANSP:OPAQUE
END:VEVENT
BEGIN:VEVENT
DTSTART:20161017T180000Z
DTEND:20161017T190000Z
DTSTAMP:20161016T182604Z
UID:c1ijl48srikc22vkkvrgvpb718@google.com
CREATED:20161016T180725Z
DESCRIPTION:mp4:video4.mp4
LAST-MODIFIED:20161016T180725Z
LOCATION:teststream
SEQUENCE:0
STATUS:CONFIRMED
SUMMARY:Event
TRANSP:OPAQUE
END:VEVENT
BEGIN:VEVENT
DTSTART:20161017T160000Z
DTEND:20161017T170000Z
DTSTAMP:20161016T182604Z
UID:72klt8s5ssrbjp9ofdk8ucovoo@google.com
CREATED:20161012T212924Z
DESCRIPTION:mp4:video1.mp4\,0\,-1
LAST-MODIFIED:20161016T164138Z
LOCATION:teststream
SEQUENCE:3
STATUS:CONFIRMED
SUMMARY:11am Broadcast
TRANSP:OPAQUE
END:VEVENT
BEGIN:VEVENT
DTSTART:20161017T170000Z
DTEND:20161017T180000Z
DTSTAMP:20161016T182604Z
UID:ac3lgjmjmijj2910au0fnv5vig@google.com
CREATED:20161016T164116Z
DESCRIPTION:mp4:video2.mp4\,0\,1800\nmp4:video3.mp4\,0\,1800
LAST-MODIFIED:20161016T164118Z
LOCATION:teststream
SEQUENCE:1
STATUS:CONFIRMED
SUMMARY:Noon Broadcast
TRANSP:OPAQUE
END:VEVENT
END:VCALENDAR

And when we run the process, we get this spiffy code coming out:

<smil>
  <head/>
  <body>
    <stream name="altstream"/>
    <stream name="teststream"/>
    <playlist name="default-altstream" playOnStream="altstream" repeat="true" scheduled="2016-01-01 00:00:01">
      <video src="mp4:padding.mp4" start="0" length="-1"/>
    </playlist>
    <playlist name="default-teststream" playOnStream="teststream" repeat="true" scheduled="2016-01-01 00:00:01">
      <video src="mp4:padding.mp4" start="0" length="-1"/>
    </playlist>
    <playlist name="11am alternate broadcast" playOnStream="altstream" repeat="false" scheduled="2016-10-17 11:00:00">
      <video src="mp4:video5.mp4" start="0" length="-1"/>
      <video src="mp4:video6.mp4" start="0" length="-1"/>
      <video src="mp4:padding.mp4" start="0" length="-1"/>
    </playlist>
    <playlist name="Event" playOnStream="teststream" repeat="false" scheduled="2016-10-17 13:00:00">
      <video src="mp4:video4.mp4" start="0" length="-1"/>
      <video src="mp4:padding.mp4" start="0" length="-1"/>
    </playlist>
    <playlist name="11am Broadcast" playOnStream="teststream" repeat="false" scheduled="2016-10-17 11:00:00">
      <video src="mp4:video1.mp4" start="0" length="-1"/>
      <video src="mp4:padding.mp4" start="0" length="-1"/>
    </playlist>
    <playlist name="Noon Broadcast" playOnStream="teststream" repeat="false" scheduled="2016-10-17 12:00:00">
      <video src="mp4:video2.mp4" start="0" length="1800"/>
      <video src="mp4:video3.mp4" start="0" length="1800"/>
      <video src="mp4:padding.mp4" start="0" length="-1"/>
    </playlist>
  </body>
</smil>

So there you have a relatively simple one-way hack to spit Google Calendar/iCal events out into a Wowza Schedule. You would still need to manually run this every time you wanted to update the broadcast schedule (and reload the Wowza server), and this does not send any confirmation back to your iCal that the event has been scheduled.

Stay tuned for a variation on this code that uses the Google Calendar API (a much more elegant approach)

Multi-tenant Virtual Hosting with Wowza on EC2

That’s a mouthful, isn’t it?

I recently needed to migrate a couple of Wowza Streaming Engine tenants on a baremetal server that was getting long in the tooth, and was getting rather expensive. These tenants were low-volume DVR or HTTP transmuxing customers, with one transcoding customer that required some more CPU power. But this box was idle most of the time. So I decided to move it over to AWS and fire up the box only when necessary. Doing this used to be a cumbersome process with the AWS command-line tools that were Java-based. The current incarnation of tools is quite intuitive and runs in Python, so there’s not a lot of insane configuration and scripting to do.

You may recall my post from a few years back about multi-tenant virtual hosting. I’m going to expand on this and describe how to do it within the Amazon EC2 environment, which has historically limited you to  a single IP address on a system.

The first step to getting multiple network interfaces on EC2 is to create a Virtual Private Cloud (VPC) and start your EC2 instances within your VPC. “Classic” EC2 does not support multiple network interfaces.

Once you’ve started your Wowza instance within your VPC (for purposes of transcoding a single stream, I’m using a c4.2xlarge instance), you then go to the EC2 console, and on the left-hand toolbar, under “network and security” is a link labeled “Network Interfaces”. When you click on that, you have a page listing all your active interfaces.

To add an interface to an instance, simply create a network interface, select the VPC subnet it’s on, and optionally set its IP (the VPC subnet is all yours, in dedicated RFC1918 space, so you can select your IP). Once it’s created, you can then assign that interface to any running instance. It shows up immediately within the instance without needing to reboot.

Since this interface is within the VPC, it doesn’t get an external IP address by default, so you’ll want to assign an ElasticIP to it if you wish to have it available externally (in most cases, that’s the whole point of this exercise)

Once you have the new interface assigned, simply configure the VHosts.xml and associated VHost.xml files to listen to those specific internal IP addresses, and you’re in business.
As for scheduling the instance? On another machine that IS running 24/7 (if you want to stick to the AWS universe, you can do this in a free tier micro instance), set up the AWS command line tools and then make a crontab entry like this:

30 12 * * 1-5 aws ec2 start-instances --instance-ids i-XXXXXXXX
35 12 * * 1-5 aws ec2 associate-address --network-interface-id eni-XXXXXXXX --allocation-id eipalloc-XXXXXXXX
30 15 * * 1-5 aws ec2 stop-instances --instance-ids i-XXXXXXXX 

This fires up the instance at 12:30pm on weekdays, assigns the elastic IPs to the interfaces, and then shuts it all down 3 hours later (because this is an EBS-backed instance in a VPC, stopping the instance doesn’t nuke it like terminating does, so any configuration you make on the system is persistent)

Another way you can use this is to put multiple interfaces on an instance with high networking performance and gain the additional bandwidth of the multiple interfaces (due to Java limitations, there’s no point in going past 4 interfaces in this use case), and then put the IP addresses in either a round-robin DNS or a load balancer, and simply have Wowza bind to all IPs (which it does by default).

Instant Replays on Wowza

One of the useful features of Wowza is its ability to record a stream to disk and then be able to use that recording for a replay. In version 3.5, it would simply take the stream name, slap an MP4 extension on the end, and version any previous ones with _0, _1, etc. In 3.6, the default naming scheme for these recordings was a timestamp, with a configuration option to use the legacy naming convention. In Version 4, it appears this legacy naming convention option has disappeared altogether, meaning you can’t set up a player to just play back “streamname.mp4” and it would always grab the most recent one. EDIT: It appears that this loss of functionality was unintentional and has been classified as a bug, which should be fixed very soon.

This became a problem for one of my clients after their Wowza server got updated to V4. It wasn’t practical to re-code the player every week, or to go into the server and manually rename the file. Since it’s on a Windows server, PowerShell to the rescue:

$basepath= "C:\Program Files (x86)\Wowza Media Systems\Wowza Streaming Engine 4.0.3\content\"
$replayfile =  gci $basepath\streamname*.mp4 | sort LastWriteTime | select -last 1
$link = $replayfile.Name

cmd /c del $basepath\replay.mp4
cmd /c mklink $basepath\replay.mp4 $basepath\$link

I then put this into a scheduled task, with time-based triggers. Powershell is a little tricky to get into a scheduled task, but I finally got the syntax right:

Action: C:\Windows\System32\WindowsPowerShell\v1.0\powershell.exe
Arguments: -nologo -file “C:\Program Files (x86)\Wowza Media Systems\Wowza Streaming Engine 4.0.3\content\replay.ps1”

If you’re on Linux or OSX, you can do this in bash instead:

#!/bin/bash

basepath='/usr/local/WowzaStreamingEngine/content'
unset -v replayfile
for file in "$basepath"/streamname*.mp4
 do
  [[ -z $replayfile || $file -nt $replayfile ]] && replayfile=$file
 done;
rm -f $basepath/replay.mp4
ln -s $replayfile $basepath/replay.mp4

and put it in your crontab (this example is every sunday at 11:30am)

30 11 * * 0 /bin/bash /usr/local/WowzaMediaServer/content/replay.sh

Browser-Aware Player Code, 2014 Edition

Yet another installment in the never-ending series of dealing with different platforms. This is precipitated by the continued boneheadedness of Google when it comes to supporting any live streaming transports in the native browser (they just simply don’t). Some handset manufacturers are adding HLS support back, though.

You’ll notice there’s also code in here to reference an MPEG-DASH manifest as well as “sanjose” and “smooth” (in Wowza parlance). This script doesn’t make use of those capabilities at the moment, but once I get a good list of which browsers can support MSE and DASH.js, I’ll update it to be able to use that player.

This assumes that you’re using cloud-hosted JW Player with a key, but if you’re not, simply replace the first SCRIPT reference with your locally hosted JWPlayer file and comment out the jwplayer.key line.

If you wish to use a different player such as FlowPlayer, you can replace the appropriate code in the flashPlayer() function.


<HTML>
<HEAD>
<TITLE>Player</TITLE>


<script type="text/javascript" src="http://p.jwpcdn.com/6/8/jwplayer.js?ver=3.9"></script>
<script type="text/javascript">

jwplayer.key='XXXXXXXXXXXXXXXXXXXXXXXXXXXXXX';

jwplayer.defaults = { "ph": 2 };

</script>


</HEAD>
<BODY STYLE="margin: 0px; background-color: white">
<div id="videoframe"></div>

<SCRIPT type="text/javascript">
// Browser-aware video player for JW Player and Wowza
// V0.3 - May 19, 2014
// (c)2014 Ian Beyer
// Released under the GPL

var container='videoframe';
var width="100%";
var aspect="4:3";


//This section calculates actual sizes for player when using non-responsive elements.

var multiplier=aspect.split(":");
var fixedwidth = Math.floor(window.innerWidth*width.split("%")[0]/100);
var fixedheight = Math.floor(window.innerWidth*multiplier[1]/multiplier[0]*width.split("%")[0]/100);
console.log ('Size: '+width+', '+aspect+' ('+fixedwidth+' x '+fixedheight+')');

var streamserver='wowzanode1.tvwmedia.net';
var streamport='1935';
var streamapp='srcEncoders';
var streamname='TVW01';

var streambase=streamserver+':'+streamport+'/'+streamapp+'/_definst_/'+streamname;
var cupertinourl='http://'+streambase+'/playlist.m3u8';
var sanjoseurl='http://'+streambase+'/Manifest.f4m';
var smoothurl='http://'+streambase+'/Manifest';
var dashurl='http://'+streambase+'/manifest.mpd';
var rtmpurl='rtmp://'+streambase;
var rtspurl='rtsp://'+streambase;

var agent=navigator.userAgent.toLowerCase();
var is_iphone = (agent.indexOf('iphone')!=-1);
var is_ipad = (agent.indexOf('ipad')!=-1);
var is_ipod = (agent.indexOf('ipod')!=-1);
var is_safari = (agent.indexOf('safari')!=-1);
var is_iemobile = (agent.indexOf('iemobile')!=-1);
var is_blackberry = (agent.indexOf('blackberry')!=-1);
var is_android1= (agent.indexOf('android\ 1')!=-1);
var is_android2= (agent.indexOf('android\ 2')!=-1);
var is_android3= (agent.indexOf('android\ 3')!=-1);
var is_android4 = (agent.indexOf('android\ 4')!=-1);

var is_chrome = (agent.indexOf('chrome')!=-1);

if (is_iphone) { iosPlayer(); }
else if (is_ipad) { iosPlayer(); }
else if (is_ipod) { iosPlayer(); }
else if (is_android1) { rtspPlayer(); }
else if (is_android2) { rtspPlayer(); }
else if (is_android4) { a4Player(); }
else if (is_blackberry) { rtspPlayer(); }
else if (is_iemobile) { rtspPlayer(); }
else { flashPlayer(); }

function iosPlayer()
{
var player=document.getElementById(container)
player.innerHTML='<VIDEO '+
' SRC="'+cupertinourl+'"'+
' HEIGHT="'+fixedheight+'"'+
' WIDTH="'+fixedwidth+'"'+
' poster="poster.png"'+
' title="Live Stream"'+
' CONTROLS>'+
'</video>';
}

function windowsPlayer()

{

// Need to add code here for silverlight player in Windows Phone to support the 12 users that actually have one. Until then use rtspPlayer();

}

function a4Player()
{
var player=document.getElementById(container)
player.innerHTML='<A HREF="'+cupertinourl+'">'+
'<IMG SRC="player.png" '+
'ALT="Start Mobile Video" '+
'BORDER="1" '+
'WIDTH="'+width+'">'+
'</A>';
}

function dashPlayer()

{

// Reserved for future use

}

function rtspPlayer()
{
var player=document.getElementById(container)
player.innerHTML='<A HREF="'+rtspurl+'">'+
'<IMG SRC="player.png" '+
'ALT="Start Mobile Video" '+
'BORDER="0" '+
'WIDTH="'+width+'">'+
'</A>';
}

function flashPlayer()
{


//If using JW6 Premium or Enterprise, you can also use the cupertinourl here.

jwplayer(container).setup({
 width: width,
 aspectratio: aspect,
 file: rtmpurl,
 autostart: false
 });


}

</SCRIPT>
</BODY>
</HTML>