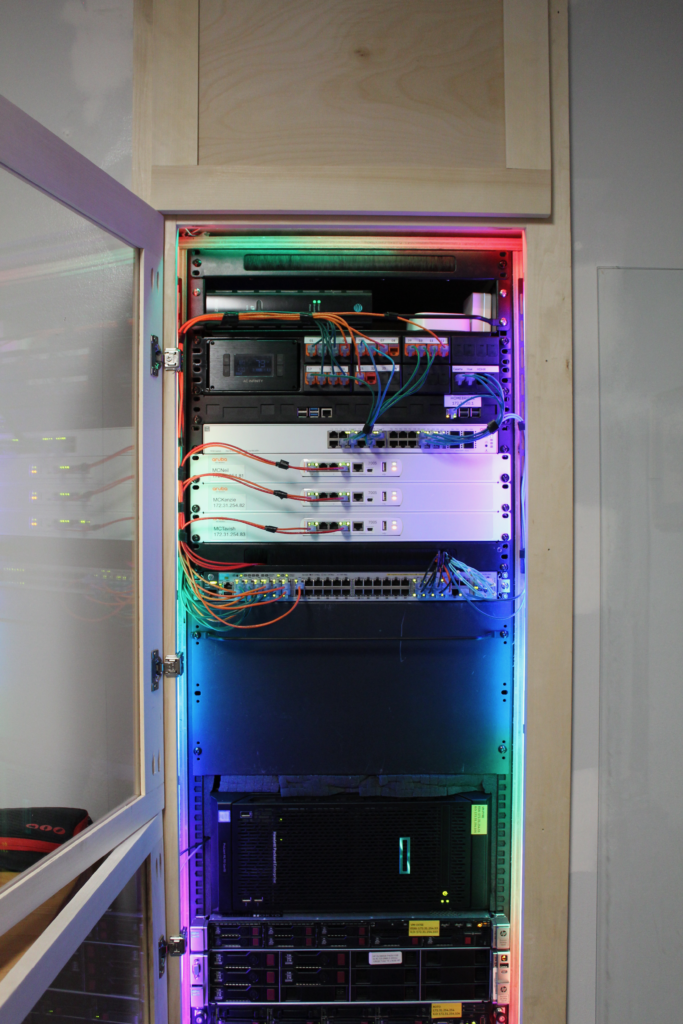
This is the new and improved lab setup at my new place. Updates as they happen (and I remember to post them). Currentish as of January 2025.
When we moved in May of 2021, it was a big change in that, after several years of employer-provided housing, we actually own this place. This meant I had some liberties I could take with my lab rack, but also some new challenges: at the old place, there was a great workshop space under the garage that was a great place to put a rack and not have to worry about noise or heat. In the new house, I needed somewhere to put the rack that would still allow me to make calls in my home office without the noise drowning out the audio. but I also wanted to make it look cool, because, duh.
After several months of kicking around ideas, I had decided I wanted to have a built-in rack that I could see from my desk. but it would have to be enclosed in order to keep noise down, and an enclosed rack was going to require me to get creative with airflow.
The Cabinet
As luck would have it, adjacent to the basement bedroom that was chosen as my office space is a large finished utility room (about 12×15 feet) that now housed the laundry room, as the original laundry space in this 1975 home having been just off the kitchen and long ago repurposed as a pantry. The wall between my office and the laundry room was found to be non-load-bearing, so it became easy to cut open a hole about 2 feet wide, from floor to ceiling where the rack would go. I have since redesigned and rebuilt much of the laundry room to make it more useful. That closet next to the rack? Not very useful, and yes, it’s out of plumb. By a LOT. That’s gonna have to go eventually It did eventually go (see below). I’m discovering that whoever finished this basement originally had to have done so with a level and a square that got run over by a bus.
For aesthetic reasons, I chose to put the rack inside a 34 inch deep by 24 inch wide cupboard, as well as a matching cabinet base with a countertop on the rest of the wall to act as a work space in the laundry room for ironing, folding, or whatever,. From the laundry room side, this just looks like regular cabinetry, revealing little about its hidden purpose:
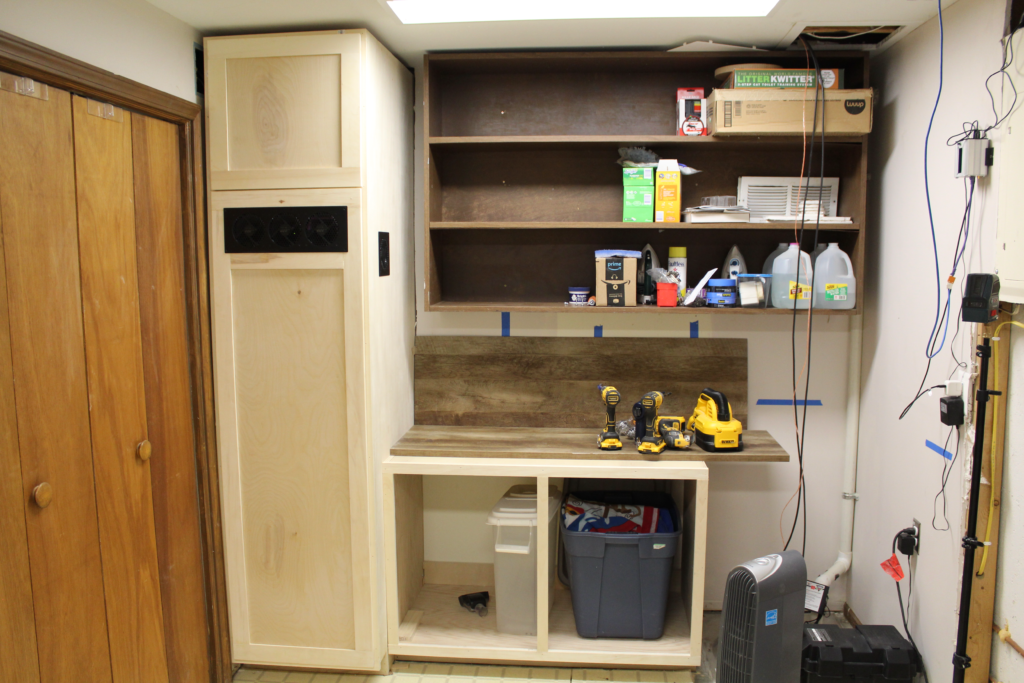
(Yes, it’s straight, level, square and plumb, which is more than can be said for the adjacent closet wall!)
Turns out, I had to build these myself. Nobody makes this kind of cabinet for rack mounting stuff. So I consulted some youtube videos on how to make cabinets (The most useful was one from Bourbon Moth Woodworking – While my workshop is nowhere near as well equipped as Jason’s, I’ve accumulated some tools over the years and could make a decent go at it). I was under no delusions that my finished product would be as good as his, but they turned out pretty decent, and if you’re making a go at building your own cabinets, it turns out that a laundry room is a good place to practice. Ultimately, these are more paint grade than stain grade, but once I (and Mrs) decide on a color and paint them, they’ll probably look great. The cabinet structure is made of 18mm (3/4″) Sande Plywood. (Sande is another name for Brosimum Utile, a versatile hardwood related to Mulberry and Fig that is native to northwestern South America and southern Central America – the plywood sold at Home Depot comes from Ecuador where it is grown for carbon capture, lumber, and paper, as well as food and medicinal uses.) The face frames are made of aspen. Door panels are 1/4 plywood, and hinges are a 1.25″ overlay concealed face frame hinge (the kind you find on almost everything) – I had found a bag of them at ReStore, but they were only 1/2″ overlay, so I had to get some of the right size on Amazon. I also acquired and made extensive use of a Kreg Jig for making pocket holes.
2023 Update:
Now, about that closet not being plumb… Early in 2023, I discovered residual but active mold behind the baseboard trim, left over from some basement flooding many years ago (the foundation leakage issues were repaired by the previous owner a decade prior). which meant the drywall had to come off. And like any good project, it suffered scope creep, and I determined that the closet in the laundry room was a rather useless waste of space which would be much better suited as a closet for the adjacent bedroom (doing duty as my office). So, I picked the closet up and rotated it 90 degrees. Sounds easy, but this involved demolishing walls and ceiling and reframing and moving the rack over about 6 feet. But the closet is now laser plumb within 1/64″ and not irrationally annoying me anymore.

During demolition, I discovered that the wall between the office and the laundry room had once been framed for a large projection TV, which explained a lot of the framing weirdness I encountered when I initially put the rack in. I also wrecked out all the janky electrical in that wall.
On the back side, I installed a 42″ Structured Media Enclosure where the phone and cable service terminate (via a conduit extending outside to the provider boxes), as well as one extending to the main mechanical soffit, containing the cables feeding the APs and media outlets in the house and an extended feeder from the TV antenna in the attic, and another extending into the lab cabinet.
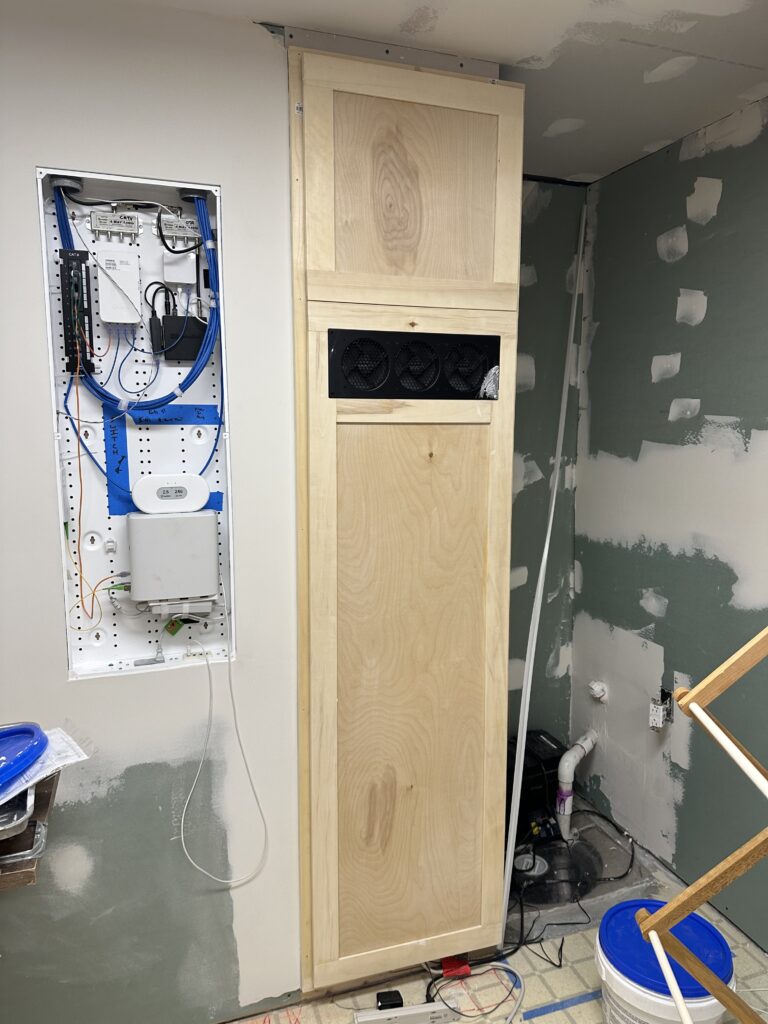
Naturally, I had to work around the existence of the sump pump which couldn’t be moved. This nook will get shelves and act as a storage space for the laundry room. Because of the previous mold issues, I redid the walls with mold-resistant green board, which now covers about 2/3 of the laundry room walls. In the process of moving the closet, I also discovered that the air return duct for the basement had at some point in the distant past been blocked off (which may have been compounding the moisture issues). Conveniently, one of the two joist cavities went over the closet and lined up with the rack… So, I extended the house air return all the way into the rack which provides even more airflow and cooling for the equipment. I extended the other one to a return grille in the laundry room, which has made the basement significantly more comfortable for both me and the equipment.
Back to our regularly scheduled story, which still shows the rack pre-move since the contents haven’t changed much:
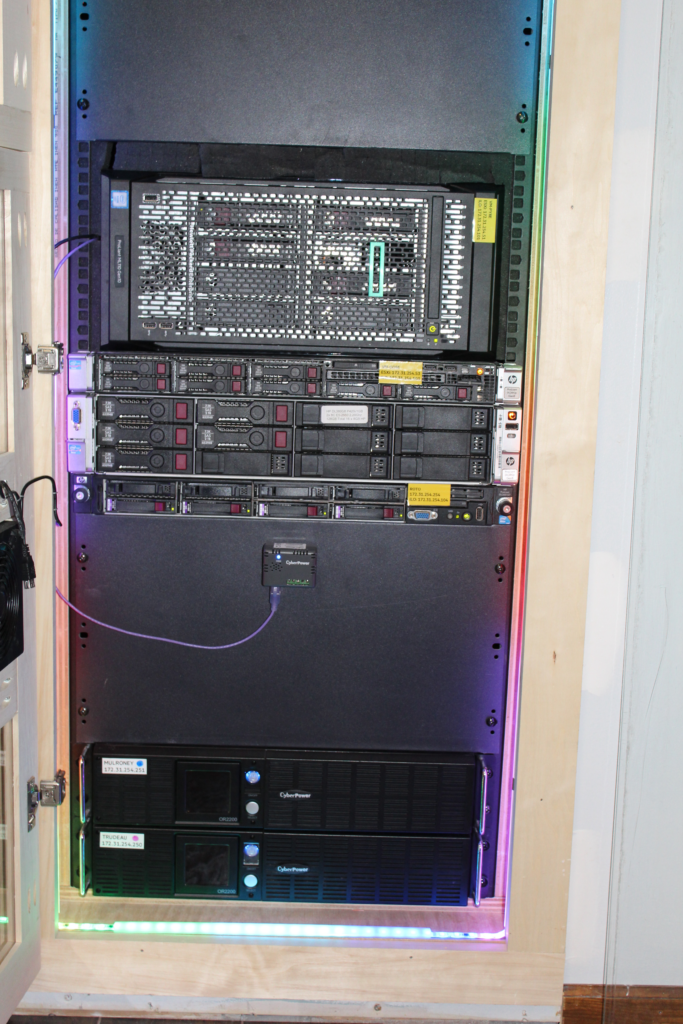
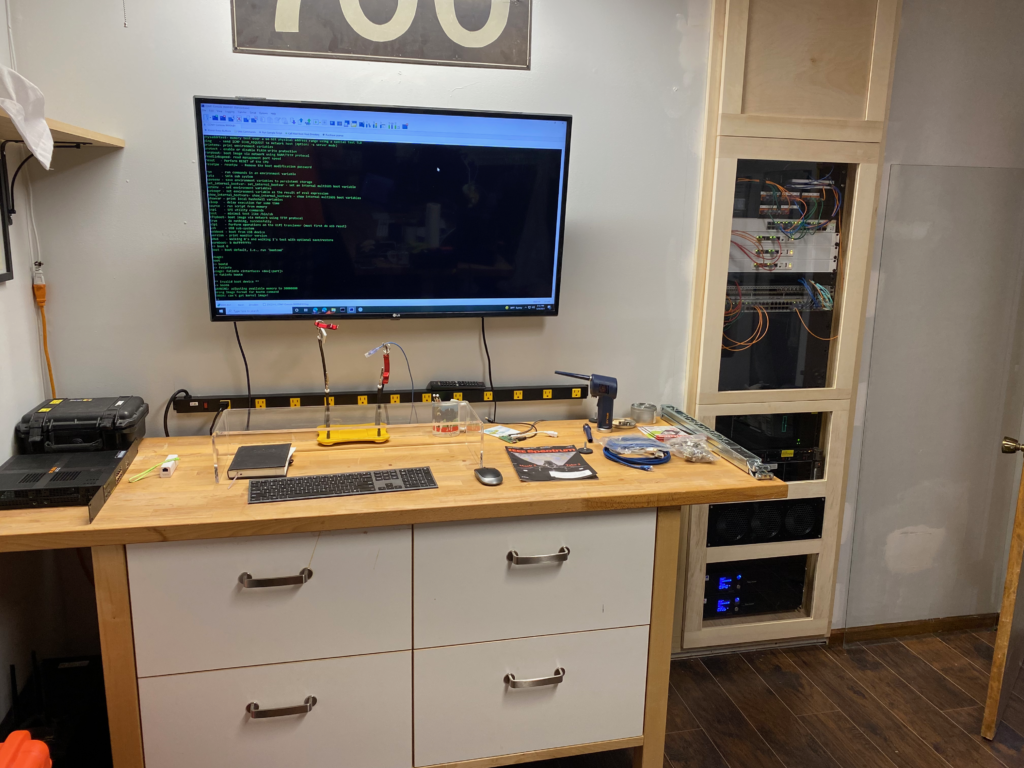
On the front (I know you’ve been eagerly awaiting a picture of the front!), the door panels are 6mm (1/4″) acrylic so I can see into the rack and bask in the glow of the blinkylights while keeping sound down.
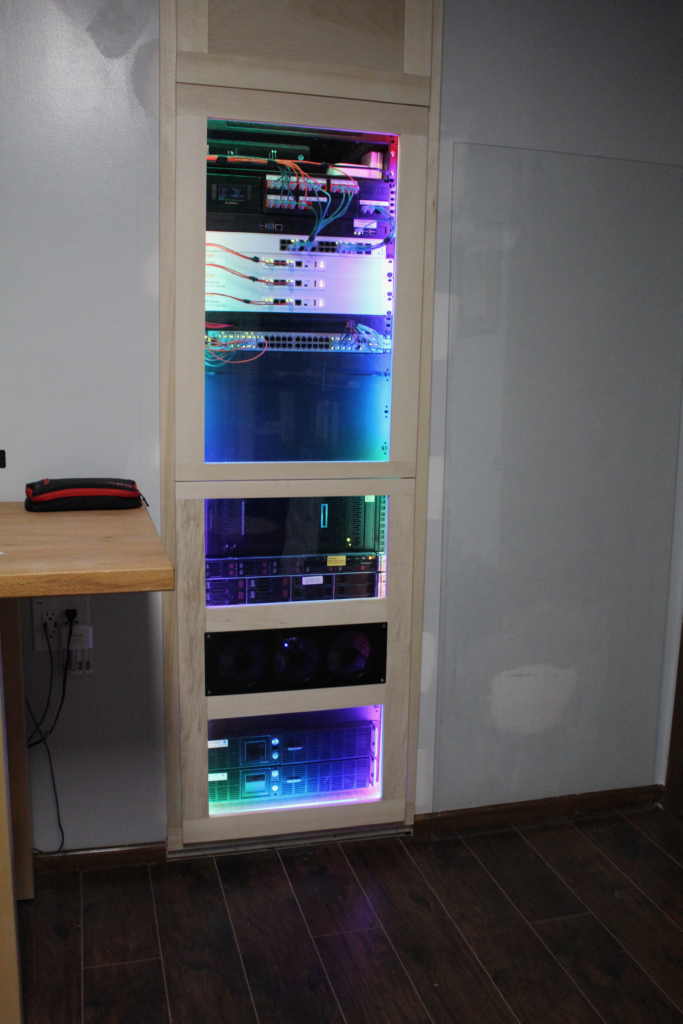
OK, so you’re probably wanting to know what’s inside this spiffy cabinet…
What’s in the box?
The rack itself is two pairs (front and back) of 37U Cage Nut Rails. They are mounted to an internal plywood frame that can be adjusted forward and backward if needed – The frame also provides space on the side walls of the cabinet to mount some lacing bars to help with cable management.
Power and Environmental
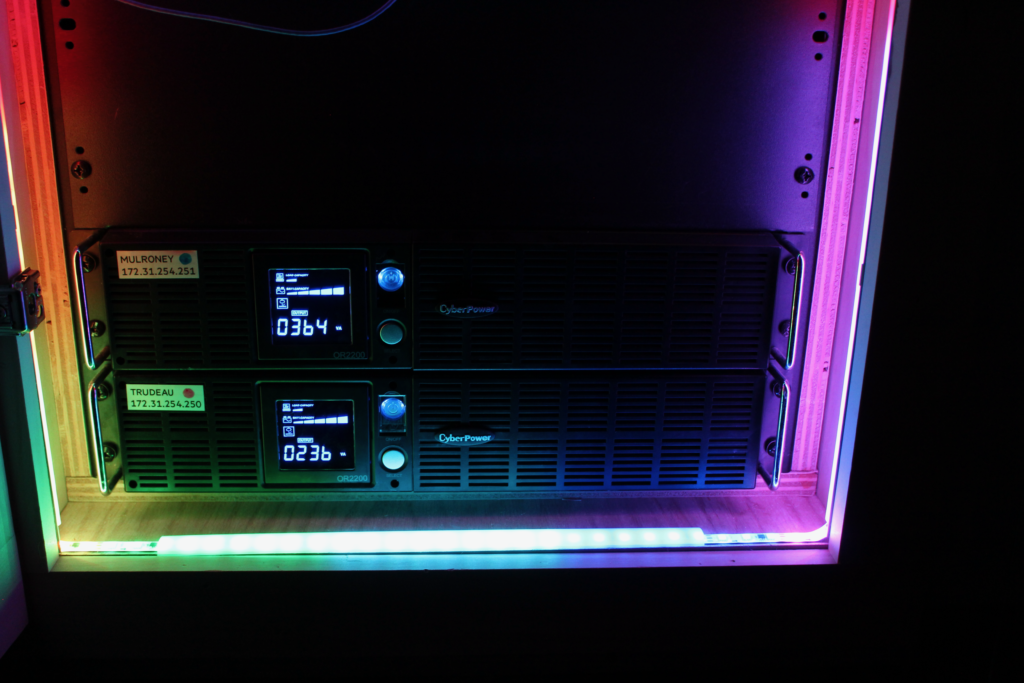
Starting from the bottom, I have two CyberPower OR2200LCDRT2U rackmountable 2200VA UPS systems with a network management card, each connected to an environmental sensor, one monitoring intake temperature, the other measuring top of rack temp. Each UPS is connected to a dedicated 20A circuit, on opposite legs of the 240V phase, with color coded outlets and cables. The “Blue side” UPS is named Mulroney, and the “Red side” UPS is named Trudeau (Pierre, not Justin). Mulroney also feeds a 1U PDU mounted at the back of the rack for the various DC power supplies. The structured media enclosure outlets are wired to a pair of C13 Inlets, and can be connected to the UPS or to the feeder circuits.
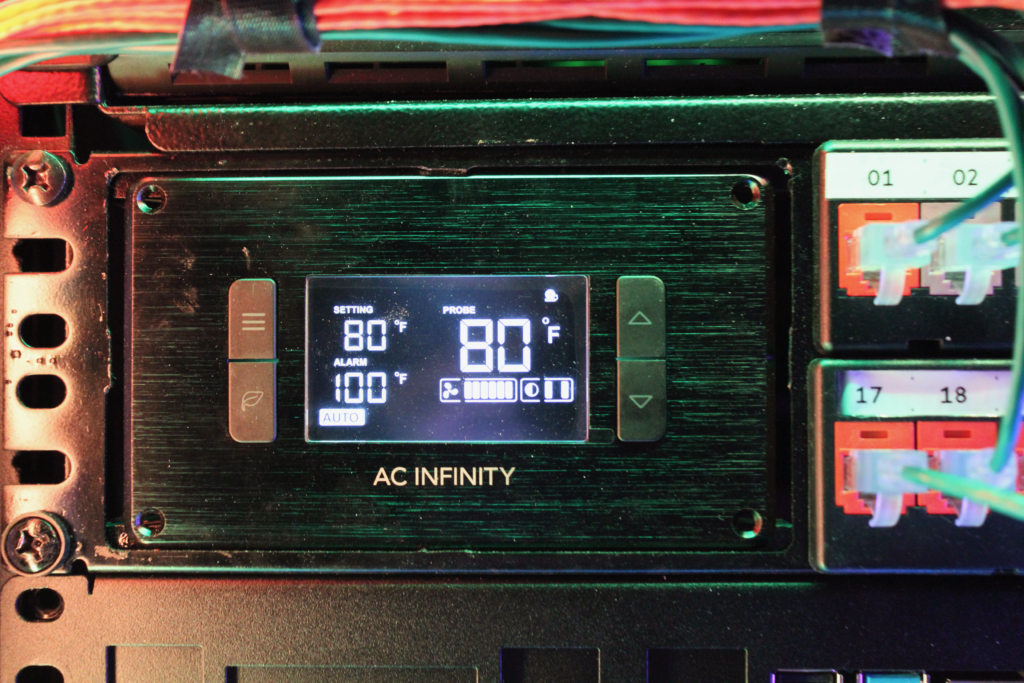
Since the rack is fully enclosed, ventilation is a key factor – The cabinet is effectively set up as a cold aisle/hot aisle configuration, with the front face of the rack acting as a supply plenum through the use of blanking panels for unused spaces. The lower front door has an AC Infinity Airplate S9 three-fan unit with the fans flipped to blow in. The back door has a matching Airplate, and both are connected to a thermostat fan control mounted in a modified Panduit 2U modular patch panel . There is an additional Airplate S3 single-fan unit on the side of the rack near the top. Total airflow from the S9 units is about 150cfm, and the S3 moves an additional 50cfm from any other openings. This provides approximately 8 full air exchanges a minute – the top of the rack by the exhaust fans is typically about 10°F above the intake temperature (which is ambient room air). The “cold aisle” source is my office, and the “hot aisle” exhaust is in the laundry room, where it then gets sucked into the HVAC. (And, as of 2023, the aforementioned HVAC return inside the cabinet)
Connectivity
Connectivity is pretty straightforward, using Panduit Mini-Com jacks that snap into the modular panel. Cable is a mix of Cat6a, Cat5e, and Cat6, depending on what I had on hand. There are 8 trunks going to the structured media enclosure, which is also where two RG6 coaxial cables land onto a pair of 4:1 splitters, one from the CATV demarc, and one from the house distribution box.
Patch cables are MonoPrice SlimRun Cat6a, following this color scheme:
- Blue: House LAN
- Orange: Trunk Links
- Red: WAN Links
- Green: AP Links
- Black: Management Links (Ethernet)
- Gray: Management Links (Non-Ethernet)
- Purple: Sensors/Instrumentation (Non-Ethernet)
- Pink: IoT/Sensors/Instrumentation (Ethernet)
- Aqua: Multimode Fiber (OM4)
Network
The network is divided into three physical segments: One for the WAN, one for the house LAN, and one for the lab LAN. They converge at the WAN switch, and there are some management network connections from the lab side into some of the gear on the house side.
WAN
The WAN side of the network comes through an Aruba 2930F-8G (JL256A) switch, divided into three VLANs:
- Primary WAN
- AT&T BGW320
- /29 Public Space
- 500M/500M fiber
- Home Router (and powers via PoE)
- VMWare Host
- AT&T BGW320
- Secondary WAN (Currently unused)
- Management (from the lab side)
House Network
The house LAN is kept separate from the lab all the way back to the internet for operational stability. There are 3 VLANs:
- Home Management Network (VLAN 1, no Wireless)
- Home Network (VLAN 20, Dual-Band SSID)
- IoT network (VLAN 30, Dual-Band SSID, 2.4GHz SSID)
- Guest Network (VLAN 42, 5GHz SSID)
- Lab Management Network (VLAN 254, No wireless)
Gear:
The previous setup was as follows, but as of late 2024, it has been replaced with some nice gear that Ubiquiti was nice enough to send me.
1 Aruba InstantON AP11D 802.11ac Wi-Fi Access Point (R2X15A) acting primarily as a router1 Aruba InstantON 1930 24-port PoE+ Switch JL683A (with Noctua fan modification)- 4 10GBase-SR optical modules
3 Aruba InstantON AP22 802.11ax Wi-Fi Access Points (R4W01A)1 Aruba InstantON AP11D 802.11ac Wi-Fi Access Point (R2X15A)1 Aruba InstantON AP12 802.11ac Wi-Fi Access Point (R2X00A)
The New Setup (August 2024):
- 1x Ubiquiti Dream Machine SE acting as router, NVR, and management
- 1x Ubiquiti USW Pro Max 24-port switch (uses 10G-SR fiber uplink to Dream Machine
- 2x Ubiquiti U7-Pro WiFi 7 Access point
Additional IoT gateway devices:
- Lutron Caseta Wireless Smart Bridge
- Philips Hue Bridge
- AirThings View sensor/bridge
- HomeBridge on Dell Optiplex 3050
Servers:
- Charolais (Monitoring and HomeBridge)
- Dell Optiplex 3050
- Ubuntu Server
- HomeBridge
- Influx
- Grafana
- Docker
Guernsey (currently offline, as the power draw got a little ridiculous)- HP ProLiant DL380
- G82x Intel E5-2640 @ 2.50GHz
- 5x 2TB SAS7.2K (Hardware RAID5)
- 1x 12TB SATA7.2K
- 1x 14TB SATA7.2K
- 1x 16TB SATA7.2K
- 128GB RAM
- Ubuntu Server
- Dual-port Intel X520 SFP+ NIC
- 10GBase-SR Multimode Fiber to 1930 Switch
- Quad-port Broadcom gigabit copper interface (integrated)
- 1GBaseT to Management Network
- NVidia Tesla GPU
- ILO 4
- Plex Media Server
Lab Network
Router
- OPNSense on a compact PC
LAN
Brocade VDX 6740- 48 SFP+ Ports
- 4 QSFP+ Ports
- Dual Power Supplies
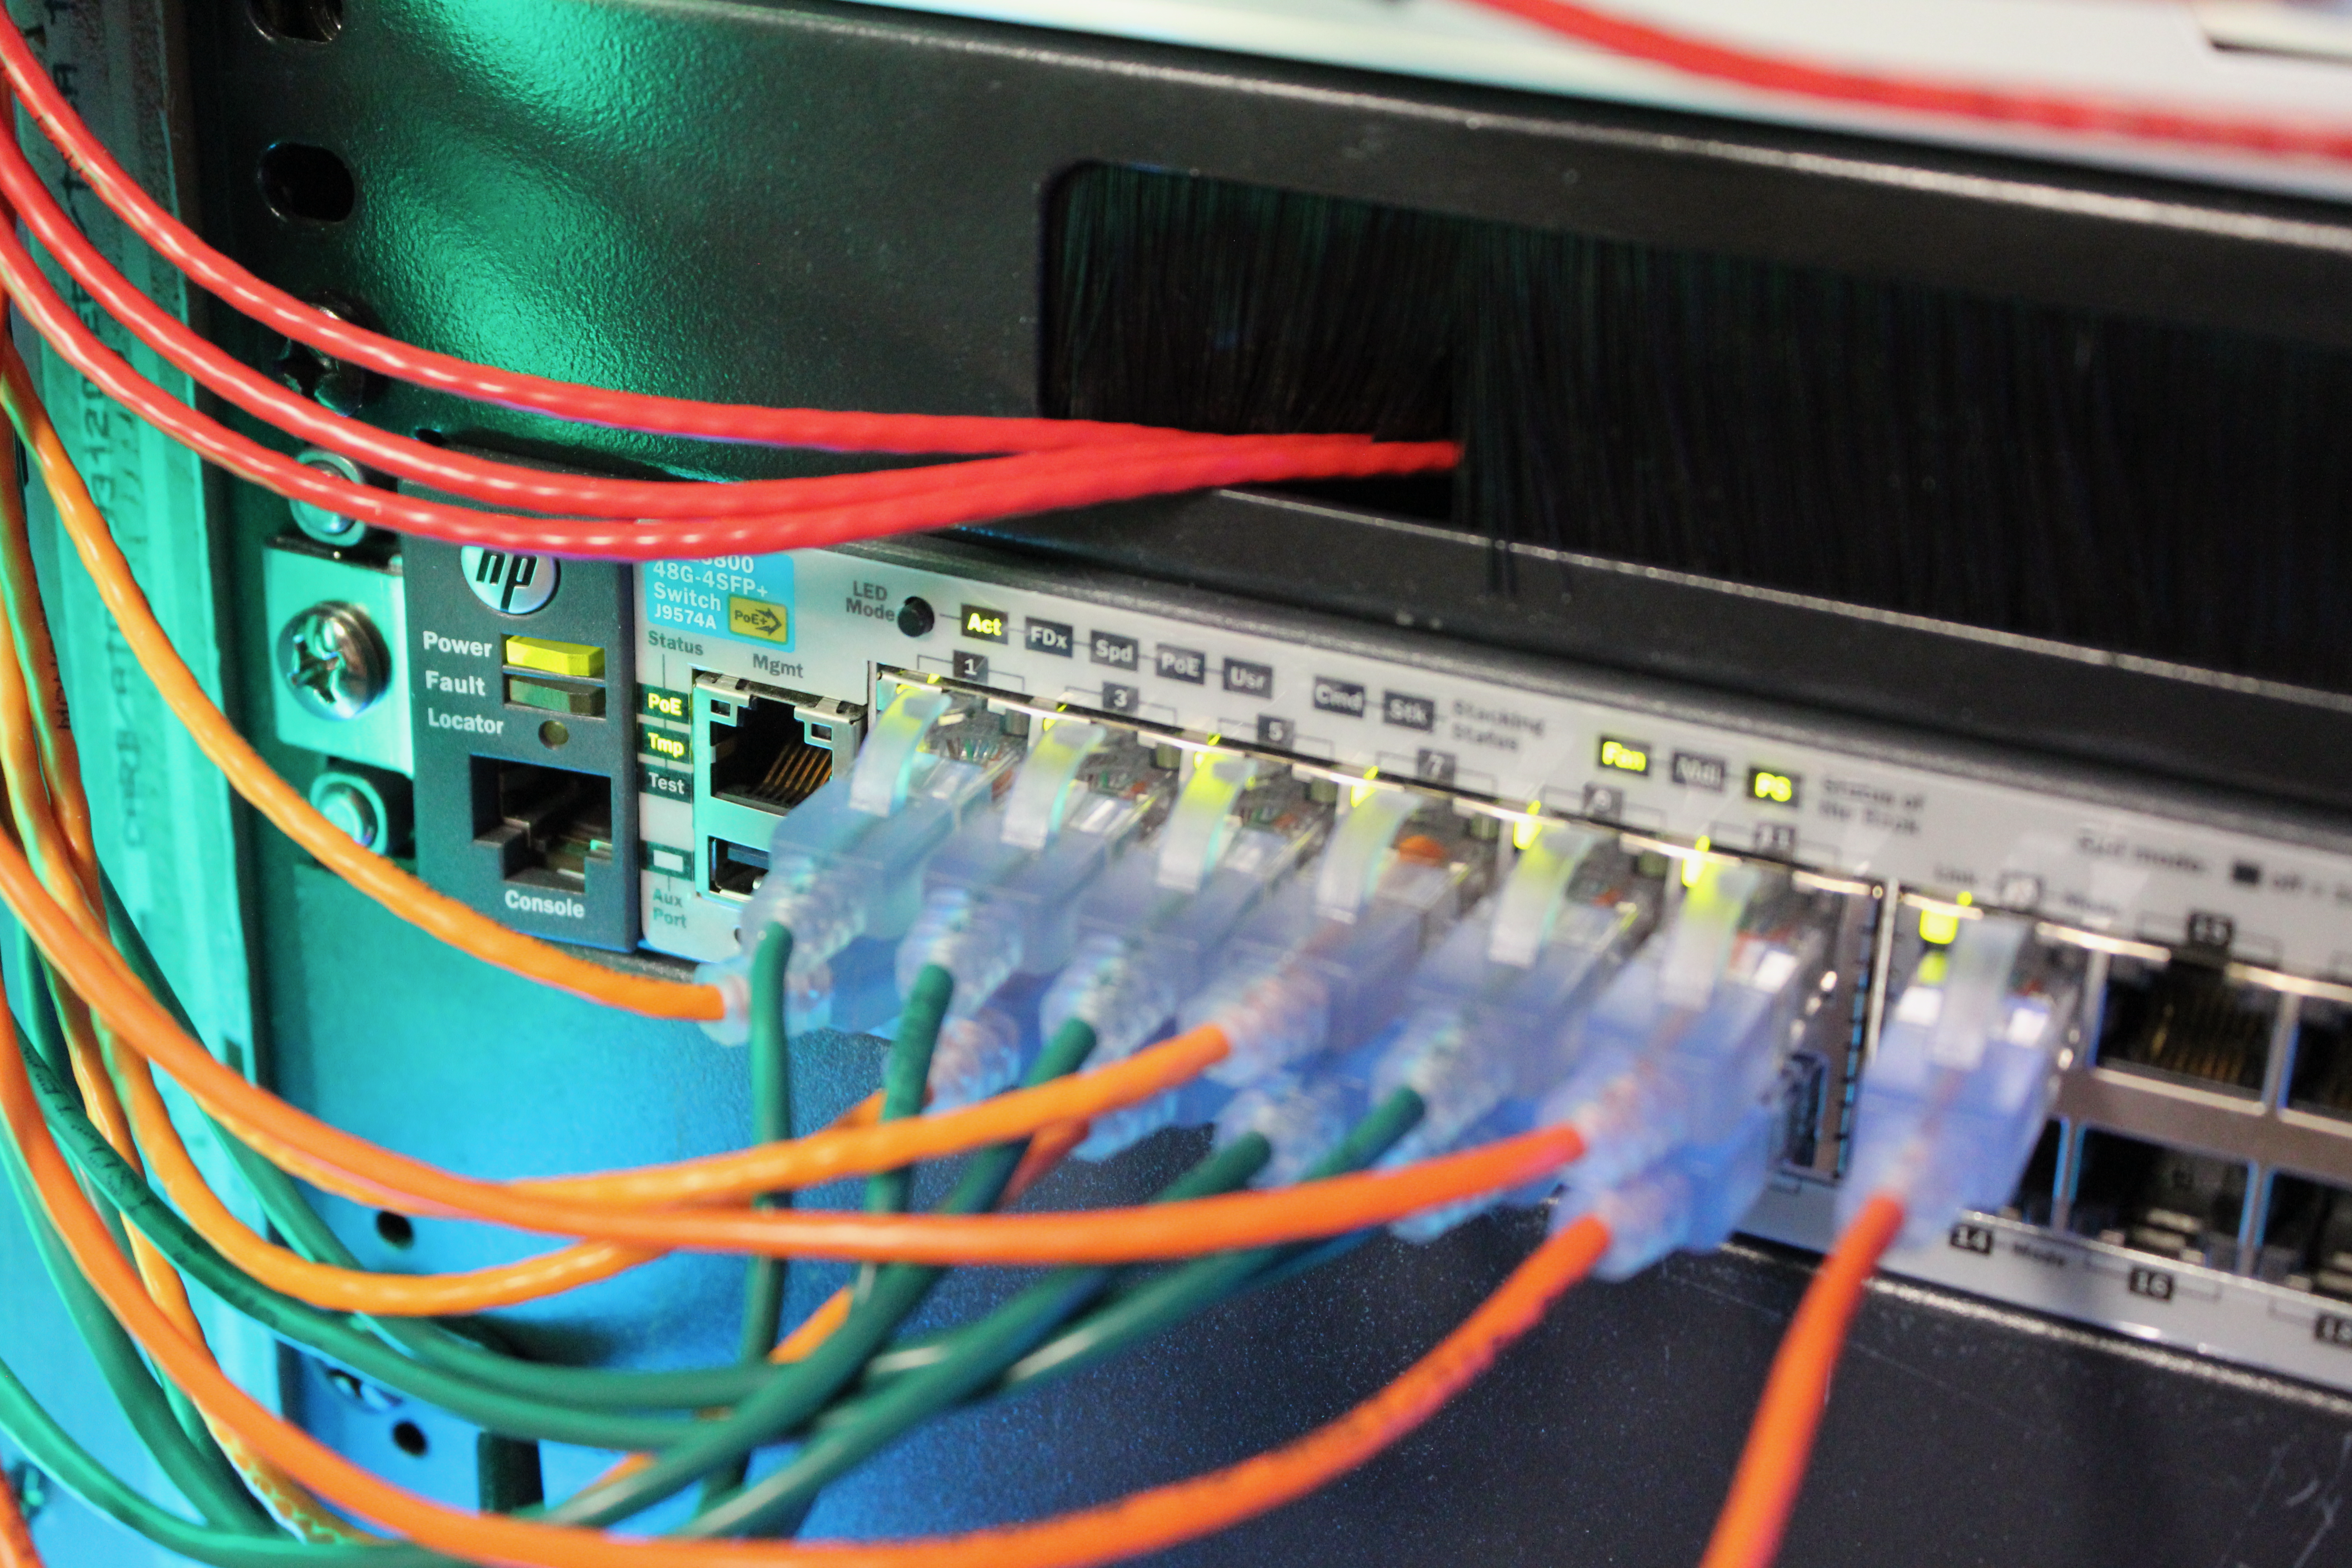
HP ProCurve 3800M 48-port PoE+ switch (J9574A)- 48 1Gbps Ports with Class 4 PoE
- 4 SFP+ ports
- Dual Power Supplies
- X410 4-post rail kit
- 4x 10GBase-SR Optics
- HPE Aruba CX6300M (JL659A)
- 48 5Gbps SmartRate Ports with Class 6 PoE
- 4 SFP56 Ports
- Dual Power Supplies
- X410 4-post rail kit
- 4x 10GBase-SR Optics
- 2x Aruba 2930F-8G (JL258A)
- 2x 10GBase-SR Optics
- 3 Aruba AP-315 Access Points
- 2 Aruba AP-515 Access Points
- 2 Aruba AP-505H Access Points
- 3 Aruba AP-303H Access Points
- 1 Aruba AP-577 Access Point
- 1 Aruba AP-215 Access Point
- 1 Aruba User Experience Insight sensor (F series)
- 3 Aruba 7005 Mobility Controller with JW084A Rack Kit
Servers
- VM-PYRE
- HPE ProLiant ML110 G10
- Intel Xeon Silver 4110 @ 2.10 GHz
- 64GB RAM
- 2x 6GB SATA 7200rpm (RAID1)
- VMWare ESXi 7.0
- Dual-port Intel X520 SFP+ NIC
- 10GBase-SR to Lab Switch
Future Enhancements
On the roadmap for the lab/office:
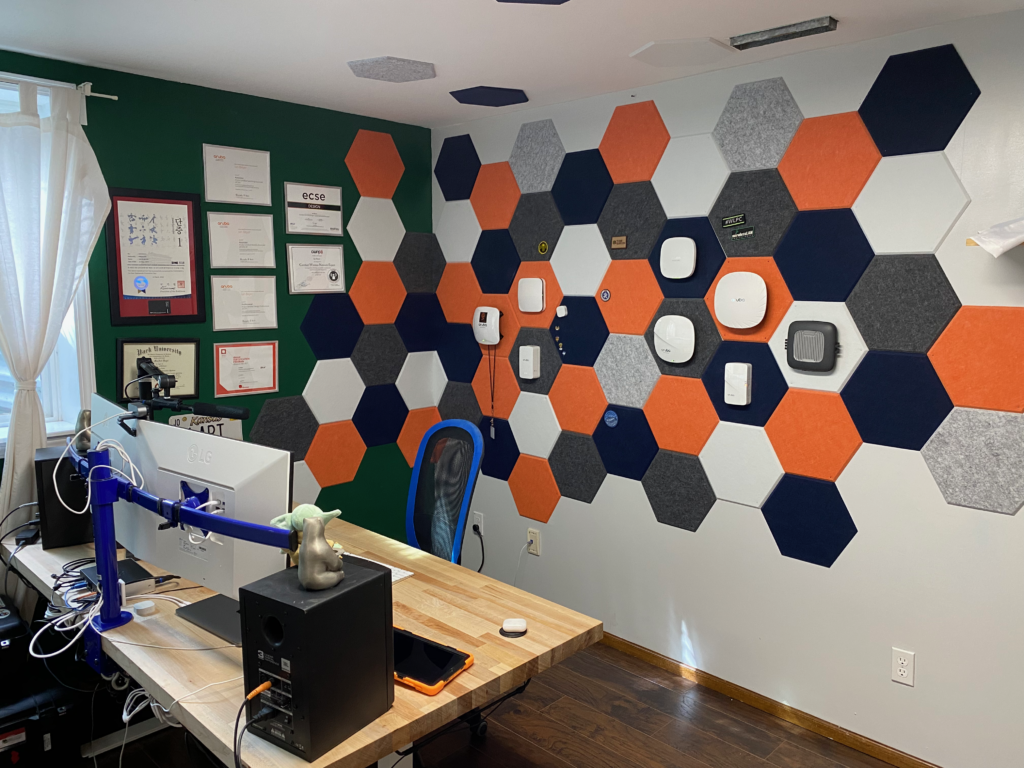
Redoing the exterior wall after replacing the crappy builder window. The wall will include a concealed cable chase to directly cable the Wall O’ WiFi to the rack.
Restacking and cabling the rack.
Adding new built-in shelves and cabinets next to the rack on both sides
Extending 2.5Gbps to my desk
